< Previous | Contents | Next >
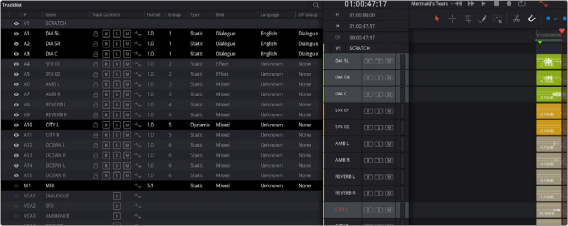
Once everything is configured, and your project is mixed, you export a master file. In order to do this, you must select a range In and Out point on the Timeline to define an export range. Additionally, you must define whichever busses are designated for rendering by defining their Kind, and you can select tracks you want to export additionally.

NOTE: An MPEG-H master file can only contain a maximum of fifteen channels total.
If the selected track and bus stems exceeds this, then the export will fail, issuing a warning. The same will occur if a range is not selected.
NOTE: An MPEG-H master file can only contain a maximum of fifteen channels total.
If the selected track and bus stems exceeds this, then the export will fail, issuing a warning. The same will occur if a range is not selected.
NOTE: An MPEG-H master file can only contain a maximum of fifteen channels total.
If the selected track and bus stems exceeds this, then the export will fail, issuing a warning. The same will occur if a range is not selected.
Selecting tracks and busses to export
1 Choose Fairlight > Immersive > Generate MPEG-H Audio File.
2 Choose a save location and name, and click Save.
At this point, all defined buses are rendered. Then, track loudness is measured for compliance. Lastly, the source audio is exported and the metadata embedded into the deliverable MPEG-H wav file.
There are several error conditions, which are deleted during the export process, that will all cause the export to fail. For example, all tracks must contain audio. Audio within switch groups must be within a specific loudness tolerance of one another. If any of these conditions occur, a dialog will appear.
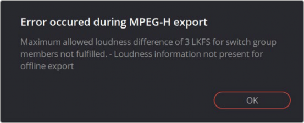
Warning dialog during MPEG-H export