< Previous | Contents | Next >
the B-Chain presets offer is most useful in situations such as surround-sound configured grading and mixing theaters, to define how the immersive audio standard you’re mixing is mapped to the speaker setup of your particular application, and to fine-tune the channels being output to each speaker specifically for your environment. In simpler monitoring situations, the B-Chain controls can be useful for configuring the standard you’re mixing with to play out of a non-standard speaker setup in your room.
Ultimately, the B-Chain controls are designed and intended for users who need to create custom, fine- tuned settings for their specific monitoring situation. For this reason, pretty much every real-world use of these B-Chain controls will require custom configuration for your unique environment.
Overview of Setting Up a B-Chain Configuration
Setting up a B-Chain configuration takes some doing, but once set up, you have a preset that’s easy to reopen at any time. In the following example, a B-Chain preset will be configured to convert a 5.1 surround output to a 3-channel left-center-right room speaker setup.
1 Choose Fairlight > Immersive > B-Chain Control to open the B-Chain Control dialog. This exposes the monitoring controls but not the configuration controls.
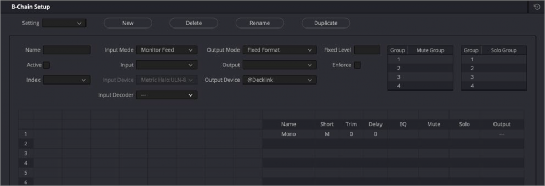
2 Click the Option menu in this window and choose Setup B-Chain Presets. The B-Chain Setup window appears.
3 Click the New button to create a new B-Chain preset, then enter a name in the dialog and click OK. In this example we’ll use the name “5.1 to LCR.” The Name you enter here is the name of the saved setting data.
Additional buttons let you Delete, Rename, or Duplicate presets that you’ve already created once you choose them from the Setting pop-up.
4 Enter a label in the Name field (this is the name that appears in the preset menu). The name you enter here is the name that appears in whatever pop-up menus you select these options from.
5 Choose Input Mode > Fixed Format, and Input > 5.1 from the pop-up menus. These define the signal coming out of your mix. (Input Mode > Monitor Feed sets the B-Chain to listen to the selected monitor source, while Input Mode > Custom Format lets you choose an arbitrary number of channels.)
6 Choose an Output Mode > Fixed Format, and Output > LCR from the next set of pop-up menus. These define the speaker setup you’ll be playing the mix out of. In this example, we’ve chosen LCR, which stands for Left, Center, Right.
At this point, you can see that once you’ve defined the Input and Output channels, the “Inputs/ Outputs” table of cells becomes populated:
![]()
— At the left of this table, each channel of your selected Input occupies a vertical column. In this example, the Input columns are labeled L, R, C, LFE, Ls, Rs, corresponding to the 5.1 channels you’ve selected to be output. It’s possible to specify setups with many more channels, in which case the left half of the table becomes scrollable.
— At the right of this table, each channel of your selected Output occupies a horizontal row that intersects the Input columns. In this example, the rows are labeled Left, Center, Right.
In this way, every Input column intersects with each Output row, making it possible for you to assign how much of each Input is fed to each Output by entering values into each intersecting cell.
The Inputs/Outputs table of the B-Chain preset window
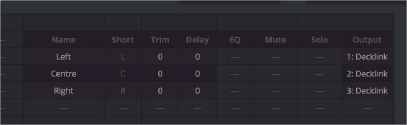
7 To assign Input channels to Output channels, double-click the field where the desired Input intersects the desired Output, and type a value to set how much level from the Input to assign to the Output. Typing 0 assigns Input to Output at “unity” gain (0dB). Numbers you type here specify tenths of a dB. Typing -3 assigns half of the level from Input to Output. Typing -100 mutes that Input to that Output completely. Blank cells with no value make no assignment. In this example, we’re typing:
a) 0 into cell L-1 to assign all of the Left source to the Left output
b) 0 into R-3 to assign all of the Right source to the Right output
c) 0 into C-2 to assign all of the Center source to the Center output
d) -6 into Ls-1 to assign a fraction of Left surround to the Left output
e) -6 into Rs-3 to assign a fraction of Right surround to the Right output
f) -8 into LFE-1 to assign a smaller fraction of LFE to the Left output (LFE is not directional)
g) 8 into LFE-3 to assign a smaller fraction of LFE to the Right output as well (LFE is not directional)
At this point, we’ve fully defined how much of which Input channels go to which Output channels. In the process, you can see that this table interface makes it possible to assign the full levels of Input channels to Output channels, to assign partial levels of Input channels to Output channels, and to assign fractions of Input channels to multiple Output channels.

The Inputs/Outputs table of the B-Chain preset window fully populated to assign inputs to outputs
8 At this point, you should notice there are additional columns to the right of the Output channels that provide various options that let you fine-tune each channel’s output in order to optimize the acoustics and layout of your room:
— Trim each channel (in tenths of a dB)
— Add a Delay (in milliseconds)
— Add specific EQ (None, LFE Only, Surr Mode)
— Mute or Solo groups.
9 The last thing you need to do is to right-click each Output channel row’s right-most Output column, and choose the hardware output of your audio or video+audio interface that you want that channel to go to. See one of the following I/O Setup procedure for how to rename these options to make this easier.
Assigning I/O channels to output to
10 Once you’ve finished setting up your B-Chain preset, click OK, and that preset will be saved and available for use.
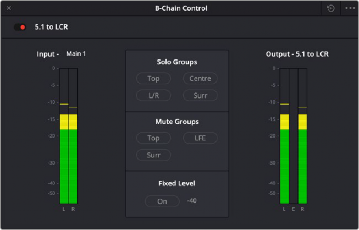
1 Choose Fairlight > Immersive > B-Chain Control to open the B-Chain Control dialog.
2 Turn on the toggle at the upper left-hand corner of the window to enable B-Chain, and choose a preset from the pop-up menu.
3 Choose the Input you want to assign that B-Chain preset to.
4 A set of Solo and Mute buttons lets you selectively choose sets of channels you want to listen to in isolation, or mute from the whole, in order to better evaluate selected portions of your mix.
5 A Fixed Level button lets you fix the output level in the DaVinci Resolve UI to a single value. With this enabled, you cannot drag the level slider to change the monitoring volume.

NOTE: While the B-Chain is enabled, the Speaker Setup controls in the Video and Audio I/O panel of the Resolve System Preferences is disabled.
NOTE: While the B-Chain is enabled, the Speaker Setup controls in the Video and Audio I/O panel of the Resolve System Preferences is disabled.
NOTE: While the B-Chain is enabled, the Speaker Setup controls in the Video and Audio I/O panel of the Resolve System Preferences is disabled.
6 When you’re finished using B-Chain for monitoring, turn off the toggle at the upper left-hand corner.
![]()
The B-Chain Control Window where you can choose and enable a B-Chain preset to affect the output
1 Choose Fairlight > Immersive > B-Chain Control to open the B-Chain Control dialog.
2 Click the Option menu in this window and choose Setup I/O Names. The I/O setup window appears, showing every single audio input and output on every audio interface that’s connected to and recognized by your system.
The I/O Setup window lets you rename the Inputs and Outputs associated with your workstation setup, to make it easier to configure Fairlight when you’re managing hundreds of channels.
The names you choose here are shown everywhere in DaVinci Resolve where channels are selectable and/or exposed.
3 To rename a channel, double-click that channel’s field in the Name column, type a new name, and press Return.
4 To protect a channel, click the checkbox in the Protect column. Protected channels are prevented from being patched to. This is intended for potentially high-volume speaker outputs, to which it would be hazardous to accidentally connect the wrong input. Protected channels can be seen everywhere patches can be made, but they’re grayed out. Protected channels can only be used in the Speaker Setup controls in the Video and Audio I/O panel of the Resolve System Preferences, and in the B-Chain Setup window.
5 When you’re finished, close the window. The names and protected status of channels are a system-wide setup.
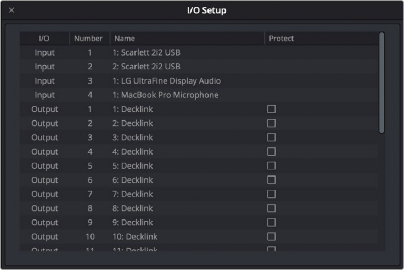
The I/O Setup window where you can rename your system’s audio outputs and protect channels going to amplified speakers