
< Previous | Contents | Next >
Undo, Modifier and Arrow Keys
NOTE: If your Desktop Console is connected to a Fairlight Audio Editor, the Control (CTL), Shift, and ALT keys on the Desktop Console work in tandem with the modifier keys on the Fairlight Audio Editor.
NOTE: If your Desktop Console is connected to a Fairlight Audio Editor, the Control (CTL), Shift, and ALT keys on the Desktop Console work in tandem with the modifier keys on the Fairlight Audio Editor.
NOTE: If your Desktop Console is connected to a Fairlight Audio Editor, the Control (CTL), Shift, and ALT keys on the Desktop Console work in tandem with the modifier keys on the Fairlight Audio Editor.
While working with the Fairlight Desktop Console, you will always have access to the Undo, Modifier, and Arrow keys, conveniently located on the lower left side of the console. The Arrow keys function like the Arrow keys on a standard keyboard and are used in conjunction with the transport buttons to move the playhead (CTI), selected clip, range, or selected tracks incrementally up, down, right, or left. The Undo key offers the failsafe option to go back a step at any time, just as you would expect during normal keyboard and mouse workflows. Additionally, the SHIFT, ALT and CTL modifier keys are used with other console controls to expand functionality and speed up your workflow. For example, while you hold the Control key, the Rewind and Fast Forward transport buttons act as Project Start and Project End buttons to quickly jump to the beginning or end of the Timeline. The Shift modifier key can be used with the knobs for fine incremental parameter control, while the ALT modifier key used with Undo results in Redo functionality to go forward a step.
Track Select Buttons

The Fairlight Desktop Console includes a dedicated row of multi-function Select (SEL) buttons at the top of the channel strips for selecting either tracks or master buses. From left to right, the 12 Select buttons follow the order of the tracks in the Mixer, and in the Timeline from top to bottom. Use the bank buttons to move to the next or previous set of 12 tracks.
Track Select Buttons
![]()
12 Track Select (SEL) buttons
— In Focus mode, track Select buttons become toggle switches for switched parameters assigned to the focused channel strip. Focus mode parameter sets are determined by the control buttons in the upper left of the Desktop Console.
— In Strip mode, the Select buttons can be used to select the track or bus assigned to that specific channel strip. Pressing a Select button is the same as clicking a track header or channel strip in the Fairlight page Mixer with your mouse. Select buttons illuminate when latched and the top of the corresponding LCD brightens so you can always see at a glance which tracks are selected in Strip and Focus modes. Likewise, if you are using an optional HDMI monitor with your Desktop Console, you’ll see illuminated Select buttons for each selected track in the Channel Extension buttons along the bottom of the screen.
— The Active track reflects whichever track is actively being controlled or touched with any of the channel strip controls. You can select and control multiple tracks at once, however only the most recently touched track is considered the active track. For easy identification, the active track’s name turns red in both the LCD display and the Fairlight page Timeline. It is important to
recognize the active track because that will be the track that receives focused parameter controls in Focus mode.
Track Select Button Press Options
The default Strip mode Select buttons include some unique selection nuances to improve your efficiency without the need for a mouse.
— Press once to select or deselect a track.
— Select as many tracks as needed, one track at a time, by simply pressing the corresponding SEL button.
— Double-press any SEL button to deselect all other tracks and exclusively select the current track.

TIP: To select all tracks or an extensive range of tracks, open the Tracks Index panel in the Fairlight page. Select a track in the Index, then hold Shift while turning the dial to extend selection. Additionally, you can select a track in the Tracks Index and choose Edit > Select All, or press Cmd-A on your keyboard to select all tracks.
TIP: To select all tracks or an extensive range of tracks, open the Tracks Index panel in the Fairlight page. Select a track in the Index, then hold Shift while turning the dial to extend selection. Additionally, you can select a track in the Tracks Index and choose Edit > Select All, or press Cmd-A on your keyboard to select all tracks.
TIP: To select all tracks or an extensive range of tracks, open the Tracks Index panel in the Fairlight page. Select a track in the Index, then hold Shift while turning the dial to extend selection. Additionally, you can select a track in the Tracks Index and choose Edit > Select All, or press Cmd-A on your keyboard to select all tracks.
— To select a range of tracks, hold a SEL button, then double-press another SEL button to select both tracks as well as all contiguous tracks between them. In this case, the button that was double-pressed will become the active track.
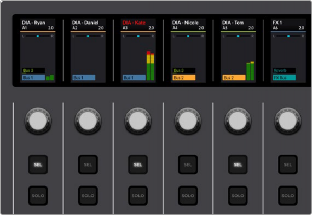
![]()
Strip mode Select buttons latched on tracks A1, A3, and A5, and the red track name on the A3 track indicating it is the active track
