< Previous | Contents | Next >
Fairlight Mixer. When active, the knob controls the Bus Send 1 Level, or press and hold ALT to control the Bus Send L/R Pan.
Send control set mapping
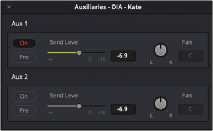
Bus Send window available in the Fairlight page Mixer
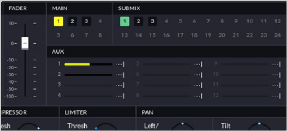
Send control set visual feedback in optional HDMI monitor
Fader Channel Strips
The most prominent real estate on the Fairlight Desktop Console is dedicated to the fader channel strips. The upper section of these channel strips operate independently in Strip mode, or collectively for Focus mode tasks. The default operational mode of the console provides 12 fader channel strips, each with a Fader, Mute, Solo and Select (SEL) button, a rotary control knob for pan adjustments and a LCD Screen that displays channel information. Any changes applied to the channel strip controls are mirrored in the DaVinci Resolve Timeline and Mixer accordingly.
![]()
The desktop console remains in default mode for standard mixing operations unless one of the buttons in the control section is selected. For example, you may be using the faders and pan knobs on-the-fly to adjust track levels and panning during playback. Without stopping, you’d like to adjust the EQ for the active track. No problem, just press the EQ control button and the entire upper section of the channel strips, including the SEL buttons, knobs, and LCD screens, change function to the
EQ focused mode. In EQ focused mode, the collective LCD screens, SEL switches, and knobs control specific EQ parameters that mirror the Fairlight Mixer’s EQ window controls.
When you finish adjusting the EQ, simply unlatch the EQ control button, and the console returns to the default mixing functionality. You can switch between control modes as often as you like during playback, recording, or other mixing tasks.
This section describes the default functionality of the fader channel strips.
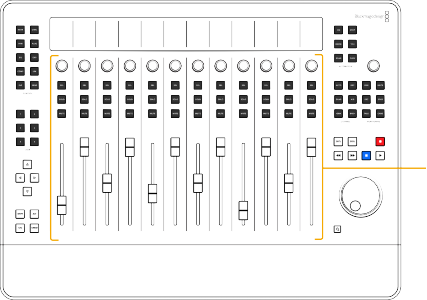
12 fader channel strips with Fader, Control knob, SEL, Solo, and Mute buttons
Touch-Sensitive Faders
The bottom-half of the Fader Channel Strip area comprises 12 identical touch-sensitive motorized faders that offer precision gain controls for 12 signal paths. These faders correspond with faders on the Fairlight page Mixer. Touching a fader results in realtime graphical and numeric feedback of the current level on the adjacent LCD screen. Additionally, each 100mm fader has a DC belt-driven coreless motor and offers precision touch-control fader automation.
Faders can be reset to unity (0dB) by simply pressing the Control (CTL) button while touching a fader. Hold Control and swipe your hand along each of the twelve faders to reset them all in a single maneuver.
Channel Strip Control Buttons
Each channel strip also contains illuminated Mute, Solo, and Select status buttons for the individual channels. These toggle buttons can be pressed individually or swiped on or off. Highly-visual LED lights make it easy to spot which buttons are switched on or off at a glance, which is especially important in the middle of a mixing session. These channel strip buttons and their toggled states are mirrored in the DaVinci Resolve Edit and Fairlight page Mixers and Timeline track headers, as well as in the strip mode layout in the optional HDMI monitor.
![]()
![]()
![]()
Latch the AUTO channel modifier button to change the SEL switch function to Automation Write.
![]()
Latch the REC channel modifier button to change the SEL switch function to Arm for recording.
![]()
In Focus mode, latch the ENAB channel modifier button to enable the SEL switches to be used as Track Select buttons.
![]()
Multiple tracks can be soloed simultaneously to isolate selective tracks for playback while all non-soloed tracks will be muted.
Solo buttons work for the corresponding channel in both Strip and Focus modes.
![]()
![]()
Hold Control and press any Solo button to clear all soloed buttons. Hold Control and press any Solo button again to restore soloed tracks.
![]()
![]()
Hold ALT and press Solo to toggle on or off Solo Safe status.
Tracks set to Solo Safe will always play, even if Solo is enabled for other tracks, and are easily identified by the blue-highlighted Solo status icon in the Fairlight page Mixer and Timeline track headers.
![]()
![]()
Desktop Console with active Mute, Solo, and Select buttons in the fader channel strips

Optional HDMI monitor display showing track status for the channels in Strip mode
Channel Control Knobs
Each channel strip includes a touch-sensitive multi-function encoder knob with realtime graphical and numeric feedback of the current position on the adjacent LCD screen. The Channel Control knobs default to left-right (L/R) Pan controls and offer smooth precision rotary adjustments. The handy
touch-control of these knobs is perfect for recording Pan automation because you can start recording data the instant you touch a knob and stop when you release it. Knob settings are mirrored in the corresponding Mixing window in DiVinci Resolve.
![]()
![]() Hold SHIFT in conjunction with the knob for refined incremental control.
Hold SHIFT in conjunction with the knob for refined incremental control.
![]()
![]()
Hold ALT to switch from L/R Pan to front-back (F/B) panning and corresponding feedback on the LCD screen.
![]()
![]()
Hold CTL and touch any knob to reset the designated parameter to the default value.
LCD Screens
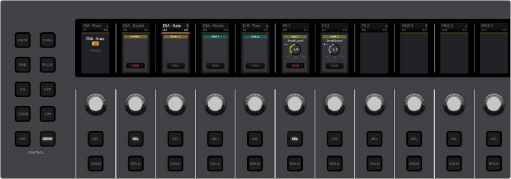
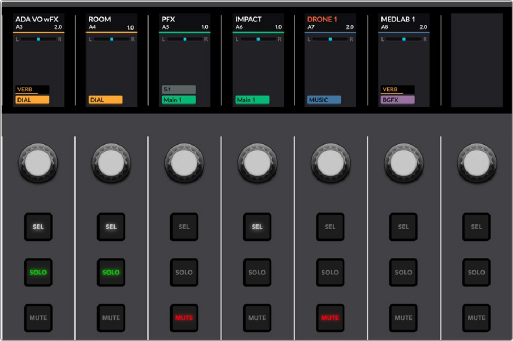
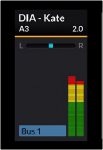
At the top of each channel strip you’ll find a high-resolution LCD color display that shows the Track or Bus name, color, metering up to 7.1.4 wide, bus assignments, and panning if in Default strip mode. The information displayed for each track directly correlates with the Fairlight page Mixer and track headers.

NOTE: The LCD screens display different information based on the current Control mode in use on the Fairlight Desktop Console. You’ll find detailed images of the other Control modes later in this chapter.
NOTE: The LCD screens display different information based on the current Control mode in use on the Fairlight Desktop Console. You’ll find detailed images of the other Control modes later in this chapter.
NOTE: The LCD screens display different information based on the current Control mode in use on the Fairlight Desktop Console. You’ll find detailed images of the other Control modes later in this chapter.
![]()
Fader channel strip LCD screens showing track name, number, color, pan status, level meters, and VCA group number
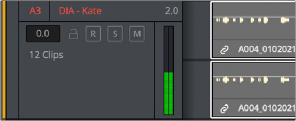
Fairlight page track headers showing
track name, number, color, and level meters