< Previous | Contents | Next >
mode toolset while you work because that is where you’ll find keys to quickly toggle on and off track layers, show or hide the Video Scroller, set the playhead (CTI) to fixed or moving, as well as save your project and modify the Audio Editor’s playback controls.
Another advantage of momentary key presses is that they don’t change the latched state of the key you are holding. Working with momentary key presses requires a bit of skill to master, but it can greatly increase your overall speed and efficiency.
Latching the Play Jog key starts playback and unlatching the same key engages the jog wheel. Momentarily holding the Play Jog key reveals six related menu option keys in the picture keys along the left side of the jog wheel without changing the current latched or unlatched state of the Play Jog key. While momentarily holding the Play Jog key, you can quickly latch any of the menu option keys. When you release the Play Jog key, the menu option keys are no longer visible. This maneuver can easily be done with the right hand while controlling the jog wheel.
Track Selection Keys
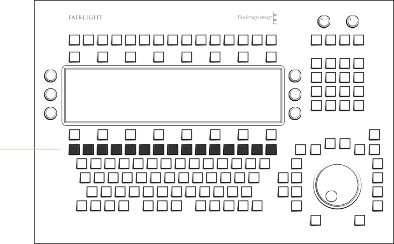
Quickly identifying and selecting tracks and buses is a vital part of recording, editing, and mixing workflows. Therefore, the Fairlight Audio Editor includes a dedicated row of picture keys, at the top of the keyboard, for selecting either tracks or master buses.
![]()
Track Selection Keys
Track Selection keys utilize the Fairlight Audio Editor’s unique self-labeling picture key technology to display each track’s user-defined name and color just as it appears in the Fairlight page Timeline.

TIP: Holding the CTRL key down reveals alternate commands, including Mute Clear and Solo Clear (to clear either Mute or Solo states from all tracks). Holding the CTRL key and pressing Mute Clear or Solo Clear a second time acts as a specialized undo/redo toggle to restore all tracks to their previous Mute or Solo state prior to being cleared. This is
incredibly useful during mixing so that you can focus on a set of soloed tracks, un-solo them all simultaneously to hear them with the mix, then quickly return them to their soloed state.
Additionally, the Track Selection keys change appearance to reflect their current state so that you can quickly identify which tracks are selected and which track is actively displayed in the built-in Editor screen. When multiple tracks are selected, the most-recently selected track is always the track actively displayed on the Editor screen. Track Selection keys also reflect each track’s status with a colored icon that indicates if the track has been muted (M), soloed (S), or armed for recording (R).
— Unlatched: The track is deselected, with the track’s color showing as a bar above the track’s name.
— Latched: The track is selected, with the track’s color expanding over two thirds of the button.
— Active: The active track can easily be identified by a white bar on the lower third of the key and the track’s color in the upper two thirds. Additionally, the active track’s name, track number, track color and signal processing parameters are displayed on the Editor screen.

ADA VO wFX and ROOM tracks are selected, Room track is active, PFX muted, MEDLAB 1 and MEDLAB 2 tracks are soloed, and the DRONE track is deselected.


NOTE: Pressing a Track Selection key is the same as clicking a track header or channel strip in the Fairlight page Mixer with your mouse.
NOTE: Pressing a Track Selection key is the same as clicking a track header or channel strip in the Fairlight page Mixer with your mouse.
NOTE: Pressing a Track Selection key is the same as clicking a track header or channel strip in the Fairlight page Mixer with your mouse.
Master buses showing in the Track Selection keys with Main 1 active and the main named 5.1 muted.
![]()
— Latches or unlatches that Track Selection key with visual feedback accordingly.
— Selects or deselects that track in the Fairlight page Timeline and Mixer.
— Displays that track’s signal processing in the built-in Editor screen.
— Tallies on or off that track’s Channel Select button and calls up that channel’s parameters on the Fairlight Console Channel Control panel, if you are working on a Fairlight console.
The dedicated Track Selection keys are located in the top row of the picture keyboard, where the number keys would be on a standard keyboard. Here you’ll find 12 track selection keys as well as All Tracks, Page Up ( ^ ), and Page Down ( v ) keys.
You can select multiple tracks by pressing additional Track Selection keys. However, there can only be one active track at a time and it’s always the last Track Selection key pressed. Like most Fairlight Audio Editor keys, the Track Selection keys include some unique selection nuances to improve your efficiency without the need for a mouse.
— Track Selection keys: There is one Track Selection key for each track in the Fairlight page Timeline. From left to right the first 12 keys are Track Selection keys that follow the order of the tracks in the Timeline from top to bottom. Press once to select or deselect a track. Select as many tracks as needed, one track at a time, by simply latching the corresponding Track Selection keys. Double-press any Track Selection key to deselect all other tracks and actively select the current track. Hold a Track Selection key, then double-press another Track Selection key to select both tracks as well as all contiguous tracks between them. In this case, the key that was double-pressed will become the active track.
— All Tracks: Press this key to quickly select or deselect all tracks in the Timeline. Long-press the All Tracks key to change the entire picture keyboard to Track Selection keys for up to 48 tracks from left to right top to bottom. When All Tracks is latched, you’ll also have the option to continue to show tracks, or display master buses such as the Mains, Submix and Aux buses, and VCA
groups. Below the All Tracks key, on the far right side of the picture keyboard, you’ll see the Tracks and Masters keys. Here you can choose which type of feed is displayed in the top row of the picture keyboard. Tracks are all of the Timeline tracks, and Masters are the buses for mixing and output. Long-press the key again to return to the default picture keyboard with one row of 12 Track Selection keys at the top.

NOTE: Hiding track visibility in the Timeline, using the Index, or using the Hide Track key on the Audio Editor hides a track from the Timeline and Mixer, but does not change the corresponding track’s state, output or Track Selection key. Additionally, in DaVinci Resolve 16 and higher you can show all master buses including Mains, Subs and Aux buses as tracks in the Timeline as long as the Automation toolset is showing and the buses are marked visible in the Tracks Index.
NOTE: Hiding track visibility in the Timeline, using the Index, or using the Hide Track key on the Audio Editor hides a track from the Timeline and Mixer, but does not change the corresponding track’s state, output or Track Selection key. Additionally, in DaVinci Resolve 16 and higher you can show all master buses including Mains, Subs and Aux buses as tracks in the Timeline as long as the Automation toolset is showing and the buses are marked visible in the Tracks Index.
NOTE: Hiding track visibility in the Timeline, using the Index, or using the Hide Track key on the Audio Editor hides a track from the Timeline and Mixer, but does not change the corresponding track’s state, output or Track Selection key. Additionally, in DaVinci Resolve 16 and higher you can show all master buses including Mains, Subs and Aux buses as tracks in the Timeline as long as the Automation toolset is showing and the buses are marked visible in the Tracks Index.
![]()