< Previous | Contents | Next >
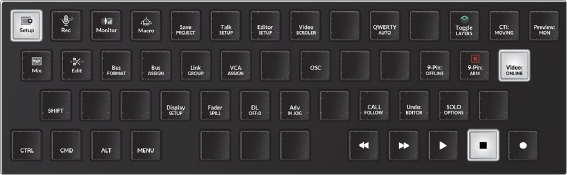
The Setup mode toolset is for the behind-the-scenes setup of operational elements that in many cases are set up when you start a project and left alone for the duration of the project. Here you’ll find specialized keys for setting up the Audio Editor’s functionality, toggling controls, or opening and closing settings windows that would otherwise require a mouse and menu selections on the Fairlight page. There are also some specialized setup keys that are only available on the Audio Editor, where you may wish to momentarily jump into Setup mode to enable or disable functions, then jump back to your current task.
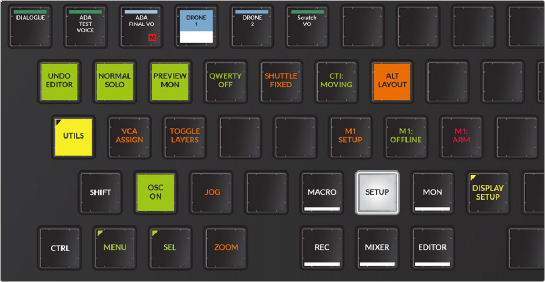
Setup mode default toolset
— Video Online/Offline: When toggled On (Online) the playhead is sync locked to the current video timecode in the Timeline. When toggled off (Offline), the playhead moves freely, and can be used to go to another area of the Timeline or Media Pool to add or edit a clip. Toggling this key back
On (Online), returns the playhead to the exact position it was prior to going offline. This is a great way to temporarily move the transport offline so that you can go to a clip in another part of the Timeline, use the playhead as a sync point to copy or cut the clip, then toggle the Video back Online to jump the playhead and copied clip to the previous timeline location.
— Display Setup: This menu key reveals Display Setup Source keys to accommodate all of the Fairlight LCD screens on a console. Each Source key toggles between DATA, HDMI and SDI as needed.
— Fader Spill: Temporarily spilling the member tracks of a master bus or VCA group to nearby faders is a fast way to finesse member track levels while mixing. Use this menu key to reveal two menu Spill option keys that determine the type of fader channel and direction in which member tracks are temporarily mapped to the adjoining faders on the Fairlight Channel Fader panel.
![]()
— Spill Left/Spill Right: This menu options key toggles between Spill: Left and Spill: Right, which in turn dictates whether the member tracks of a bus are assigned to neighboring faders to the left or right of a bus when Spill is engaged in the Channel Fader panel.
— Spill Any/Spill Tracks: When in the default (unlatched) state, the Spill: Any menu option allows member tracks of a bus to be spilled to the nearest faders to the left or right, including faders assigned to Master buses and VCA groups. When latched to the Spill: Tracks option, member tracks of a bus spill either left or right, starting with the nearest track fader in the designated direction. This option is useful if you need to maintain fader control of your buses while you spill their constituent tracks to the nearest track faders.

NOTE: Fader spill is engaged on the Channel Fader panel with a momentary-press on the Bank/Flip key, then latching the call button on a bus channel in the current fader bank. For more detailed instructions on using Fader Spill and creating custom Fader Banks, see Chapter 184, “Modular Fairlight Consoles.”
NOTE: Fader spill is engaged on the Channel Fader panel with a momentary-press on the Bank/Flip key, then latching the call button on a bus channel in the current fader bank. For more detailed instructions on using Fader Spill and creating custom Fader Banks, see Chapter 184, “Modular Fairlight Consoles.”
NOTE: Fader spill is engaged on the Channel Fader panel with a momentary-press on the Bank/Flip key, then latching the call button on a bus channel in the current fader bank. For more detailed instructions on using Fader Spill and creating custom Fader Banks, see Chapter 184, “Modular Fairlight Consoles.”
— DL Off: This is the Decklink Offset key that lets you offset the Decklink Output so the picture and audio are in sync. Momentary press the DL Offset key and turn the jog wheel to increase or decrease the frame offset between 0 and 7 frames. This feature is also available in the Fairlight, Video I/O Offset section of the the DaVinci Resolve User Preferences.
— ADV In Jog: Latch this key to apply the Decklink Output offset while playback is in Jog or Shuttle mode. This feature is also available as a checkbox in the Fairlight section of the DaVinci Resolve User Preferences.
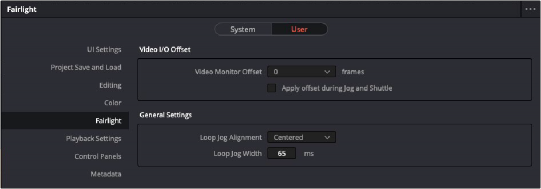
Fairlight - Video I/O Offset settings in DaVinci Resolve User Preferences that mirror the DL Offset and ADV in Jog picture key functions on the Audio Editor
— Talk Setup: This menu key reveals three menu option toggle keys to customize the Editor’s Talkback functionality:
— Smart Talk/Push-2-Talk: This key toggles between the default unlatched Smart Talk option and the latched Push-2-Talk option. Smart Talk allows the user to either latch the Talk button for extended hands-free talkback, or Push-2-Talk with a momentary press on the Talk button. Latching this key toggles on the Push-2-Talk mode, which limits talkback to the momentary- press Push-2-Talk method similar to using a 2-way radio.
— GPI: Talk/DIM/None: This key toggles the Monitoring Controls for the general purpose input (GPI) between None, Talk plus DIM, or DIM only.
— GPO: Talk/None/Armed/Record: Use this menu options key to determine when the general purpose output (GPO) sends a signal during a session. This key toggles between Talk, None, Armed and Record.
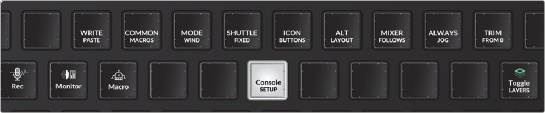
Console Setup menu option keys
— Console Setup: This menu key reveals toggle keys to customize the Editor functionality, including:
— Write Paste: Toggle this key on if you want controls automatically placed in Write mode when pasting from one channel to another.
— Common Macros/Mixer Macros: Use this key to choose whether the 14 macro quick keys remain the same (common) for both Edit and Mix modes, or if they change to macros 1-14 for Edit mode and 15-28 for Mix mode.
— Mode Jump/Wind: This key toggles between Jump and Wind modes for the Rewind and Fast Forward keys above the jog wheel.
— Mixer Follows/Mixer Link: Use this key to toggle the mixer between Follows and Link modes. When Mixer Link is toggled on, the mixer updates to show selected tracks in the Timeline. (Corresponding Resolve Preference > User > Fairlight.)
— Always Jog: When this key is toggled On, any movement of the jog wheel will cause the transport to switch to Jog. Always Jog affects the wheel when the transport is not in motion and does not override Shuttle, Scroll, or Record operations.
— Trim from 0: Toggles on Trim from Unity (0). You can use this in Mix mode while trimming fader automation. When toggled on, if automation is set to trim, faders armed to write will rest at unity where they can be manually adjusted from that position to trim the existing automation curve.
— Shuttle Fixed/Shuttle Free: This key toggles between Fixed or Free Jog Shuttle mode.
— Jump/Wind: This key toggles between Jump and Wind modes for the Rewind and Fast Forward keys above the jog wheel.
— Icon Buttons/Text Only: Use this key to toggle the picture keys between Icon and Text or Text only.
— ALT Layout: Latch this key to switch from the Normal layout to a new alternative text-only keyboard layout. This new Alt text-picture key layout shows keys that are relevant to the current task, with keys grouped toward the middle and lower rows of the keyboard for easy access. In this layout, the Editor Mode keys are located in the center of the the lower two rows of the picture
![]()
keyboard. They are easy to spot with white text labels and a white line at the bottom of each mode key. The alternative layout also utilizes the six soft menu picture keys to the left of the jog/shuttle wheel for toolset group keys based on the current Editor mode and task at hand.
1 Press the white SETUP mode key, if necessary.
2 Press the yellow UTILS (Utilities) key. To reveal the Utilities menu options keys in the row above the UTILS key. The yellow tag in the upper-left corner of the UTILS key indicates it is a menu key.
3 Press the orange ALT LAYOUT menu options key to return to the normal layout.
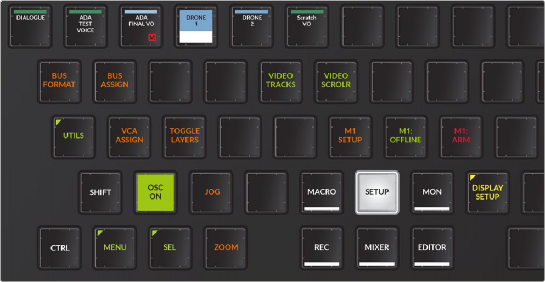
Alt Layout with the SETUP mode key latched and the UTILS menu key on the far right unlatched

NOTE: You’ll find pictures of each of the Alt Layout toolsets later in this chapter.
NOTE: You’ll find pictures of each of the Alt Layout toolsets later in this chapter.
NOTE: You’ll find pictures of each of the Alt Layout toolsets later in this chapter.
Alt Layout with the UTILS menu key latched and subsequent menu options keys in the row above including the latched Alt Layout key
![]()
— Call Follows key: In addition to selecting a track, there are other criteria for making a track active and “calling” its information into the Editor screen and corresponding Channel Control bay if you are on a Fairlight Audio Editor connected to a Fairlight console. These Call Follows menu options depend on the physical buttons, touch-sensitive knobs, and faders on the Fairlight console.
The Call Follows menu key offers five Call Option keys that can be used alone or in combination to determine which track or master bus is active:
— Current Track: When toggled on, the most recently selected track is the active track.
— Fader Touch: When toggled on, touching a fader on the Fader panel makes it active.
— Pan Touch: When toggled on, touching the Pan knob on the Fader panel makes it the active track.
— Inline Touch: When toggled on, touching any touch sensitive knob on the Channel Control panel, while set to Inline mode, calls that track and makes it active.
— Solo Button: Latching the Solo button on the Fader panel makes it active. Using a mouse or the Solo button on the Fairlight Audio Editor does not “call” the track active. Only the Solo button on the Fairlight Fader Control panel works in this scenario.
— Undo Editor/Undo All: This key is a matter of operator preference. When set to the default (unlatched), Undo Editor, tasks performed in Mix mode, including recording and editing automation data, will not be undoable. You can, however, simply record new mixing data to override the previous data as needed. Latching this key enables the Undo All mode, which in turn will undo all actions including automation applied in Mix mode.
— CTI Fixed/Moving: This key lets you choose whether the playhead (CTI) moves across the Timeline, or is fixed in place with the Timeline scrolling past.
— Preview Track/Mon: This key determines where preview monitoring goes when auditioning a sound and comes in handy when you need to preview a clip in the Media Pool or Sound Library. When toggled to Preview Track, you will put the track in Thru mode so it works like a live mic input and the sound you preview will be subject to the track’s fader levels, solo or mute state, and any processing applied to the track. If toggled to Preview Mon, the sound goes directly to the monitors without any processing or controls via the track’s channel strip in the mixer or console.
— Normal Solo/Solo Follows: This lets you customize how the Solo commands work.
Normal Solo/Solo Follows is a bypass toggle for the Call Follows, Solo Button option. If the Call Follows, Solo Button menu options key is latched, and the Normal Solo/Solo Follows key is latched, soloing a track in the Audio Editor or Channel Fader panel “calls” that track’s information into
the Editor display on the Audio Editor, and the Channel display in a Fairlight Console Channel bay. Unlatching the Normal Solo/Solo Follows key bypasses the Solo Call feature and returns Solo functionality to Normal Solo behavior, as the name suggests.
1 With the Video Online/Offline key latched on, move the Playhead to the desired frame in the Timeline. For this example, let’s make it the frame where a door slams closed in the Viewer.
2 Unlatch the Video Online/Offline key so that it is offline.
3 Move the playhead to another location in the Timeline where there is a door closing sound effect that you’d like to copy.
4 Select the track with the clip you want to copy, and move the playhead over the frame that you want to sync with the door closing frame.
5 In Edit mode, press the Copy Clip key.
6 Latch the Video Online/Offline key so that it is Online. The playhead jumps to the previous location using the playhead as a sync point to match the door closing audio clip to the video frame of the door closing.
7 If necessary, press the Track Selection key for the track where you wish to paste the synced clip.
8 Press the Enter key to paste the clip.