< Previous | Contents | Next >
— Punch In Again: The system pre-rolls, then enters record at the exact same place as last time, whether it was manually for automatically activated. When entering this record operation, you still need to manually punch out. This allows you to get the same start point for recording but with a manual exit.
— Record Head: Pre-rolls, then starts recording at the head of the first clip to come beneath the playhead in the selected track. When entering this record operation, you still need to manually punch out.
Monitor Mode Toolset
As the name suggests, this mode is for setting up your monitor system. In most cases, this is set up at installation, but there are also controls for setting up the monitors for a particular session and quickly switching between different sources, including external sources, speaker sets, and surround formats. You can even mute any of the current speakers by latching its associated picture key marked with a Speaker icon.
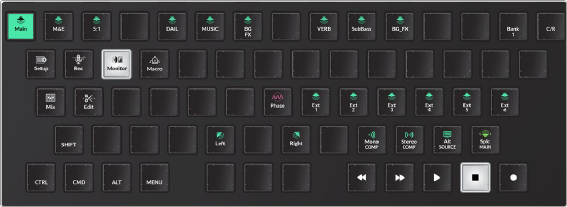
Monitor mode default keys showing Control Room monitoring
— C/R / Studio toggle: This key toggles the Monitor mode keys between Control Room (C/R) and Studio monitoring keys.
— Phase: Hold this key and press any speaker button to toggle its phase.
— Alt Source: Use this key to toggle between the Main system bus and the most recently selected Alternative source. The standard monitoring source is the Main system bus. However, you can choose many other sources, including other system buses or external sources, such as a CD player. The system remembers the last non-standard source that you chose as the Alternative source.
— Mono Comp: If your current speaker set is not mono, you can press this button to monitor playback in mono.
![]()
— Stereo Comp: If the current speaker format is not stereo, you can press this key to monitor the playback in stereo.
Macros Mode Toolset
Macros are programmable keys where you can record sequences of keystrokes. The Macro mode toolset includes 30 programmable Macro keys, as well as Delete, Rename, and Record keys for recording and managing your macros. The first 14 Macro keys are also assigned to the Macro quick-
keys at the top of the Audio Editor’s display (Pad). Macros can record any keystroke on the Fairlight Audio Editor, including a momentary press to enter a different mode and keypresses in that mode during the momentary press. For example, it is common, when recording a macro, that you start in the mode with the first key you want to record, then momentary-press the Macro mode key to enter Macro mode just long enough to start recording the macro. Upon releasing the Macro mode key, the first key you press on the original mode will be the first one recorded.
The most important thing to remember when recording macros is that they are reliable once created, but have no context except what you program. It’s a good idea to think of the starting and ending context for your macro prior to recording. For example, if the macro requires moving clips from
one track to an empty track, make sure you create the new track before executing the macro. If the macro uses jump keys, make sure you have them set up ahead of time and so on. It is up to the user to remember a starting point and ending point, if relevant. Once a macro has been recorded, the associated quick key at the top of the Editor lights up to show that it is available as a macro.


NOTE: To prevent accidentally recording, renaming or deleting a Macro key, the Macro action keys require a momentary press plus a numbered Macro key.
NOTE: To prevent accidentally recording, renaming or deleting a Macro key, the Macro action keys require a momentary press plus a numbered Macro key.
NOTE: To prevent accidentally recording, renaming or deleting a Macro key, the Macro action keys require a momentary press plus a numbered Macro key.
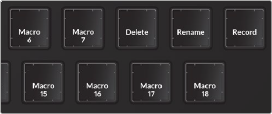
Macro mode keys
— Delete: Press and hold this key and press a Macro key to delete the macro.
— Rename: Press and hold this key and press a Macro key to open the User Macros dialog and rename the macro.
![]()
— Record: Press and hold this key and press a numbered Macro key to record. Press Control and the Menu key to stop recording. The Menu modifier key changes to Menu (rec) when recording a macro and Stop Recording when you press the Control modifier key while recording a macro.

Standard modifier keys in Macros mode and Macros action keys, including Delete, Rename, and Record
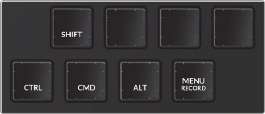
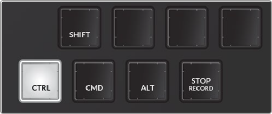
Menu becomes Menu Record key during macro recording and Stop Record when Control key is pressed during macro recording
1 Set up the Editor for whatever steps you plan to record in the Macro and latch that mode.
2 Momentarily press the Macros mode key to enter that mode temporarily.
3 Do not release the Macros key.
4 With the other hand, in the Macro mode toolset, momentarily press the Record key and the numbered Macro key that you want to record. Release the Record and numbered Macro key.
5 Release the Macros mode key to return to the latched Editor mode.
6 Press the keys one at a time as needed to complete the steps that you want to record to the macro.
7 Stop playback, if necessary.

NOTE: You can take as long as you need to record a macro, and if you make a mistake you can either delete the macro or re-record it using the Delete or Record keys.
NOTE: You can take as long as you need to record a macro, and if you make a mistake you can either delete the macro or re-record it using the Delete or Record keys.
NOTE: You can take as long as you need to record a macro, and if you make a mistake you can either delete the macro or re-record it using the Delete or Record keys.
8 Press the Control key and press the Stop Recording key in the modifiers section of the keyboard.
1 Prepare the Editor for recording the first macro. In this case, press the Edit mode key and latch the A1 track selection key to select that track. Move the playhead over the first clip in the track.
2 Momentary press the Macros key with the left hand. Do not release the Macros mode key.
3 In the Macros toolset, press the Record key and the Macro 1 key, to initiate recording of the Macros 1 key. Release both keys. The Macros keys disappear from view in the Macros toolset.
4 Release the momentary press on the Macros key to return to the Edit mode. The next keypress will be the first recorded to the Macro 1.
5 Press the Cut Clip key to cut the clip on the selected track beneath the playhead.
6 Press the Down key to the left of the jog wheel to move the track selection, and the shadow of the clip that was cut, down one track.
7 Press the Enter key to paste the clip.
8 Press the Up key next to the jog wheel to move the selection back up to the A1 track.
9 Press the Control modifier to change the Menu key to a Recording Stop key. Press the Recording Stop key.

NOTE: You could also use this same macro to move a clip from any selected track to the track below because it contains the Up and Down arrow keys instead of specified track selection keys. Additionally, you could take this macro idea to a whole new level and include jump keys and fades at the edges of the clips as you edit.
NOTE: You could also use this same macro to move a clip from any selected track to the track below because it contains the Up and Down arrow keys instead of specified track selection keys. Additionally, you could take this macro idea to a whole new level and include jump keys and fades at the edges of the clips as you edit.
NOTE: You could also use this same macro to move a clip from any selected track to the track below because it contains the Up and Down arrow keys instead of specified track selection keys. Additionally, you could take this macro idea to a whole new level and include jump keys and fades at the edges of the clips as you edit.
From this point forward, pressing the Macro 1 key in the Macros Mode toolset, or the Macros 1 quick key at the top of the Editor will perform the macro of cutting a clip on one selected track and moving it to the track below then returning to the original track. With this macro, you could easily use jump keys to move down the Timeline a clip at a time, and move any clips that need to go to the A2 track with the press of the Macro 1 key.
1 Enter the Macros mode toolset.
2 Long-press the Rename key and press the Macro key that you want to rename.
3 In this case Macro 1. Release both keys.
4 The picture keyboard changes to QWERTY keys and the User Macros dialog opens on the computer screen.
5 Type a new name for the Macro and press Return.
6 The Macro is named in the Macro mode keys.
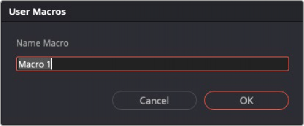
User Macros dialog on Computer screen
![]()
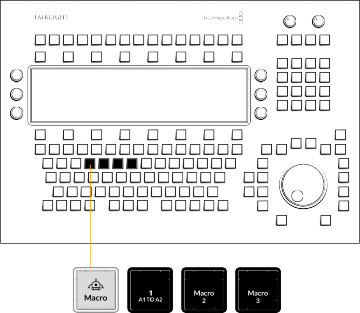
Named Macro 1 in the Macros Mode keys

TIP: If you are going to name your macros, it’s a good idea to give them a brief but literal name to help you remember the macro’s function. In the above example, the macro was named A1 to A2 because it was designed to move a clip from the A1 track to the A2 track.
TIP: If you are going to name your macros, it’s a good idea to give them a brief but literal name to help you remember the macro’s function. In the above example, the macro was named A1 to A2 because it was designed to move a clip from the A1 track to the A2 track.
TIP: If you are going to name your macros, it’s a good idea to give them a brief but literal name to help you remember the macro’s function. In the above example, the macro was named A1 to A2 because it was designed to move a clip from the A1 track to the A2 track.