< Previous | Contents | Next >
— Copy and Paste Toolset Group: When the Mix On key is unlatched, the Copy/Paste key latches, and you will see a Copy key next to a toolset with six paste action keys, including Paste EQ, Paste DYN, Paste AUX, Paste PATH, Paste PLUGS, and Paste ALL. These keys are all used to copy attributes from the active track and paste them on a selected track. To use these keys, press the
Copy key to copy all of the track attributes for the active track. Select another track and choose the Paste action key that corresponds with the attributes you want to paste to the newly selected track.
— Mix ON: This key toggles on or off the Automation toolset. When toggled on, the Copy/Paste key toggles off and the Copy and Paste toolset group switches to the automation specific toolset such as the Mix, Punch Menu, and Preview menu keys.
— Automation Menu keys: Enable, Mix list, Mix Menu, Punch Menu, and Preview Menu all reveal a set of submenu option keys when latched. The subsequent option keys offer the exact same options available on the Fairlight page interface. For example, latching the Enable menu key reveals ten option keys that represent each of the ten Enable buttons on the Fairlight page Automation toolbar, in the exact order that they appear onscreen. The Enable option keys are as follows from left to right: Write FADER, Write MUTE, Write PAN, Write EQ, Write COMP, Write LIMITER, Write AUX, Write PLUGINS, Write MISC, including a dedicated All button.
— Open/Close GUI window keys: The Patch, Mix List, and Presets keys open and close the corresponding windows on the computer screen.
— Toggles: The Touch and @Stop keys toggle between the different Touch and Stop automation modes when toggled. The Touch toggles between OFF, LATCH, and SNAP while the @Stop key toggles between RETURN, EVENT, and HOLD.
— Preview Menu: Switches the Automation controls into Preview mode for auditioning settings without writing new automation data and offers Preview menu option keys including; Fill Range, Glide Range, Punch In, and Punch Out.
— Safe Menu: This automation option provides the ability to specify an active automation zone with Active In and Active Out keys where the system does not receive timecode automation outside of the specified range. When Safe automation mode is active, automation Read and Write functions are only available within the active range and are disabled outside of the designated activesw range.
— Write Quick Keys: Write FADER, Write MUTE, Write PAN. These keys can be used to quickly enable the three most common Automation parameters.
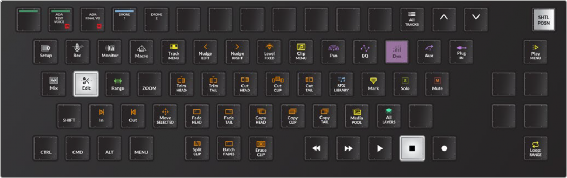
Edit Mode Toolset
If you’re read the previous Fairlight chapters, you’re already familiar with the Audio Editing tools and menu options. The Edit mode toolset includes over twenty specialized picture keys for adding, moving, editing, and trimming clips in the Timeline. The keys represent all of the audio editing options available in the Fairlight page via the Edit and Trim menus as well as a handful of tools that are only available
![]()
in the Audio Editor. You’ll also find keys to open, preview, and edit clips from the Sound Library and Media Pool.
Fairlight audio editing is by nature fast and fluid, even when you are working with the software and computer alone. Where the Fairlight Audio Editor enhances the process is that with the combination of the jog wheel and Edit mode action keys, you can move and edit clips at incredible speeds and even edit clips on the fly without ever picking up your hands. In fact, the Fairlight Audio Editor is designed for two-handed operations. The added functionality of two-handed workflows really comes into play when working in the Edit mode.

EXAMPLE: With your left hand, you can easily select tracks and press action keys, while you use your right hand to drive the jog wheel controls and press the Enter key to paste material that its copied to the clipboard.
EXAMPLE: With your left hand, you can easily select tracks and press action keys, while you use your right hand to drive the jog wheel controls and press the Enter key to paste material that its copied to the clipboard.
EXAMPLE: With your left hand, you can easily select tracks and press action keys, while you use your right hand to drive the jog wheel controls and press the Enter key to paste material that its copied to the clipboard.
The Edit mode action keys work off of two principals: removing material you don’t want to keep in the Timeline, or moving material to another location. To remove material, you use tools that erase or trim. To move material, you use the Clipboard tools that cut or copy and therefore store the material in memory to be pasted elsewhere. When you cut or copy material, a semi-transparent version of the Clipboard clip appears in the Timeline and can be moved to another track or location and pasted.

NOTE: For more details about the fundamentals of editing audio clips in the Fairlight page, please refer to Chapter 171, “Editing Basics in the Fairlight Page.”
NOTE: For more details about the fundamentals of editing audio clips in the Fairlight page, please refer to Chapter 171, “Editing Basics in the Fairlight Page.”
NOTE: For more details about the fundamentals of editing audio clips in the Fairlight page, please refer to Chapter 171, “Editing Basics in the Fairlight Page.”
Another consideration when editing is to determine if you are modifying the head, tail, whole clip, or a range containing only part of a clip or multiple clips. All audio edits are non-destructive and reversible with the Undo key.
Edit mode keys
— Cut: Cut Head, Cut Clip, Cut Tail keys all cut the material based on the selected track, clip and playhead position and place the removed material in the clipboard for pasting with the Enter key. For more fluid editing, hold down a Cut key, such as Cut Tail, and use the jog wheel to move the cut portion of the clip to a new location, then release the Cut Tail key to automatically paste the cut clip in the new position.
![]()
— Copy: Copy Head, Copy Clip, Copy Tail keys all copy the material based on the selected track, clip and playhead position and place the copied material in the clipboard for pasting with the Enter key.
— Trim: Trim Head, Trim Tail uses the playhead’s position to remove the current clip’s head or tail. You can also press and hold Trim Head or Trim Tail while using the jog wheel to extend either the head or tail of the current clip. While doing this, you see the full waveform the clip you’re trimming as you turn the jog wheel, but when you release the Trim Head or Trim Tail button, the Head or Tail of the selected clip appears trimmed at the current frame at the playhead.
— Split: The Split key splits the clip at the playhead position creating a new edit point between two clips.
— Fade: The Fade Head and Fade Tail keys add fades respectively from the playhead to the head or tail of a clip.
— Erase: Erase clip deletes the clip from the Timeline.

NOTE: For a detailed rundown of the Batch Fades Settings window, see Chapter 171, “Editing Basics in the Fairlight Page.”
NOTE: For a detailed rundown of the Batch Fades Settings window, see Chapter 171, “Editing Basics in the Fairlight Page.”
NOTE: For a detailed rundown of the Batch Fades Settings window, see Chapter 171, “Editing Basics in the Fairlight Page.”
— Batch Fades: Long-press this key to open the Batch Fades Settings window or press to execute Batch Fades for the current audio clip or range selection.
— Cut Range: Use this key to cut all clips and partial clips within the range on the selected track or tracks. The Cut Range key replaces the Cut Clip key when Range is toggled on. This cuts clips within the range on all selected tracks.
— Copy Range: Use this key to copy all clips and partial clips within the range on the selected track or tracks. The Copy Range key replaces the Copy Clip key when Range is toggled on. This copies clips on all selected tracks within the range.
— Split Range: This key splits any clips lying across the range boundaries into two pieces at the range In Point and Range Out Point. This affects clips at the range boundaries on selected tracks.

NOTE: For ease of use and quick mastery, the Edit mode action keys are logically grouped in pairs or trios so that keys involving the head of a clip are first and tails are last. For example, the Cut Head, Cut Clip, and Cut Tails keys are grouped together as a trio. Placing three fingers over those keys make it easy to remember the first key is the head, middle key is the full clip, and last key is the tail.
NOTE: For ease of use and quick mastery, the Edit mode action keys are logically grouped in pairs or trios so that keys involving the head of a clip are first and tails are last. For example, the Cut Head, Cut Clip, and Cut Tails keys are grouped together as a trio. Placing three fingers over those keys make it easy to remember the first key is the head, middle key is the full clip, and last key is the tail.
NOTE: For ease of use and quick mastery, the Edit mode action keys are logically grouped in pairs or trios so that keys involving the head of a clip are first and tails are last. For example, the Cut Head, Cut Clip, and Cut Tails keys are grouped together as a trio. Placing three fingers over those keys make it easy to remember the first key is the head, middle key is the full clip, and last key is the tail.
— Erase Range: Erase Range deletes the range from the Timeline. This Erase Range key replaces the Erase Clip key when Range is toggled on.
In addition to the default Edit mode action keys, there is also a set of refinement action keys that can be used to finesse edits, fades, and clip positions. The refinement action keys require the Control modifier key as well as the jog wheel in most cases. These refinement action keys are logically placed for quick decisions so you can first execute an edit and then refine it without lifting your left hand or searching for a refinement key.
![]()
— Erase: Erase Head and Erase Tail keys appear on the same keys as Cut Head and Cut Tail so that you can quickly choose between a cut, which keeps the material in the clipboard and erasure of the material, with the touch of your left Pinky finger on the Control key.
— Fade: Head X-Level and Tail X-Level keys appear on the Fade Head and Fade tail keys so that you can first add a fade, then press Control and use the same key to refine the fade level with the jog wheel. Additionally, long-press SHIFT to reveal Head XPoint and Tail XPoint that can be
changed with the jog wheel or long-press CTRL + SHIFT to use the jog wheel to refine Head Shape and Tail Shape.
— Slip: Slip Head, Slip Clip, and Slip Tail keys are located on the same keys as Copy Head, Copy Clip, and Copy Tail. That way you can seamlessly copy, move, and paste material to a new location, then hold the Control key while pressing the respective Slip key, and turn the jog wheel to refine the Head, Clip position or Tail based on the jog movement of the playhead.
— Trim: The Trim Clip refinement tool shares a key with the Split Clip key so that you can split a clip at the playhead position, then hold Control and the same key while using the jog wheel to refine the position of the edit point created by the split.
— Clip Level: This key plus the jog wheel and the Control modifier key adjusts the Display level of the selected clip’s waveform.
— Jog Wheel: To place the playhead (CTI) at either the In or Out point of a range, use Control plus the jog wheel. Hold Control while turning the jog wheel to the left to move the playhead to the In point. Hold Control while turning the jog wheel to the right to move the playhead to the Out point.
The Edit mode tools work exactly as expected if you are familiar with the Fairlight page in
DaVinci Resolve. There are, however, a few specialized keys that don’t have counterpart tools in the Fairlight page. These unique tools perform valuable time-saving tasks.

NOTE: At the time of this printing, The Edit page in DaVinci Resolve includes a Clip menu option and keyboard shortcuts for incremental decibel changes, however there is no comparable shortcut, or menu in the Fairlight page.
NOTE: At the time of this printing, The Edit page in DaVinci Resolve includes a Clip menu option and keyboard shortcuts for incremental decibel changes, however there is no comparable shortcut, or menu in the Fairlight page.
NOTE: At the time of this printing, The Edit page in DaVinci Resolve includes a Clip menu option and keyboard shortcuts for incremental decibel changes, however there is no comparable shortcut, or menu in the Fairlight page.
— Clip Level: This key is both a Menu and Jog Wheel modifier key. Hold the Clip Level key to reveal seven option keys to raise or lower the selected clip’s volume up +/- 3 dB. Incremental menu options keys from left to right include: -3dB, -2dB, -1dB, 0dB, +1dB, +2dB, +3dB. As a Jog Wheel modifier key, hold the Clip Level key with the left hand and turn the jog wheel with the right hand to raise or lower the clip’s volume level dynamically based on the amount and direction that you turn the wheel. This can be performed on the fly during playback, so you can dial up or down the volume level of any clip on the selected track as the playhead passes over the clip. Clip level changes can also be applied to multiple clips on multiple selected tracks simultaneously.
— Reverse Clip: This key is available as one of the Clip Menu action keys. When pressed, this key reverses the clip beneath the playhead on the selected track. This creative sound design tool is also available in the Record mode Clip Menu toolset.
— Range Menu Keys: A momentary-press on the Range key revels six invaluable Range-defined tools for speeding up your tasks. Although they are also available in the Record and Mix mode toolsets, you will primarily use them in Edit mode.
— Copy Segment: This action key copies all timeline material within a marked range.
![]()
— Paste Segment:This key pastes a copied segment to a new timeline location based on the playhead position.
— Previous Gap: Use this key to extend a range by moving the range In Point to the previous gap in the selected track or tracks.
— Next Gap: Use this key to extend a range by moving the range Out Point to the next gap in the selected track or tracks.