< Previous | Contents | Next >
Rendering Files vs. Outputting to Tape
Because the Deliver page does double duty, you control whether you’re rendering files or outputting to tape using the Tape button in the Interface toolbar. Doing so replaces the controls in the Viewer with tape controls.
![]()
Render or Edit to Tape modes
The Render Settings
The Render Settings contains the customizable settings that determine how media is rendered out of DaVinci Resolve. If you’re using the Tape option, these settings are disabled.
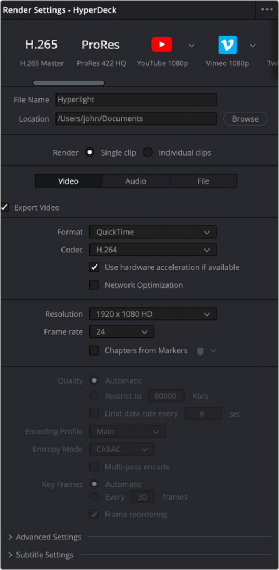
Render Settings
The Render Settings are divided into four general sections:
— Render Presets: At the very top, a scrollable row of icons lets you choose one of a series of presets to quickly set up the type of render you want. The Custom option exposes all render settings so you can set up a render manually.
— Render Location: A Browse button opens a dialog that lets you choose a volume and directory to render to.
— Render: Two options let you either render the entire selected area of the Timeline
as a single clip suitable for reviewing or mastering, or as a series of individual clips more suited to round-trip workflows. The option you choose here changes which render settings are available below.
— Video, Audio, and File Render Settings Panels: All other render settings are divided among three panels. Checkboxes at the top of the Video and Audio panels let you selectively disable video export
(if you want to export the audio only) or disable audio export (if you want to export video only).
![]()
For more information on all of these settings,