< Previous | Contents | Next >
This preset is specifically for rendering an audio-only media file from the Timeline. Video rendering is disabled, and this preset defaults to rendering the Main 1 bus as a single clip, rendering one track per channel using the MXF OP-Atom format set to the Linear PCM codec, at 16-bits. However, the QuickTime, MP4, and WAV formats are also available, and you can also render 24- or 32-bit output. Additionally, you have the option to render other Mains or Submixes, or to choose a specific Timeline Track to render. Finally, you can choose to render the current program as Individual Clips.
Creating and Using Your Own Presets
If there is a particular group of settings that you find yourself using repeatedly, you can turn it into a custom Easy Setup, for easy recall.
1 If you want to start from scratch, make sure to choose Custom from the preset panel to unlock every setting in the Render Settings pane.
2 Choose the particular settings you require in the Video, Audio, and File panels for your new preset.
3 Open the Render Settings Options menu, and choose Save as New Preset.
4 Type a name into the “Render Preset” dialog, and click Save. The new preset now appears in the Preset panel.
— Click any preset. Every setting in the Render Settings pane updates to reflect the preset you selected.
— Click a preset you want to change, make whatever changes you need to in the Video, Audio, and File panels, then click the Render Settings Option menu, and choose Update Current Preset.
— Click a preset you want to delete, then click the Render Settings Option menu, and choose Delete Current Preset.
Import and Export Custom Presets
Custom render presets that you create can be imported and exported from the Deliver page. Presets are saved in .xml files that can be easily sent to other users or workstations to ensure the exact same delivery methods are used between machines. In addition, any newly created export presets are available in the “Add to Render Queue Using” menu when you right-click a timeline.
Render presets can now be imported and exported from the Deliver page.
1 In the Deliver page, adjust the Video, Audio, and File options in the Render Settings to your needs.
2 In the Render Settings Option (3-dot) menu, select Save as New Preset.
3 Enter a name for the new preset, and press OK.
The new preset will be available in the Render Settings Option menu, as well as an option in the Custom Preset Settings icon in the Render Presets row at the top of the Render Settings.
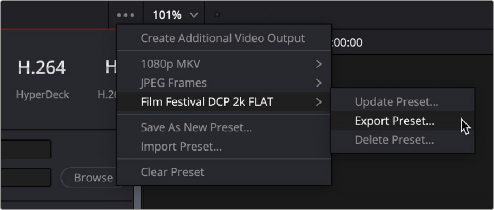
1 In the Deliver page, click on the Render Settings Option (3-dot) menu.
2 Select the name of the saved preset you wish to export.
3 Select Export Preset from the drop-down menu.
4 Use the file browser to name and set the save location of the preset. The new preset will be available as an .xml file.
1 In the Deliver page, click on the Render Settings Option (3-dot) menu.
2 Select Import Preset from the drop-down menu.
3 Select the Render Setting .xml file in your file browser.
4 Press Open.
The imported preset will be available in the Render Settings Option menu, as well as an option in the Custom Preset Settings icon in the Render Presets row at the top of the Render Settings.
1 Make any changes you wish to the Video, Audio or File Render Settings.
2 In the Deliver page, click on the Render Settings Option (3-dot) menu.
3 Select the name of the saved preset you wish to update.
4 Select Update Preset from the drop-down menu.
5 Press the Update Button from the warning dialog. This action can not be undone. The selected preset will be updated with the new settings you selected.