< Previous | Contents | Next >
Once you’ve defined the settings necessary to render the type of media you require, and the range of the current session you want to render, you need to add all that information as a job to the Render Queue. You can add as many jobs to the Render Queue as you need, depending on what files you need to output.
Each job can have individually specified ranges of clips and individual clip settings, which can include different render directories, different formats, resolutions, data levels, burn-in settings, and so on. As a result, you can use the Render Queue to queue up the render of multiple sections of the current session, or multiple versions of the same media. Furthermore, you can queue up multiple sessions, if you have several differently graded sessions.
1 Select a timeline.
2 Choose the settings you require in the Render Settings, using one of the Presets, or by choosing your own custom settings.
3 Choose a range of clips to render using the Deliver page Timeline using the procedures described in the previous section.
4 Click the Add to Render Queue button at the bottom of the Render Settings.
5 If you haven’t chosen a location for the render yet, you’ll be prompted to do so now via a File Destination dialog, so choose a location and click Ok. If there’s already media in the render location you’ve specified, you may also see a dialog telling you “This render may overwrite existing clips in this folder.” If you want to continue, click Yes, otherwise click No.
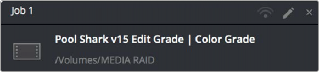
That render setup is now added as a job to the Render Queue, showing the project and timeline name, and location path where the render will be written to.
A selected job in the Render Queue
When you attempt to add a job to the Render Queue with a timeline that contains any offline material, DaVinci Resolve automatically gives you a warning. You may choose to either cancel adding the job, or to add it anyway, knowing you’re about to render one or more offline clips.
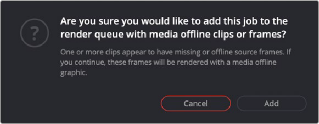
Media Offline warning box that appears if your timeline contains offline clips or frames and is added to the Render Queue
Click the Render Queue Option menu (at the upper right-hand corner) and choose Show Job Details. Each job now lists the frame size, format, frame rate, audio channels and sample rate, and duration below the name and location path.
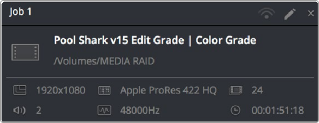
A selected job in the Render Queue with job details shown
— Jobs can be given custom names simply by clicking on the default job name ( Job 1, Job 2, and
so on) and typing a new name of your own. This can be useful for setting up jobs that you may be re-rendering over and over as you work on a project.
1 If you want to restrict rendering to only selected jobs in the Render Queue, then select one or more jobs by clicking on one, and then Command-clicking on others to choose discontinuous jobs, or Shift-clicking on another to select an entire range of jobs. When you select one or more jobs, only the selected jobs will be rendered. If no jobs are selected, then all jobs in the queue will be rendered.
2 Click the Start Render button, underneath the Viewer to the right of the interface.
3 If there are jobs in the Render Queue that have already been rendered, a dialog will appear asking “Selected items contain already rendered items. Do you want to re-render them?” Clicking Yes will re-render all jobs in the Render Queue. Clicking No only renders the jobs that have not yet been rendered. Clicking Cancel cancels the entire rendering operation.

TIP: While rendering is in progress, a small progress bar will appear on the DaVinci Resolve icon in the dock of Mac OS X, or on the taskbar of Windows.
TIP: While rendering is in progress, a small progress bar will appear on the DaVinci Resolve icon in the dock of Mac OS X, or on the taskbar of Windows.
TIP: While rendering is in progress, a small progress bar will appear on the DaVinci Resolve icon in the dock of Mac OS X, or on the taskbar of Windows.
Rendering begins, starting with the highest job in the list. The Overall Progress bar starts to fill up, from right to left, indicating how much of what’s been queued up has been rendered so far. While rendering is in progress, the Start Render button changes to the Stop Render button, which can be clicked at any time to halt rendering.
— To clear a specific job: Click the X at the upper right-hand corner of a job’s entry in the Render Queue.
— To clear all previously rendered jobs: Click the Render Queue Option menu (at the upper right- hand corner) and choose Clear Rendered.
— To clear all jobs: Click the Render Queue Option menu (at the upper right-hand corner) and choose Clear All.