< Previous | Contents | Next >
Tape output is accomplished on the Deliver page, which has to be placed in the Tape mode before you can proceed.
— Click the Tape button, which is the third button from the left on the Interface toolbar at the top of DaVinci Resolve. The Deliver page updates to reflect the relevant controls for editing to tape.
While in Edit to Tape mode, the Deliver page is used to control the VTR, in order to establish In and Out points for insert or assemble editing of the selected portion of the current Timeline to tape.
— Capture and Playout: The Render Settings panel turns into the Capture and Playout panel, with controls and settings governing how DaVinci Resolve will output your program to tape.
— Edit to Tape Queue: The Render Queue turns into the Edit to Tape Queue, which lets you set up a batch of either previously rendered media files, or In and Out point-defined segments of the current Timeline for simultaneous output to tape.
— Transport controls: The transport controls, while similar in appearance to those used while in Render mode, now control the VTR. While in Edit to Tape mode, the transport controls of the DaVinci control panel also control the deck, rather than your program.
— Shuttle control: A shuttle control appears in what was formerly the jog or scrubber bar, which lets you shuttle through the range of reverse and forward speeds compatible with that deck.
— In and Out controls: In Edit to Tape mode, the In and Out buttons to the right of the transport controls define a range of the tape to Insert or Assemble edit to, within the current Timeline. While in Edit to Tape mode, you can still define In and Out points to define a specific range of the Timeline by right-clicking a clip in the Thumbnail or Mini-Timeline, and choosing Mark In or Mark Out. You can only add In or Out points to the beginning and end of clips.
— Cue In and Cue Out controls: Buttons next to the timecode In and Out fields cue the tape to those frames on tape.
![]()
Edit to Tape controls
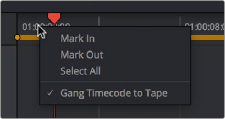
Gang Timecode to Tape
When the Deliver page is in Tape mode, you can right-click the ruler running along the top of the Timeline and choose “Gang Timecode to Tape,” which puts DaVinci Resolve into a mode where every time you set an In point on the Deliver page Timeline, a corresponding In point is automatically set on the tape deck. Setting both In and Out points on the Deliver page Timeline results in the In and Out points on the tape deck being set at the same timecode, making it easy to set up insert edits to tape on top of a previously output program.