< Previous | Contents | Next >
Exporting and Importing Media Pool Metadata
DaVinci Resolve makes it possible to export metadata from the Media Pool of one project for import into the clips of another project, for instances where you need to move metadata around. This process exports all metadata from the Media Pool as a .csv file.
For example, a DIT might have entered a lot of metadata to the DaVinci Resolve project used for generating dailies, but then an impatient editor might have created a separate project to begin editing those dailies. Instead of requiring the editor to enter each clip’s metadata all over again, you can export the metadata from the DIT’s project and import it into the editor’s new project, automatically matching the relevant metadata to each corresponding clip.
1 Open a project containing Media Pool metadata you want to export.
2 Optionally, select which clips in the Media Pool you want to export metadata for.
3 Choose File > Export Metadata From > Media Pool to export metadata from every clip in the Media Pool, or choose File > Export Metadata From > Selected Clips to only export metadata from clips you selected in step 2.
4 When the Export Metadata dialog appears, enter a name and choose a location for the file to be written, then click Save. All metadata is exported into a .csv file that can be viewed and/or edited in any spreadsheet application.
1 Open a project containing clips you want to populate with imported metadata.
2 Optionally, select which clips in the Media Pool you want to import metadata to.
3 Choose File > Import Metadata To > Media Pool to import metadata to potentially every clip in the Media Pool, or choose File > Import Metadata To > Selected Clips to only import metadata to clips you selected in step 2.
4 When the Import Metadata dialog appears, choose a metadata .csv file to import, and click Open.
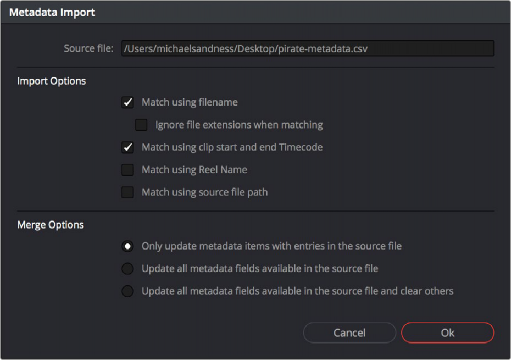
5 When the Metadata Import dialog appears, choose the Import Options you want to use to match the .csv file’s metadata to the correct clips in the currently open project. By default,
DaVinci Resolve tries to use “Match using filename” and “Match using clip start and end Timecode” to match each line of metadata in the .csv file with a clip in the Media Pool, but there are other options you can use such as ignoring file extensions, using Reel Name, and using source
file paths.
6 Next, choose which Merge Option you want to use in the Metadata Import dialog. There are three options:
— Only update metadata items with entries in the source file: The default setting. Only updates a clip’s metadata if there’s a valid entry in the imported .csv file. Other clip metadata fields are left as they were before the import.
— Update all metadata fields available in the source file: For each clip that corresponds to a line of metadata in the imported .csv file, every single metadata field referenced by the .csv file is overwritten, regardless of whether or not there’s a valid entry for that field.
— Update all metadata fields available in the source file and clear others: For each clip that corresponds to a line of metadata in the imported .csv file, every single metadata field referenced by the .csv file is overwritten, regardless of whether or not there’s a valid entry for that field. Furthermore, metadata fields that aren’t referenced by the imported .csv file are cleared of whatever metadata was there before.
The Metadata Import dialog that lets you choose options for how to match and merge imported metadata
7 The Metadata Import dialog that lets you choose options for how to match and merge imported metadata
8 When you’re finished choosing options, click Ok and all available metadata from the source .csv file will be imported.