
< Previous | Contents | Next >
1 Sign into the Blackmagic cloud server in the Project Manager.
2 Click on the Show/Hide Project Libraries icon in the upper left of the Project Manager to expose the sidebar.
3 Select the Cloud icon from the Project Library options.
4 Right-click on the library you want to rename in the Project Libraries sidebar, and enter the new name in the dialog box.
5 Click the OK button.
TIP: You can not delete or change the name of the currently connected project library (indicated by an orange highlight around it). In order to do so, you must select and connect to another project library first, and then apply the steps above.
TIP: You can not delete or change the name of the currently connected project library (indicated by an orange highlight around it). In order to do so, you must select and connect to another project library first, and then apply the steps above.
TIP: You can not delete or change the name of the currently connected project library (indicated by an orange highlight around it). In order to do so, you must select and connect to another project library first, and then apply the steps above.
Upgrading a Cloud Project Library
From time to time, new versions of DaVinci Resolve require changes to the way projects are created, which requires project libraries created with older versions of DaVinci Resolve to be upgraded before you can access the projects within. Fortunately, this is a simple process.
1 Sign into the Blackmagic cloud server in the Project Manager.
2 Click on the Show/Hide Project Libraries icon in the upper left of the Project Manager to expose the sidebar.
3 Select the Cloud icon from the Project Library options.
4 Right-click on the library you want to upgrade in the Project Libraries sidebar, and select Upgrade from the drop-down menu.
5 Click the upgrade button on the confirmation dialog box that opens.
Sharing a Cloud Project Library
You can share a cloud project library with other users around the world with a Blackmagic ID.
1 Sign into the Blackmagic cloud server in the Project Manager.
2 Click on the Show/Hide Project Libraries icon in the upper left of the Project Manager to expose the sidebar.
3 Select the Cloud icon from the Project Library options.
4 Click on the Details icon (the circled letter “i”) on the cloud project library you wish to share to open the details settings.
5 A members list will appear, and your user name and email will be first on the list with a little crown icon, showing that you are the owner of this project library.
6 Click the Share button at the bottom of the sidebar.
7 Enter the Blackmagic ID (email address) of the person you want to share this project library with.
8 Press the Share button.

IMPORTANT: The users you share your project library with have access to modifying and deleting any projects within that shared library, so be judicious about who you give access to.
IMPORTANT: The users you share your project library with have access to modifying and deleting any projects within that shared library, so be judicious about who you give access to.
IMPORTANT: The users you share your project library with have access to modifying and deleting any projects within that shared library, so be judicious about who you give access to.
The user will instantly have access to this shared library, and an email will inform them as well. If the user was already logged in with their Blackmagic ID, they will have to log out and re-login again for the shared project library to show up in their cloud library.
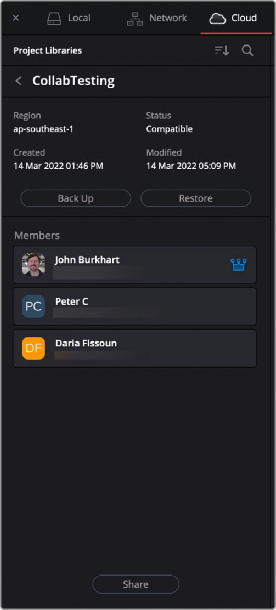
The Members section of the Blackmagic cloud library