< Previous | Contents | Next >
The heart of Presentations is the Viewer; here you can both video conference and control the playback of a clip. The Viewer provides a low latency, streaming video that you can use to accurately mark and comment on, as those comments show up in real time to other users and on the
DaVinci Resolve timeline.
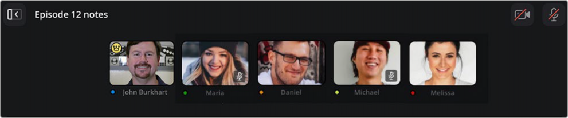
Video Conferencing
The top strip of the Viewer contains a basic video conferencing interface, with each user’s video stream appearing in a live thumbnail. By default the camera and microphone are turned off, so you will need to switch them on manually.
The video conferencing interface; note the Camera and Microphone on/off controls in the upper right.
1 Click on the Camera and/or Microphone icons in the upper right of the Viewer.
2 Give your OS and browser appropriate permissions to use the devices.
3 To turn off the Camera and Microphone, click their respective icons again.
With your camera and microphone on, all other connected users will see and hear you through their web browsers, so be generous and discrete with your comments.
Controlling a Clip in the Viewer
Each user can view and comment on any of the clips (including the same clip) in real time. The Viewer for each user is independent of all the others, though the administrator has the option to sync everyone’s Viewer to their own, in order to watch the same clip at the same time.
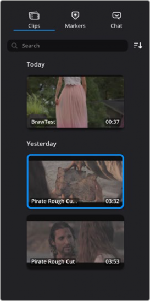
Selecting a Clip
Selecting a clip to view is as easy as clicking on the clip’s thumbnail in the Clips column. Clips are sortable by date, duration, and name in ascending or descending order. The Clips column is also searchable by clicking on the magnifying glass to the right and entering your search terms. Only clips matching your search terms will be shown. You can also hover your pointer over the clip thumbnail to scrub through the video.

Administrators can edit the names, and delete clips from the presentation by hovering over the thumbnail and selecting the appropriate icons (pencil and trashcan) in the upper right.
Administrators can edit the names, and delete clips from the presentation by hovering over the thumbnail and selecting the appropriate icons (pencil and trashcan) in the upper right.
Administrators can edit the names, and delete clips from the presentation by hovering over the thumbnail and selecting the appropriate icons (pencil and trashcan) in the upper right.
The Clips column
Viewer Controls
The Presentations Viewer has a set of playback controls at the bottom of the browser that you can use to position your playhead exactly.

The Viewer controls
![]()
![]()
![]()
![]()
![]()
![]()
![]()