< Previous | Contents | Next >
At this point, the video from the connected camera should become visible within the Viewer, the camera timecode should be displayed in the Viewer’s timecode window, and you can begin using all of the capabilities of the Color page to begin grading whatever is onscreen, including Gallery split- screens for matching and comparing. The current color adjustments in all palettes are automatically applied to both the image in the Viewer and the video output to an external display (if there is one).
While Resolve Live is on, much of DaVinci Resolve’s non-grading functionality is disabled, so when you’re finished, be sure to turn Resolve Live off.
![]()
— Click the Exit button at the bottom left-hand corner of the Viewer.
— Choose Color > Resolve Live (Command-R).
Using Freeze
In Resolve Live mode, the Freeze button (it looks like a snowflake) freezes the current incoming video frame, so you can grade it without being distracted by motion occurring during the shoot. When you’ve made the adjustment you need, you can unfreeze playback in preparation for grabbing a snapshot.
— Click the Freeze button (that looks like a snowflake).
— Choose Color > Resolve Live Freeze (Shift-Command-R).
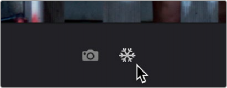
The snowflake button freezes the image so you can grade a particular frame
Using Snapshot
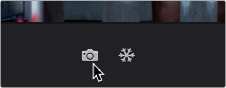
Once you’re happy with a grade, clicking the Snapshot button saves a snapshot of the current still in the Viewer, the incoming timecode value, and your grade into the Timeline. Snapshots are simply one-frame clips. They use grades and versions just like any other clip. In fact, ultimately there’s no
difference between the timeline created by a Resolve Live session and any other timeline, other than that the Resolve Live timeline only has a series of one frame clips, which appear in the Timeline of the Edit page as a series of 1-frame stills.
— Click the snapshot button (with a camera icon).
— Choose Color > Resolve Live Snapshot (Command-Option-R).

For example, you may begin the process of building and refining a grade for a particular scene during an unrecorded run-through. Then, once shooting starts, you may take snapshots of each shot’s slate, and then of significant takes that follow, tweaking where necessary and in conjunction with the DP’s feedback once things get going. New camera setups may require further tweaks, which you’ll save as snapshots for those shots, and as you work in this way you’ll find yourself building up a timeline of snapshots that correspond to that day’s shoot.
As you work, keep in mind that you must temporarily turn Resolve Live off in order to open a grade from a previous snapshot in the Timeline, in order to use it as a starting point for another shot. You can also save grades into the Gallery.
![]()