< Previous | Contents | Next >
Local project libraries are the simplest and most common type of project library and require no additional set up or configuration by the user, other than installing DaVinci Resolve. These libraries are saved locally to your workstation; by default they are placed in a folder called Resolve Disk Database, though they can be placed manually anywhere on your file system.
Creating a New Local Project Library
Creating a new local library is a simple and straightforward process.
1 Click on the Show/Hide Project Libraries icon in the upper left of the Project Manager to expose the sidebar.
2 Select the Local icon from the Project Library options.
3 Click on the “Add Project Library” button at the bottom of the sidebar.
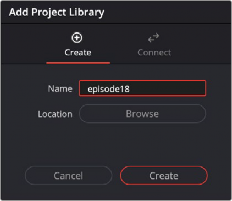
4 Select the Create option to make a new project library.
5 Enter a new name for your project library.
6 Press the Browse button next to Location, to select where on your local computer to save the project library.
7 Press the Create button.
You can now create or import new projects directly into your new local project library.

Creating a local project library
Connecting to an Existing Local Project Library
You can reconnect to an already existing project library using the following steps.
1 Click on the Show/Hide Project Libraries icon in the upper left of the Project Manager, to expose the sidebar.
2 Select the Local icon from the Project Library options.