< Previous | Contents | Next >
3 Click on the “Add Project Library” button at the bottom of the sidebar.
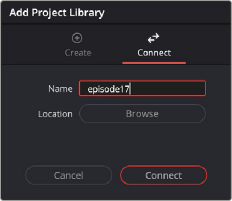
4 Select the Connect option to access the existing project library.
5 Enter a new name for your project library.
6 Press the Browse button next to Location, to select where on your local computer the folder containing the existing project library is. It is commonly named “Resolve Disk Project library.”
7 Press the Connect button.
You can now view and use all the existing projects directly from the existing local project library.
Connecting to an existing local project library
Disconnecting from a Local Project Library
You can disconnect and remove an already existing project library from the Project Libraries list using the following steps.
1 Click on the Show/Hide Project Libraries icon in the upper left of the Project Manager to expose the sidebar.
2 Select the Local icon from the Project Library options.
3 Right-click on the project library that you want to disconnect from, and select disconnect from the context menu.
4 Press the disconnect button in the confirmation dialog.
Disconnecting a project library simply removes it from the available options in the Project Libraries sidebar. It does not delete the project library. You can either manually delete it in the OS filesystem, or reconnect to it using the steps described in Connecting to an Existing Local Project Library.
Backing up a Local Project Library
You can also back up project libraries by exporting them, and then reimport them later.