< Previous | Contents | Next >
Member Management in the DaVinci Resolve Project Server
It is possible to assign specific users to specific project libraries and adjust their roles. This gives extra granularity for security for complex projects with many users. Every network project library starts with the default user: postgres and password: DaVinci. This was until recently the only way to sign into the DaVinci Resolve Project Server remotely, but now you can add custom users and passwords as well. Members will be able to use their individual credentials to sign into network projects in the Project Manager.
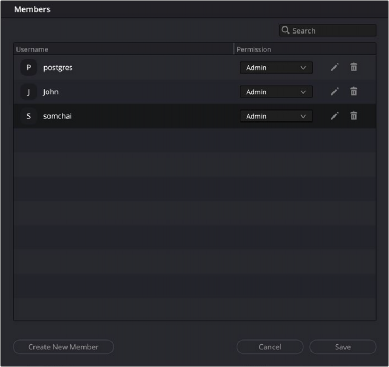
The DaVinci Resolve Project Server Members management window
1 Click the Members button on the top right of the DaVinci Resolve Project Server.
2 Click the Create New Member button at the bottom of the Members window.
3 Select a username and password for the member, you can optionally add a thumbnail photo as well. This thumbnail will be used to identify the user in collaboration mode.
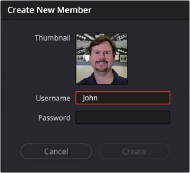
The DaVinci Resolve Project Server Create New Member window
4 Repeat as for as many new users as you want to add.
5 Click the Save button to store the new users, or click Cancel to discard your changes.
1 Click the Members button on the top right of the DaVinci Resolve Project Server.
2 Find the user you want to delete and press the trash can icon in that user’s row. There is no warning dialog for the deletion, and it is not undoable, so make sure you double check that you have selected the correct user.
1 Click the Members button on the top right of the DaVinci Resolve Project Server.
2 To change the user’s role between Administrator and Collaborator use the selection menu.
3 To edit a user’s name and password details select the Pencil icon.
Assigning Members to Specific Project Libraries
Once you have created some members, you can add them to specific project libraries. This lets you have multiple teams of people, working on multiple projects off the same Project Server, without the off chance that they accidentally delete another teams projects, or have access to sensitive material.
1 Open a project library’s details settings by clicking on the “i” icon to the right of its name.
2 Click on the Manage Members button at the bottom of the project library.
3 To add a member, check the box next to their name in the All Members field.
4 To remove a member, click on the “x” next to their name in the Added Members field.
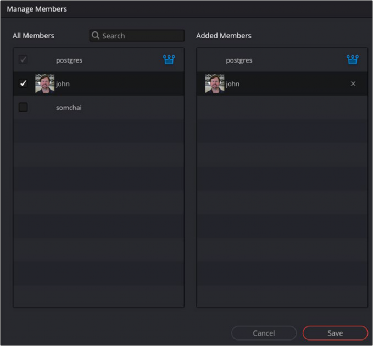
The DaVinci Resolve Project Server Mange Members window
Members added to a project library in this way will be able to log-in using their credentials in the Network Libraries section of the Project Manager in DaVinci Resolve.