< Previous | Contents | Next >
Setting Up DaVinci Remote Monitor
Setting up a Remote Monitor session is easily done from the DaVinci Resolve Studio interface: additionally, the Host and all Clients must have Blackmagic Cloud accounts.
1 The Resolve Host needs to be running the full DaVinci Resolve Studio version of the software.
2 Select Workspace > Remote Monitor.
3 Sign into your Blackmagic Cloud account, if necessary.
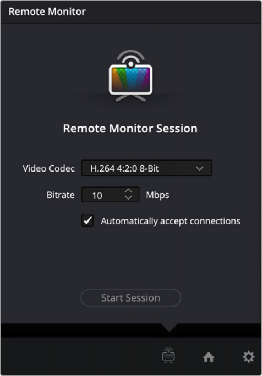
4 In the Remote Monitor Window, select the Video Codec and Bitrate you wish to use for the session. Please note, the Video Codec used must be one that all the client devices support.
For maximum compatibility, H.264 4:2:0 8-bit is a good choice, however accurate color monitoring may necessitate using another 10- or 12-bit codec instead. Bandwidth needs to increase with the number of clients that are connected. While Remote Monitoring over the internet is possible, the best performance will be had with a wired ethernet connection.
The DaVinci Remote Monitor Session Setup
5 Check the “Automatically accept connections” box to let anyone with the Session Code connect directly. If you wish to approve each connection manually, uncheck this box.
6 Click the Start Session button.
7 Copy the generated Session Code from its field, and disseminate it to all the Resolve Clients via email, text message, etc.
At this point your Remote Monitor has started, and a timer will show the duration of the current session. A Remote Monitor icon will appear in the lower right of the DaVinci Resolve interface, and the top of it will turn red to indicate that at least one Client has connected and you are now “live.” A Session Participants field shows you who is currently connected as a Client.
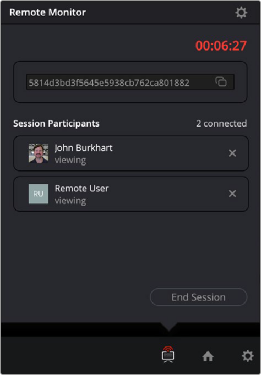
The DaVinci Remote Monitor showing the time connected and the participants involved
1 The Resolve Client needs to have the full DaVinci Resolve Studio version of the software installed, or the iOS app installed.
2 Launch the DaVinci Remote Monitor app on your device. This is found in your DaVinci Resolve folder on your computer where you installed the software.
3 Sign into your Blackmagic Cloud account.
4 Paste the Session Code you received from the Resolve Host into the provided field.
5 Select the Output Device you wish to use for monitoring. This can be a connected computer display, or a Blackmagic Decklink or UltraStudio device for color accurate monitoring.
6 Click the Join button.
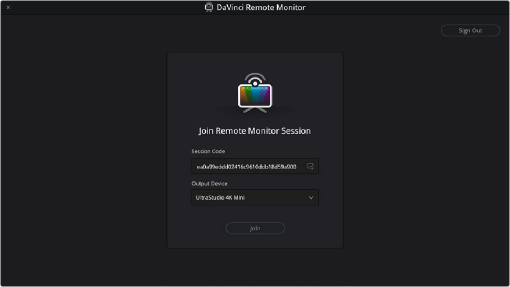
The DaVinci Remote Monitor app Join screen

NOTE: Remote Monitoring uses WebRTC to initiate connections between DaVinci Resolve Studio and multiple clients. However, some heavily restricted network setups may still block the initiation of a session, and a VPN may be required. A wired connection is recommended for the best performance.
NOTE: Remote Monitoring uses WebRTC to initiate connections between DaVinci Resolve Studio and multiple clients. However, some heavily restricted network setups may still block the initiation of a session, and a VPN may be required. A wired connection is recommended for the best performance.
NOTE: Remote Monitoring uses WebRTC to initiate connections between DaVinci Resolve Studio and multiple clients. However, some heavily restricted network setups may still block the initiation of a session, and a VPN may be required. A wired connection is recommended for the best performance.
At this point your Remote Monitor window will appear, and you will see and hear the output of the current viewer of the Resolve Host as they work.
1 Click on the DaVinci Remote Monitor icon in the lower right of the interface.
2 Click on the End Session button to stop the Remote Monitor for all users, or click on the X next to the name of a Client to disconnect the session for that user only.
1 Make the DaVinci Remote Monitor app active (not the Remote Monitor window).
2 Click on the Leave button to end your session.
1 Click on the DaVinci Remote Monitor icon in the lower right of the interface.
2 Click on the Settings icon in the upper right of the Remote Monitor window.
3 Select a new Codec and Bitrate for the video stream.
4 Click on the Save button.
This will change the streaming settings to the new codec and bitrate that you chose. Existing Clients will be automatically reconnected to the new stream without having to do anything on their end.
This lets you easily change the quality of the video stream on the fly to compensate for bandwidth and hardware issues.