< Previous | Contents | Next >
The CineForm codec itself encodes full-frame image data using wavelet compression, at any resolution, at up to 12-bits, in a choice of RGB, Y’CbCr, or RAW color spaces. DaVinci Resolve is compatible with CineForm in a QuickTime wrapper using any supported color space, allowing access to the dual streams of image data that are provided.
When the time comes to output your program, keep in mind that while DaVinci Resolve can read CineForm files, CineForm files cannot be rendered out of DaVinci Resolve unless you’ve purchased an encoding license for OS X or Windows from GoPro. Furthermore, DaVinci Resolve cannot render Stereoscopic CineForm files.
![]()
If you import stereo CineForm clips to the Media Pool, they will at first appear to be regular non-stereo clips that output a single image. However, these can easily be converted to stereo 3D clips using the following procedure.
1 Import the CineForm media to the Media Pool as you would any other clips.
2 Select the CineForm media you need to convert, then right-click the selection and choose “Convert to Stereo” from the contextual menu. Those clips will now appear with a stereo 3D badge to indicate that they’re stereo.
Creating Stereo 3D Clips From Separate Files
If you’re working with stereo media that was either captured or created as individual left- and right-eye files, then you need to convert each matching pair of clips into the stereo 3D clips that you’ll need to work in DaVinci Resolve. This is a two-step procedure.
Step 1—Import and Organize Your Media
You need to import all of the left-eye and right-eye media into separate bins.
1 Open the Media page, and create three Media Pool bins named “Left,” “Right,” and “Stereo Clips.” The exact names are not important, but the way the media is organized is.
2 Import all left-eye media into the “Left” bin, and all right-eye media into the “Right” bin. If you’re importing stereoscopic Cineform media, you still need to create this kind of organization, which requires you to place duplicates of each clip into each of the “Left” and “Right” bins.
Step 2—Generate 3D Stereo Clips
Once you’ve organized your media appropriately, you’re set up to synchronize the left- and right-eye clips using timecode.
1 Create a new bin in the Media Pool, and name it “Stereo Clips.” This is the bin that will eventually contain the linked stereo clips you’re about to create.
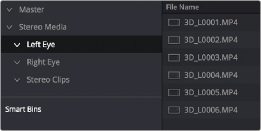
How to organize media for working in stereo 3D
![]()
2 Right-click anywhere within the Media Pool and choose Stereo 3D Sync.
The Stereo 3D Sync dialog appears, with buttons for choosing the left-eye folder, choosing the right-eye folder, choosing the output folder, and checkboxes for specifying whether to match reel names and file names, and additional fields for entering characters that identify left- and right-eye clips.
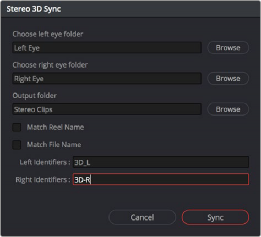
The Stereo Media Sync window
3 Click the Browse button corresponding to “Choose left eye folder” and then use the hierarchical list of bins that appears to choose the bin you named “Left.” Follow the same procedure to choose the right-eye media.
4 Click the Browse button corresponding to “Output folder” and then use the hierarchical list of bins that appears to choose the bin you named “Stereo Clips.”
5 Choose which matching criteria to use. Ideally, you only need to use whichever one of the three criteria that apply. The three options are:
— Match Reel Name: If the reel names of the left- and right-eye media match, turn this checkbox on.
— Match File Name checkbox: If the file names of the left- and right-eye media match, turn this checkbox on.
— Left Identifiers and Right Identifiers fields: If the left- and right-eye clips are identified by a special subset of characters within the file name (for example, “3D_R” and “3D_L”), then you can type each into the appropriate field, and these characters will be used to match the left and right eyes together.
6 Click Sync.