< Previous | Contents | Next >
Organizing and Grading Stereo 3D Dailies
![]()
A common workflow is the creation of digital dailies within DaVinci Resolve before editing in an NLE. This provides the editors, director, and producers with the advantage of having more attractive media to work with, that’s also more comfortable to view if handled with the automatic geometry and color- matching functions that match the media of each pair of shots together for a preliminary left- and right-eye balance. The resulting Timelines can then be output to whichever media format is most convenient to use.
Step 1—Create 3D Stereo Clips
The very first step in the process of creating dailies is to import all of the left-eye and right-eye media into individually organized bins, and to then link them together to create stereo 3D clips, as described in the previous section.
Step 2—Edit the New Stereo Clips
Into One or More Timelines for Grading
Now that you’ve created a set of Stereo 3D clips, you’re ready to edit them into one or more Timelines for grading. You can do this by simply creating a new Timeline and deselect the Empty Timeline checkbox. A new Timeline will be created with the stereo 3D clips you created.
Step 3—Align Your Media
For the stereoscopic effect to work without causing headaches, it’s critical that both eyes are aligned. This can be tricky to adjust using manual controls, but is something that can be automatically analyzed. You can perform stereo 3D alignment to a single clip using the Stereo 3D Palette controls, or you can select a range of clips to align all of them automatically at once. There are two methods of alignment; which is more appropriate depends on the type of geometry issues you have to address.
— Transform Alignment: Analyzes the image and makes vertical and rotational adjustments to line up the left- and right-eye images as closely as possible.
— Vertical Skew: Analyzes the images and makes a vertical-only adjustment to line up the left- and right-eye images.

Controls for aligning the left- and right-eye media
Step 4—Grading Stereo Media
Grade the clips in the Timeline as you would any other digital dailies, with the sole addition of using the controls in the Stereo 3D palette to control monitoring and manage the adjustments made to each eye as necessary. The currently selected eye will be reflected in the video scopes.
As when creating any other kind of dailies, you can use LUTs, the Timeline Grade, and individual clip grading to make whatever adjustments are necessary to create useful media for editing.
Grading Windows
If you’re using windows, The Color group of the General Options panel of the Project Settings has a checkbox called “Apply stereoscopic convergence to windows and effects” that correctly maintains the position of a window that’s been properly placed over each eye when convergence is adjusted.
![]()
![]()
You must turn on a checkbox in the Project Settings to enable stereo convergence for windows
When this option is enabled, the Window palette displays an additional Transform parameter, “Convergence,” that lets you create properly aligned convergence for a window placed onto a stereoscopic 3D clip.
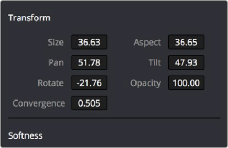
The Convergence control in the Transform section of the Window palette
After placing a window over a feature within the image while monitoring one eye, you can enable Stereo output in the Stereo 3D palette and use the Pan and Convergence controls to make sure that window is properly stereo-aligned over the same feature in both eyes. At that point, adjusting the Convergence control in the Stereo 3D palette correctly maintains the position of the window within the grade of each eye.
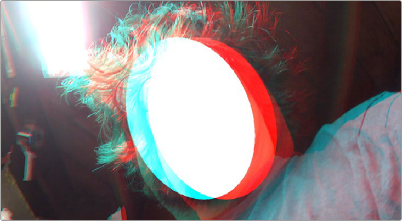
A convergence-adjusted window in stereo