< Previous | Contents | Next >
— Left button: Displays the left-eye image and grade.
— Ripple Link button: When enabled (orange), all changes you make to the grade of the currently selected eye are automatically copied to the correspondingly opposite eye. When disabled (gray), grades made to the currently selected eye are made independently.
— Right button: Displays the right-eye image and grade.
You can also choose which eye you’re viewing and grading by right-clicking a clip’s thumbnail and choosing Stereo 3D > Switch Eye or by choosing View > Switch Eye To > Left Eye or Right Eye.
![]()
Using Ripple Link When Grading Stereo 3D Clips
You would turn Ripple Link off to suspend rippling when you want to make an individual adjustment to the grade of one eye to obtain a better match between the two. When you’re finished matching the two clips, you can turn it back on to resume automatic grade rippling.

IMPORTANT: Regardless of whether or not Ripple Link is enabled, local versions created for one stereo 3D-identified clip are automatically available to the paired timeline.
IMPORTANT: Regardless of whether or not Ripple Link is enabled, local versions created for one stereo 3D-identified clip are automatically available to the paired timeline.
IMPORTANT: Regardless of whether or not Ripple Link is enabled, local versions created for one stereo 3D-identified clip are automatically available to the paired timeline.
Stereo 3D grade rippling is always relative, so differences between the grades that are applied to the left- and right-eye clips are preserved. In fact, when you add or remove nodes to or from one eye, the same nodes are automatically added to or removed from the corresponding clip it’s paired with, regardless of whether or not Ripple Linked is enabled.
Stereo 3D Geometry Controls
The next group of parameters lets you adjust the geometry of stereo 3D clips. The Pan, Tilt, and Zoom controls are provided as a convenience, and simply mirror the same parameters found in the Transform palette’s Input mode, but made specific to the geometry of the left- and right-eye media. Convergence, Pitch, and Yaw are the three parameters that are unique to the Stereo 3D palette.
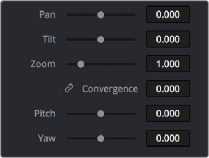
Stereoscopic 3D Geometry controls
— Convergence: Adjusts the disparity between the left and right eyes, to define the point of convergence (POC), or the region within the image where the left- and right-eye features are in perfect alignment. If necessary, Convergence can be animated using the Stereo Format parameter group in the Sizing track of the Keyframe Editor. If you want to adjust convergence in pixels, open the Stereo 3D palette option menu, and turn on “Show convergence in pixels.”
Features that overlap perfectly in both right- and left-eye clips are at zero parallax, putting that feature’s depth at the screen plane. Matching features that are divergent in the left- and right-
eye clips have increasingly positive parallax, and appear to be farther away from the audience. Matching features that are divergent and reversed in the left- and right-eye clips have increasingly negative parallax, and appear to be closer to the audience than the screen plane.
— Linked Zoom button: When enabled (white), both the left- and right-eye clips are automatically zoomed whenever Convergence is adjusted so that both eyes always fill the screen. When disabled (gray), changes to Convergence will cause the opposing left and right edges of each eye’s clip to have blanking intrude.
— Pitch: Pivots the image around the horizontal center plane of the frame.
![]()
— Yaw: Pivots the image around the vertical center plane of the frame.
Sizing Repositioning in Stereo 3D

WARNING: It is not advisable to use the Rotate parameter when transforming stereo 3D clips. Geometrically, rotation tilts a stereo pair of clips inappropriately, and ruins the “side- by-side” convergence that’s necessary to create the stereoscopic illusion.
WARNING: It is not advisable to use the Rotate parameter when transforming stereo 3D clips. Geometrically, rotation tilts a stereo pair of clips inappropriately, and ruins the “side- by-side” convergence that’s necessary to create the stereoscopic illusion.
WARNING: It is not advisable to use the Rotate parameter when transforming stereo 3D clips. Geometrically, rotation tilts a stereo pair of clips inappropriately, and ruins the “side- by-side” convergence that’s necessary to create the stereoscopic illusion.
Generally, you’ll want to reposition stereo 3D clips with Ripple Link turned on, but you may occasionally find yourself needing to make a manual adjustment to one eye in particular with Ripple Link disabled. As with color adjustments, Sizing adjustments made with Ripple Link disabled are only applied to the clip in the current Timeline. When Ripple Link is turned on, all Sizing adjustments are automatically copied to the correspondingly numbered shot of the other stereo 3D timeline.
Protecting Stereo Adjustments When Copying Grades
Each version of a grade has independent stereo adjustments stored along with the Sizing settings. To prevent accidental overwrite of convergence and alignment data when copying grades from one clip to another, you can right-click within the Gallery and choose one of the following options to turn them on:
— Copy Grade: Preserve Convergence
— Copy Grade: Preserve Floating Windows
— Copy Grade: Preserve Auto Align

TIP: Stereo 3D and Sizing settings are processed before node-based corrections in the DaVinci Resolve image processing pipeline.
TIP: Stereo 3D and Sizing settings are processed before node-based corrections in the DaVinci Resolve image processing pipeline.
TIP: Stereo 3D and Sizing settings are processed before node-based corrections in the DaVinci Resolve image processing pipeline.
When enabled, these options let you overwrite a clip’s grade without overwriting specific Stereo 3D parameters.