< Previous | Contents | Next >
The Media Page can be customized to create more room in different areas to accommodate specific tasks.
— Drag the vertical or horizontal border between any two panels to enlarge one and shrink the other.
— To toggle the Clone Tool on and off: Click the Clone Tool button in the UI toolbar at the top.
![]()
— To toggle the Audio Panel on and off: Click the Audio button in the UI toolbar at the top.
— To toggle the Metadata Editor on and off: Click the Metadata button in the UI toolbar at the top.
— To toggle the Media Storage browser folder list on and off: Click the button at the top-left corner of the Media Browser.
— To toggle the Media Pool Bin list on and off: Click the button at the top-left corner of the Media Pool.
— To add a favorite: Right-click any folder in the Media Storage browser folder list, and choose “Add folder to favorites” from the contextual menu.
— To remove a favorite: Right-click the favorite you want to remove, and choose “Remove folder from favorites” from the contextual menu.
— Choose Workspace > Reset UI Layout.
Undo and Redo in DaVinci Resolve
No matter where you are in DaVinci Resolve, Undo and Redo commands let you back out of steps you’ve taken or commands you’ve executed and reapply them if you change your mind.
DaVinci Resolve is capable of undoing the entire history of things you’ve done since creating or opening a particular project. When you close a project, its entire undo history is purged. The next time you begin work on a project, its undo history starts anew.
Because DaVinci Resolve integrates so much functionality in one application, there are three separate sets of undo “stacks” to help you manage your work.
— The Media, Cut, Edit, and Fairlight pages share the same multiple-undo stack, which lets you backtrack out of changes made in the Media Pool, the Timeline, the Metadata Editor, and the Viewers.
— Each clip in the Fusion page has its own undo stack so that you can undo changes you make to the composition of each clip, independently.
— Each clip in the Color page has its own undo stack so that you can undo changes you make to grades in each clip, independently.
In all cases, there is no practical limit to the number of steps that are undoable (although there may be a limit to what you can remember). To take advantage of this, there are three ways you can undo work to go to a previous state of your project, no matter what page you’re in.
— Choose Edit > Undo (Command-Z) to undo the previous change.
— Choose Edit > Redo (Shift-Command-Z) to redo to the next change.

TIP: If you have the DaVinci control panel, there is one other control that lets you control the undo stack more directly when using the trackballs, rings, and pots. Pressing RESTORE POINT manually adds a memory of the current state of the grade to the undo stack.
Since discrete undo states are difficult to predict when you’re making ongoing adjustments with the trackball and ring controls, pressing RESTORE POINT lets you set predictable states of the grade that you can fall back on.
— On the DaVinci control panel, press the UNDO and REDO buttons on the T-bar panel.
![]()
You can also undo several steps at a time using the History submenu and window. At the time of this writing, this only works for multiple undo steps in the Media, Cut, Edit, and Fairlight pages.
1 Open the Edit > History submenu, which shows (up to) the last twenty things you’ve done.
2 Choose an item on the list to undo back to that point. The most recent thing you’ve done appears at the top of this list, and the change you’ve just made appears with a check next to it. Steps
that have been undone but that can still be redone remain in this menu, so you can see what’s possible. However, if you’ve undone several changes at once and then you make a new change, you cannot undo any more and those steps disappear from the menu.

The History submenu, which lets you undo several steps at once
Once you’ve selected a step to undo to, the menu closes and the project updates to show you its current state.
1 Choose Edit > History > Open History Window.
![]()
2 When the History dialog appears, click an item on the list to undo back to that point. Unlike the menu, in this window the most recent thing you’ve done appears at the bottom of this list. Selecting a change here grays out changes that can still be redone, as the project updates to show you its current state.
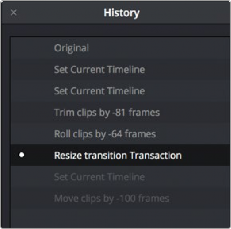
The Undo history window that lets you browse the entire available undo stack of the current page
3 When you’re done, close the History window.