
< Previous | Contents | Next >
1 Create a Smart Bin in one of the following categories: Keywords, Shot, or Scene.
2 Select all of the clips that you want to apply the Smart Bin property to.
3 Drag those clips from the Media Pool and drop them on top of the Smart Bin.
NOTE: Dragging and dropping clips to assign Smart Bin properties only works with the Automatic Smart Bin Keywords, Shot, or Scene categories. Dragging clips to any other Smart Bin will have no effect.
NOTE: Dragging and dropping clips to assign Smart Bin properties only works with the Automatic Smart Bin Keywords, Shot, or Scene categories. Dragging clips to any other Smart Bin will have no effect.
NOTE: Dragging and dropping clips to assign Smart Bin properties only works with the Automatic Smart Bin Keywords, Shot, or Scene categories. Dragging clips to any other Smart Bin will have no effect.
![]()
For example, you could make a smart bin with the Keyword: “Sunset.” That bin would automatically show up under the Keywords category in the Smart Bins. Then you could select all the sunset shots in your Media Pool, and drag them on top of that bin to apply the “sunset” keyword to all the clips at the same time.
Manual Smart Bin Creation
It’s easy to manually create Smart Bins with customized rules to filter very specific collections of media and timelines that you want to use.
— Choose Show Smart Bins from the Media Pool option menu to toggle the visibility of all Smart Bins on and off.
1 If necessary, open the Bin list, choose Show Smart Bins from the Media Pool option menu, then right-click anywhere in the background of the Smart Bin area of the Bin list, and choose Create Smart Bin.
2 In the Create Smart Bin dialog, enter a name for the filter, and use the following controls to create one or more filter criteria (you can have as many filter criteria as you like):
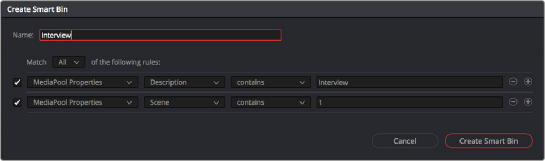
The Create Smart Bin dialog
— Show in all projects checkbox: Lets you create a persistent Smart Bin that appears in all projects in your project library. Smart Bins created this way will be found in the User Smart Bins folder inside every project’s Smart Bin area in the Media Pool.
— Match options: For multi-criteria filtering, choosing All ensures that every single criteria you specify is met for a clip to be filtered. Choosing Any means that if only one out of several criteria is met, that clip will be filtered.
— Filter criteria enable checkbox: Lets you enable or disable any criteria without having to delete it.
![]()
— Metadata category drop-down: Lets you choose which category of metadata you want to select a criteria from. Each category of metadata that’s available in the Metadata Editor is available from this drop-down menu. Additionally, Color Timeline Properties (containing many properties unique to the Color page timeline) and Media Pool Properties (containing every column in the Media Pool) provide access to additional metadata you can use for filtering.
— Metadata type drop-down: For choosing which exact type of metadata to use, of the options available in the selected metadata category.
— Metadata criteria drop-down: Lets you choose the criteria by which to filter, depending on the metadata you’ve selected. Options include “true/false,” integer ranges, date ranges, string searches, flag and marker colors, et cetera.
— Add filter criteria button: Lets you add additional criteria to create multi-criteria filters. You could use multiple criteria to, for example, find all exterior clips, that also contain the keyword “Sunset,” that aren’t closeups, in order to find all the exterior long and medium shots in sunset lighting. Additionally, if you Option-click this button, you can add a nested match option in order to create even more sophisticated filters, such as when the filter must match all of one set of criteria, and any of another set of criteria.

A complicated Smart Bin with multiple criteria and a second match option setting
As you’re editing the filter criteria, the thumbnail timeline automatically updates to show you how the Smart Bin you’re creating is working.
3 When you’re done editing the filter criteria, click Create Smart Bin. The resulting Smart Bin appears in the Smart Bin area of the Bin list, at the left of the Media Pool’s browser area.
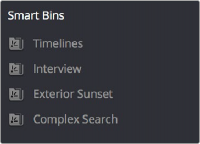
Once you’ve created a Smart Bin, it appears in the lower half of the Media Pool’s Bin list, alongside every other Smart Bin in that project. This keeps them organized, separate from the manually created bin shown above.
![]()
All Smart Bins appear together at the bottom of the Media Pool’s Bin list
Once you’ve created a Smart Bin, you can re-edit it whenever the situation requires.
— To rename a Smart Bin: Right-click the Smart Bin you want to rename, choose Rename from the contextual menu, enter a new name, and press Return.
— To edit a Smart Bin: Double-click the Smart Bin, then edit the filter criteria, and click OK.
— To duplicate a Smart Bin: Right-click any Smart Bin and choose Duplicate from the contextual menu. This is a good way to create multiple variations of a Smart Bin that you created with complex rules, where you need to create variations by modifying those rules without needing to reinvent the wheel each time.

Smart Bins Work Better With Metadata
Keep in mind that the more metadata you associate with each clip, the more methods you have at your disposal for creating custom Smart Bins (for editing) and Smart Filters
(for grading) with which to zero in on the clips you need for any given situation. This will not only make it easier to find what you need, but it’ll help you to work faster. At the very least, it would be valuable for you to use the Metadata Editor to add information to each clip such as a Description, Shot and Scene designations, take information, and possibly some useful keywords such as character names, shot framing, interior or exterior keywords, and so on.
For example, if you’ve entered enough metadata, then you can create multi-criteria Smart Bins or Smart Filters that let you find the equivalent of “every close-up of Sally inside the diner,” or “every long shot of Antonio outside in the parking lot.” In a documentary, you could easily isolate “every interview shot of Louis from camera 1,” or “every B-roll clip with Robyn.” All of this will help you find media faster for editing, or quickly isolate similar clips that you need to match together for grading.
For more information about using the Metadata Editor, see Chapter 19, “Using Clip Metadata.”
— To delete a Smart Bin: Right-click the Smart Bin you want to delete, choose Delete Smart Bin from the contextual menu, and click Delete in the warning dialog. Deleting a Smart Bin does not delete any gathered media associated with that bin.