< Previous | Contents | Next >
When multiple Media Pool windows are open, the Workspace > Media Pool Windows submenu lets you bring a floating Media Pool window into focus when you have one or more open and hidden.
This is most useful when you have two displays connected to your workstation, as you can drag these separate bins to the second display while DaVinci Resolve is in single screen mode. If you hide the Bin list, not only do you get more room for clips, but you also prevent accidentally switching bins if you really want to only view a particular bin’s contents in that window.
Using the Media Pool in Thumbnail View
![]()
If you work in Thumbnail view using the controls at the top right of the Media Pool, you have the option to resize the thumbnails to make them easier to see, and you can move the mouse pointer over each clip to hover scrub through its contents. Clicking any clip to select it displays it in the Media page Viewer. Whichever clip is currently selected is also output to video for monitoring.
In Thumbnail view, you can use the Sort Order drop-down, at the top right of the Media Pool, between the Icon Size slider and the Icon/List view buttons, to choose how clips are sorted. There are fourteen options: File Name, Reel Name, Clip Name, Start TC, Duration, Type, FPS, Audio Ch, Flags, Date Modified, Date Created, Shot, Scene, and Take.
Working With Columns in List View
If you work in List view using the controls at the top right of the Media Pool, you gain additional organizational control by exposing columns that show the metadata that each clip contains, prior to media being added to your timeline. You can use these columns to help organize your media.
— To show or hide columns: Right-click at the top of any column in the Media Pool to reveal the column list, and while the column list is open, click the checkboxes of any columns you want to show or hide. Unchecked columns cannot be seen. When you’re finished, click anywhere else in the Media Pool to dismiss the column list.
— To rearrange column order: Drag any column header to the left or right to rearrange the column order.
— To resize any column: Drag the border between any two columns to the right or left to narrow or widen that column.
— To sort by any column: Click the column header you want to sort with. Each additional time you click, the same header toggles that column between ascending and descending sort order.
Once you’ve customized a column layout that works for your particular purpose, you can save it for future recall.
— To create a column layout: Show, hide, resize, and rearrange the columns you need for a particular task, then right-click any column header in the Media Pool, and choose Create Column Layout. Enter a name in the Create Column Layout dialog, and click OK.
— To recall a column layout: Right-click any column header in the Media Pool, choose the name of the column layout you want to use from the contextual menu, and choose Load from that item’s submenu. All custom column layouts appear at the top of the list.
— To edit a column layout: Load the column layout you want to edit, make whatever changes you need to, then right-click any column header in the Media Pool, choose the name of the column layout you just edited from the contextual menu, and choose Update from that item’s submenu.
— To delete a column layout: Right-click any column header in the Media Pool, choose the name of the column layout you want to delete from the contextual menu, and choose Delete from that item’s submenu.
![]()
While the available columns of metadata correspond to those fields shown in the Metadata Editor, the available columns in the Media Pool of the Media and Edit pages are a subset of the total amount of metadata that’s available, although they represent the most commonly used metadata you’ll find yourself referring to when editing and finishing.
The available columns in List view include:
Angle: An editable field to contain the angle of the media in a multi-camera shoot. |
Audio Bit Depth: The bit depth of any audio channels in the media file. |
Audio Ch: The total number of audio tracks in the media file. |
Audio Codec: The specific codec used by the audio portion of the media file. |
Audio Offset: Lists the audio offset, in frames, for clips that have been synchronized to separately recorded audio. This parameter is editable in the Media Pool. |
Bit Depth: The bit depth of the media file. |
Camera #: The number assigned to a specific camera. |
Clip Color: The current color assigned to that clip. |
Clip Name: Editing the Clip Name lets you change the name with which clips appear throughout DaVinci Resolve when View > Use Clip Name for Clip Titles is enabled. By default, the clip name mirrors the source clip’s file name. When editing the clip name in the List view of the Media Pool, you can use “metadata variables” that you can add as graphical tags that let you reference clip metadata. For example, you could add the corresponding metadata variable tags %scene_%shot_%take and that clip would display “12_A_3” as its name if “scene 12,” “shot A,” “take 3” were its metadata. The clip name can also be edited in the Clip Attributes window. For more information on the use of variables, as well as a list of all variables that are available in DaVinci Resolve, see Chapter 16, “Using Variables and Keywords.” |
Comments: A user-editable field for entering information about that clip. |
Data Level: The data level setting for the media file. |
Date Created: The date the media file was created. |
Date Modified: The last date the media file was modified. |
Description: A user-editable field for entering information about that clip. |
Duration: The total duration of the clip, in timecode. |
End: The last frame number of the media file. |
End TC: The timecode value of the last frame in the media file. |
FPS: The frame rate of the media file. |
File Name: The name of the file on disk that clip is linked to. |
File Path: The file path where that media file is located on disk. |
Flags: Which flags, if any, have been added to a media file. |
Format: The image format used by that clip, such as QuickTime, MXF, WAVE, and so on. |
Frame/Field: Whether that media file is progressive or interlaced. |
Frames: The total duration, in frames. |
Good Take: An editable field to contain the circled state of media, relative to the script supervisor’s notes. |
H-FLIP: Whether that media file is horizontally flipped in DaVinci Resolve. |
HDRX: Only displayed for R3D media, indicates whether or not it’s HDRX media. |
IDT: If ACES color science is selected in the Color Management panel of the Project Settings, the IDT used by that clip is listed here. |
In: The timecode value of the In point, if any, that’s stored for that clip. |
Input Color Space: If Resolve Color Management is selected in the “Color Science” menu of the Color Management panel of the Project Settings, then this column will show the Input Color Space that has been assigned to each clip. By default, all clips inherit the Input Color Space setting that’s been selected in the Color Management panel of the Project Settings. |
Input LUT: Which input Lookup table has been assigned, if any. |
Input Sizing Preset: The currently selected Input Format Preset, if there is one. |
Keyword: A user-editable field for entering searchable keywords pertaining to that clip. Only shows clip keywords, not marker keywords. |
Offline Reference: Lists the offline reference video that has been assigned to a given timeline. |
Optimized Media: Populated with the resolution of whatever optimized media you’ve created (Original, Half, Quarter, and so on). Clips that have not been optimized appear with “None.” |
Out: The timecode value of the Out point, if any, that’s stored for that clip. |
PAR: The pixel aspect ratio, if assigned. |
Reel Name: The reel name of that clip. Dynamically generated by the “Assist using reel names from the” setting in the General Options panel of the Project Settings. |
Resolution: The frame size of the media file. |
Roll/Card: An editable field to contain the roll number of media that was scanned from film. |
![]()
S3D Sync: Shows a frame count when you slip an eye to fix non-synced timecode using the “Slip Opposite Eye One Frame Left/Right” commands. This parameter is editable in the Media Pool. |
Sample Rate: The sample rate of the media file’s audio, if there is any. |
Scene: An editable field to contain the scene number of the media, relative to the script. |
Shot: An editable field to contain the shot number of the media, relative to the scene. |
Slate TC: The Slate timecode track used to sync audio with video. |
Start: The first frame number of the media file. |
Start KeyKode: The starting KeyKode value of a scanned negative. |
Start TC: The timecode value of the first frame in the media file. |
Take: An editable field to contain the take number of the media, relative to the shot. |
Type: The type of item, such as Video+Audio, Video, Audio, Timeline, Multicam, Still, and so on. |
Usage: After a timeline has been created by importing an AAF, EDL, or XML project, the Usage column automatically reflects how many times each clip is used in the project. This makes it easy to identify clips that aren’t in use, and which can be removed from the Media Pool. |
V-FLIP: Whether that media file is vertically flipped in DaVinci Resolve. |
Video Codec: The specific codec used by the video portion of the media file. |
![]()
Editable Description and Comments Columns
When the Description and Comments columns are displayed by the Media Pool in List view, you can edit their contents by clicking once within a clip’s Description or Comments field, waiting a moment, and then clicking a second time to select that field.
Using Metadata View in the Media Pool
In the Metadata View mode, each clip is represented by its own card with a thumbnail and basic clip metadata information visible. This view is designed to have more metadata information than a thumbnail but more targeted information than the List view. This feature, combined with its sort modes, is a powerful way to organize and reorganize your clips in the Media Pool.
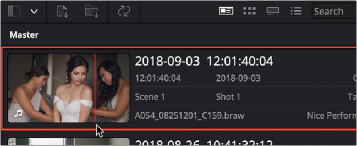
— Thumbnail: A scrubbable thumbnail image of your clip.
— Row 1: A main description field that is variable and determined by the sort order selection.
— Row 2: Start Timecode, Date Created, Camera #.
— Row 3: Scene, Shot, Take.
— Row 4: Clip Name, Comment.
![]()
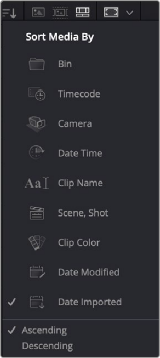
The Media Sort options The Metadata View icon view (highlighted icon in the top bar),
showing the thumbnail being scrubbed next to the clip’s metadata
The strength of the Metadata view is the automatic clustering of your clips based on the sort order you choose in the Media Pool Sort By menu, at the very upper-right corner of the Media Pool.
Each different sort mode changes the main description field on the card, as well as re-arranging the Media Pool to reflect the selected organization method.
— Bin: This mode clusters the clips by bin, changes the main description field to clip name, and orders the list by timecode.
— TImecode: This mode clusters the clips by creation date, changes the main description field to creation date and start timecode, and orders the list by timecode.
— Camera: This mode clusters the clips by camera #, changes the main description field to camera # and start timecode, and orders the list by timecode.
— Date Time: This mode clusters the clips by day, changes the main description field to creation date and file name, and orders the list by timecode.
— Clip Name: This mode clusters the clips by the first letter of the clip name in alphabetical order, changes the main description field to clip name, and orders the list by timecode.
— Scene, Shot: This mode clusters the clips by scene, changes the main description field to scene-shot-take, and orders the list by scene-shot-take.
— Clip Color: This mode clusters the clips by clip color name, changes the main description field to creation date and start timecode, and orders the list by timecode.
— Date Modified: This mode clusters the clips by day, changes the main description field to creation date and file name, and orders the list by the last time the clip was modified by the OS filesystem.
— Date Imported: This mode clusters the clips by day, changes the main description field to creation date and file name, and orders the list by the date the clip was added to the Media Pool.
— Ascending: Orders the Media Pool from lowest numerical value to highest, and alphabetically from A to Z.
![]()
— Descending: Orders the Media Pool from highest numerical value to lowest, and alphabetically from Z to A.
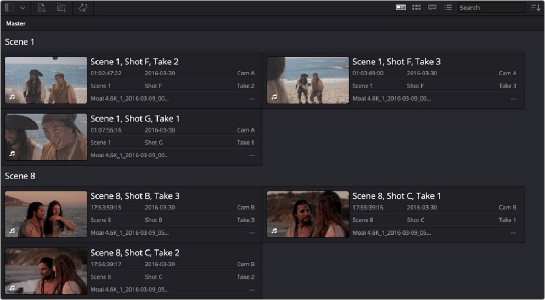
The Metadata view with clips sorted by Scene-Shot-Take

The Metadata view with the same clips sorted by Camera