< Previous | Contents | Next >
Whether you’ve imported media in preparation for editing, or you’ve imported a project for grading that resulted in media being imported automatically, once you’ve added clips to the Media Pool, it would behoove you to consider taking the time to review and add metadata to your clips.
![]()
At the very least, it would be valuable for you to use the Metadata Editor that’s available in either the Media page or the Edit page to add information to each clip such as a Description, Shot and Scene designations, Take information, and possibly some useful keywords such as Character Names, Shot Framing, Interior or Exterior keywords, and so on. If you’re especially ambitious (or you have a very responsible assistant), you could go further and add Shoot Day, Camera Type, Audio Notes, and other valuable information. Much of the metadata that is useful in the day to day work of editing and grading can be found in the Shot & Scene group, but there are many other potentially useful groups as well that you should explore.
Keep in mind that the more metadata you associate with each clip, the more methods you have at your disposal for creating custom Smart Bins (for editing) and Smart Filters (for grading) with which to zero in on the clips you need for any given situation. This will not only make it easier to find what you need, but it’ll help you to work faster.
For example, if you’ve entered enough metadata, then you can create multi-criteria Smart Bins or Smart Filters that let you find the equivalent of “every close-up of Sally inside the diner,” or “every long shot of Antonio outside in the parking lot.” In a documentary, you could easily isolate “every interview shot of Louis from camera 1,” or “every B-roll clip with Robyn.” All of this will help you to find media faster for editing, or to quickly isolate similar clips that you need to match together for grading.
Automatically Imported Metadata
In many instances, metadata is also imported along with the media you’ve added to the Media Pool. For example, media recorded on BMD cameras may have had a variety of metadata entered into the camera or automatically generated by the camera, and this metadata is automatically available in the Metadata Editor. Similarly, Broadcast WAVE files can have quite a bit of metadata entered at the
time of recording, such as scene and take numbers and channel names describing each microphone. Still images are imported with EXIF metadata. In all cases, available metadata is imported along with the media and exposed in the Metadata Editor to facilitate workflows where valuable organizational metadata is being entered on set during the shoot or immediately after ingest.
Using the Metadata Editor
Whenever you select a clip in the Media Pool, its editable metadata appears in the appropriately named Metadata Editor (so long as it’s displayed). You can use this editor to further massage the metadata of the clips in a project, adding information on set that will be of help later during editing and finishing.
By default, clips initially appear with a set of clip metadata called “Clip Details,” that shows some of the most fundamental details of the clip such as start and end timecode, duration, bit depth, and so on.
Because there are so very many metadata fields that are available, two drop-down menus at the top right of the Metadata Editor let you change which set of metadata is displayed.
— Metadata Presets (to the left): If you’ve used the Metadata panel of the User Preferences to create your own custom sets of metadata, you can use this drop-down to choose which one to expose. Surprisingly enough, this is set to “Default” by default.
![]()
— Metadata Groups (to the right): This drop-down menu lets you switch among the various groups of metadata that are available, grouped for specific tasks or workflows.
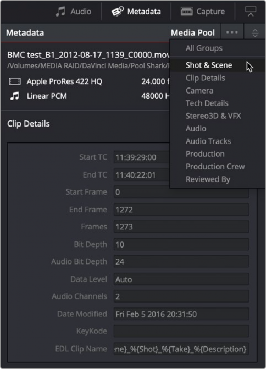
Metadata categories drop-down menu
If you want to see a list of every piece of metadata in a clip, you can choose All Groups. Otherwise, you can choose any set of metadata to narrow your focus to just those items of information.
Select any clip in the Media Pool, and edit whatever metadata fields you require. The edited metadata is immediately saved.
1 Choose a metadata set using the drop-down menu in the Metadata Editor.
2 Select multiple clips in the Media Pool by Shift-clicking, Command-clicking, or dragging a bounding box around them.
3 Edit whichever metadata fields you want to. Checkboxes are automatically turned on for any metadata fields you edit.
4 When you’re done, click the Save button at the bottom of the Metadata Editor. When you’ve edited metadata for multiple clips at once, you’ll be prompted to save your changes if you create a new selection in the Media Pool without clicking the Save button first.