< Previous | Contents | Next >
Switching Between File Names and Clip Names
Since different tasks require different information, you have the ability to switch between using clip file names and clip names. For example, finishing editors will probably have more reason to refer to the file name of each clip, making it easier to troubleshoot problems with reconforming and relinking. Creative editors, on the other hand, will want to use easier-to-read clip names to make it easier to find what they need.
![]()
— Choose View > Show File Names to toggle between both naming conventions.
Using Metadata to Define Clip Names
If you’re an enthusiastic user of clip metadata (and you should be), you can use “metadata variables” that you can add into a field that let you reference other metadata for that clip. For example, you could add the combination of variables and text seen in the following screenshot to define a clip name automatically. Variables, once they’ve been entered, are represented as graphical tags shown with a background, while regular text characters that you enter appear before and after these tags.
![]()
Variables and text characters entered to create a clip name based on a clip’s metadata
As a result, that clip would display “12_A_3” as its name if scene “12,” shot “A,” and take “3” were its metadata. When you do this, you can freely mix metadata variables with other characters (the
underscore, as in the example above) to help format the metadata to make it even more readable.
Every single item of metadata that’s available in the Metadata Editor can be used as a variable, and several other clip and timeline properties such as the version name of a clip’s grade, a clip’s EDL event number, and that clip’s timeline index number can be also referenced via variables.
Since the use of metadata variables is a great way to automatically generate names for multiple clips, you may find it more useful to add metadata variable-driven clip names by selecting all of the clips you want to edit, and opening the Clip Attributes window. By editing the Clip Name field found in the Name panel, you can add a single clip name to all selected clips at once.
1 Type the percentage sign (%) and a scrolling list appears showing all variables that are available.
2 To find a specific variable quickly, start typing the characters of that variable’s name and this list automatically filters itself to show only variables that contain the characters you’ve just typed.
3 Choose which variable you want to use using the Up and Down Arrow keys, and press Return to choose that variable to add.
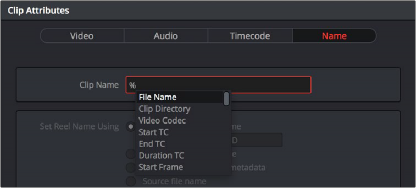
![]()
The variable list that appears when you type the % character
As soon as you add one or more metadata variables to a clip’s Clip Name column and press Return, the string is replaced by its corresponding text. To re-edit the metadata string, simply click within that column, and the metadata variables will reappear. Be aware that, for clips where a referenced metadata field is blank, no characters appear for that corresponding metadata variable in the Clip Name column.
— Click within a field using variables to begin editing it, click a variable to select it, and press Delete.
For more information on the use of variables, as well as a list of all variables that are available in DaVinci Resolve, see Chapter 16, “Using Variables and Keywords.”