< Previous | Contents | Next >
However, while the interface of the Timeline Editor changes from page to page, the actual contents of the Timeline are identical, because each page’s Timeline Editor is in fact showing the exact same Timeline that is currently open. This means that the advanced user can use every page of DaVinci to do different things to the same Timeline, with only the interface changing to make different functions possible in different pages.
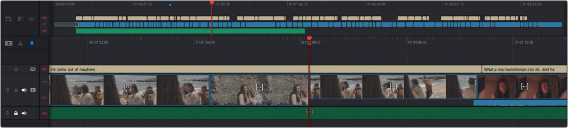
For the Cut page user, the Timeline is divided into an Upper Timeline at the top, and a larger and more detailed Timeline Editor showing a zoomed in portion of the Timeline around the playhead at the bottom. Working together, these two views of your edited sequence make it possible to navigate your entire project and cut in great detail.
![]()
The Timeline of the Cut page, comprising the Upper Timeline and the zoomed in Timeline
Upper Timeline
The Upper Timeline always shows the entire program within the full width of your computer’s display. The Upper Timeline’s playhead is always free, which makes it easy to use your pointer to scroll around the entire program by dragging within the Timeline Ruler at top. This also serves as a visual reference for keeping track of where you are in your program while you’re editing within the zoomed-in Lower Timeline below.
Despite the Upper Timeline’s relatively small size, you can still edit in it, with most editing and trimming functions that are available in the Lower Timeline also available in the Upper Timeline. Most interestingly, it’s also possible to drag clips from one part of your program in the Lower Timeline, to another area of your program in the Upper Timeline, and vice versa.
A set of small numbers to the left of the Upper Timeline lets you click a number to choose the currently selected track; this selection is mirrored on the zoomed in timeline below. The currently selected track affects where incoming clips will be placed when editing, among other things.
Lower Timeline
The zoomed in Lower Timeline (often referred to simply as “the Timeline”) shows you a close-up view of the portion of the currently open timeline that immediately surrounds the playhead. The zoom level is fixed; you cannot change it. The zoomed-in lower timeline is intended for detailed editing, but clips can be dragged between the Timeline and Upper Timeline for fast reordering of clips across the entire duration of your program.
Toolbar
The Toolbar contains several editing functions grouped together in Action and Option menus. These functions are accessed by clicking on the appropriate icon and selecting a function from the drop-down menu.
The menu icons are:
— Timeline Options: The tools under this icon deal with how the clips and timeline are displayed, and certain modes and tools that apply to the whole timeline.


![]()
All of the Timeline Options functions
— Timeline Actions: The tools under this icon are generally used to add new items or make modifications to the Timeline.

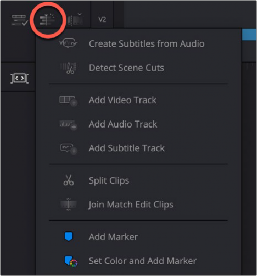
All of the Timeline Actions functions