< Previous | Contents | Next >
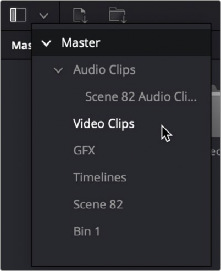
Any visible bin in the Media Pool can be opened by double-clicking it, or by clicking the Bin drop-down at the upper left-hand corner of the Media Pool and choosing a bin to open from the menu (they’re shown as a hierarchical list). When opened, a bin’s contents fill the Media Pool, and a path indicator
at the top of the Media Pool lets you see how many levels deep you are in cases where you have bins inside of bins. You can click any level of this path to jump back up the hierarchy, or you can choose another bin from the Bin drop-down.
![]()
The hierarchical Bin drop-down menu
Create Bin With Selected Clips
You can also create a bin and put clips into it in one step. Select one or more clips in the Media Pool, right-click one of the selected clips, and choose Create Bin With Selected Clips from the contextual menu. A new bin appears called “Bin X” (where X is the next number that’s available) displaying the selected clips it now contains.
Renaming Bins
To rename a bin, click its name once, then slowly click a second time (clicking too fast is a “double-click” which opens the bin), and the name becomes highlighted, ready for editing. You can also right-click a bin and choose Rename Bin from the contextual menu, which also highlights the bin’s name, ready for editing. When you’re done typing a new name, press Return (or Enter).
Import and Export Specific DaVinci Resolve Project Bins
You can import/export specific bins from one DaVinci Resolve project to another, allowing you to pass bins quickly between projects and workstations that have access to the same media. All Metadata, In/ Out points, Timelines, etc. are transferred along with the clips in the bin, but none of the actual media files are included.