< Previous | Contents | Next >
Manually Syncing Clips in the Sync Clips Window
If none of the Sync By tools is appropriate for the clips in your bin, you can manually sync the clips together by dragging each clip to the appropriate position on the Sync Clips Window timeline.
For finer control, select the clip you want to sync and press the Comma (,) or Period (.) keys to nudge the clip backward or forward by one frame. Shift-Comma (,) or Shift-Period (.) nudges the clip by
5 frames (default), or by the amount of frames set in the “Default fast nudge length” setting in the General Settings section of the Editing panel in the User settings of the Resolve Preferences. Each clip has its own track, and you can enable sync lock in the right-hand Viewer to prevent accidental slipping.
Once all of the clips in the window are synced appropriately, click the Save Sync button in the lower right-hand corner of the window.
Using Your Newly Synced Clips
![]()
After saving the sync on your clips, a new Multicam clip will appear in the Media Pool. If you select the Thumbnail View, a Sync icon appears on all the clips you modified. If you want to modify your sync, right-click on a thumbnail and select Open Sync Group to reopen your clips in the Sync Clips window. Once you place your first clip on the Timeline as a reference, you are now ready to use the Sync
Bin to edit.
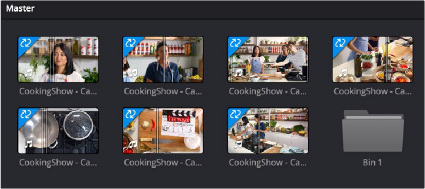
Sync icons (upper left arrows) identifying synced media clips
Sync Bin Editing
The core idea behind the Sync Bin layout is that instead of traditionally scrubbing through your timeline and clips independently, you now only have to scrub through your timeline. In the Media Pool, all of the clips that exist with that same timecode value will automatically scrub in sync with the playhead. This allows you to always have the exact clips that will fit perfectly in your timeline available at your fingertips.
Selecting this mode automatically changes the layout of the Media Pool and the Viewer to better accommodate multi camera editing in the Cut page.
Edit in Your First Clip from the Media Pool
Choose a clip that will be your base layer and place it on Track 1. This clip is used as the reference for all of the other clips in the Sync Bin. Then press the Sync Bin icon.
![]()
The Sync Bin icon
Media Pool in the Sync Bin
All of the clips in the bin, and its subfolders, are presented in filmstrip mode. The clips are ganged together automatically by timecode and sorted by camera number. An additional playhead appears at the current timeline position, and moving any of the three playheads in the Cut page will scrub through all of the clips in the Sync Bin at the same time.
Viewer in the Sync Bin
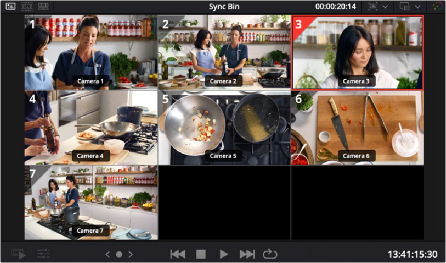
The Viewer switches to a live Multi Viewer for up to nine cameras. Each camera is labeled, numbered, and the active camera in the Timeline is highlighted in red. Cameras that were not active at the current playhead time are blacked out.
![]()
The Sync Bin camera selection can be viewed full screen in the Cinema Viewer by pressing “P” on your keyboard, allowing you to see a larger, more detailed view of each specific camera. In this full-screen mode, the Sync Bin view controls operate identically to those in the normal Viewer.
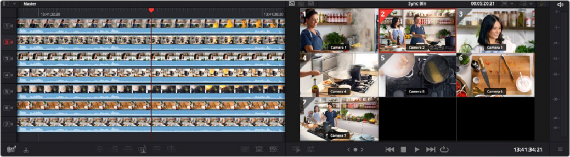
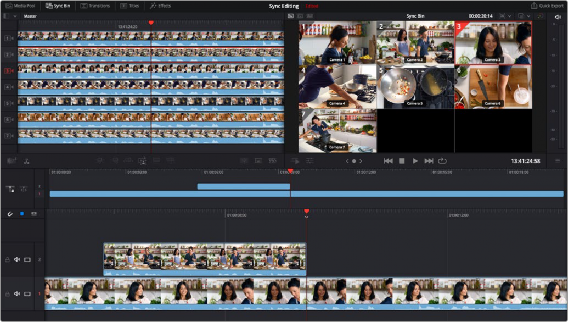
The Media Pool and Viewer in Sync Bin view
Select Your Timeline In Point
Select the In point on your timeline by scrubbing the timeline playhead to the position you wish your media to start. As you do this, all of the clips in the Sync Bin will scrub along with the playhead position. Finding and selecting your edit points in the Sync Bin is greatly simplified, as all of your possible synced media choices are available instantly.
When the “Video Only” mode is activated in the Cut page, audio from the sources in the Sync Bin are now muted, and the audio playback is from the clips in the Timeline only.
Select Your Camera
In the Multicam Viewer, select the camera angle you wish to use as your source material by doing one of the following:
— Clicking on the appropriate camera in the Multicam Viewer
— Clicking on the appropriate camera number icon in the Filmstrip Viewer
— Pressing the number key of the camera on the keyboard
The Viewer will then go into Single Clip mode, showing the camera you selected. To return to the Multi Viewer, click on the circled X close icon, or simply press the Escape key.
The clip will automatically set an In point at your current timeline position, with a default duration of five seconds. You can then manually set the Out point of the clip wherever you want.
![]()
The Multicam Viewer selection
Make the Source Overwrite Edit
Once your clip’s edit points are chosen, click on the Source Overwrite button and your selected camera clip will be perfectly positioned in sync on your timeline. The playhead will then automatically advance to the clip’s Out point, the Multi Viewer will return, and so be instantly ready for the next edit.
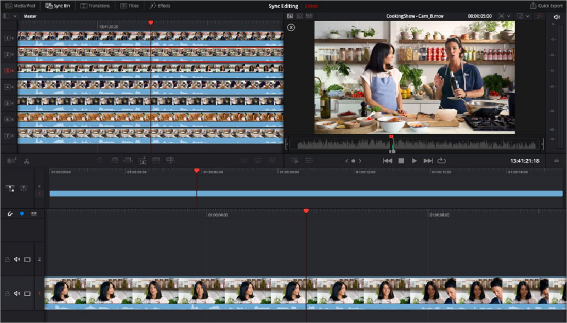
Selected Camera 2 and Playhead In point on the Timeline, ready for Source Overwrite edit.

TIP: Because the actual media in the Sync Bin determines the overall limit of the clips, and not the Timeline, it is possible to scroll past the end of the Timeline to make an edit. When you are past the end of the Timeline, the playhead now represents the Out point instead, which allows the clip to backfill itself to fit the exact duration required to fill in the Timeline.
TIP: Because the actual media in the Sync Bin determines the overall limit of the clips, and not the Timeline, it is possible to scroll past the end of the Timeline to make an edit. When you are past the end of the Timeline, the playhead now represents the Out point instead, which allows the clip to backfill itself to fit the exact duration required to fill in the Timeline.
TIP: Because the actual media in the Sync Bin determines the overall limit of the clips, and not the Timeline, it is possible to scroll past the end of the Timeline to make an edit. When you are past the end of the Timeline, the playhead now represents the Out point instead, which allows the clip to backfill itself to fit the exact duration required to fill in the Timeline.
![]()