< Previous | Contents | Next >
Any Fusion FX, Open FX, or Audio FX filters that have been applied to a clip can be modified here in their respective tabs. Different effects in the Timeline expose different controls in the Effects panel. Whichever panels are exposed, parameters within each panel are organized into groups, with a title bar providing the name of that group, along with other controls that let you control all parameters within that group at the same time.
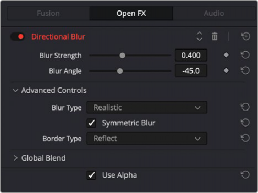
![]()
The Effects Inspector controls
These controls include:
— Enable button: A toggle control to the left of the parameter group’s name lets you disable and re- enable every parameter within that group at once. Orange means that track’s enabled. Gray is disabled.
— Parameter group title bar: Double-clicking the title bar of any group of parameters collapses or opens them. Even more exciting than that, Option-double-clicking the title bar of one parameter group collapses or opens all parameter groups at once.
— Keyframe and Next/Previous Keyframe buttons: This button lets you add or remove keyframes at the position of the playhead to or from every single parameter within the group. When the button is highlighted orange, a keyframe is at the current position of the playhead. When it’s dark gray, there is no keyframe. Left and right arrow buttons let you jump the playhead from keyframe to keyframe for further adjustment.
— Reset button: Lets you reset all parameters within that group to their default settings.
— Use Alpha: Checking this box applies the Open FX alpha channel to the selected clip, compositing it over any background elements that appear in lower tracks. If more than one alpha-modifying effect is applied to a single clip, the alpha channels are mixed together.
For a detailed explanation of each of the Resolve FX plugins that accompany DaVinci Resolve, see Part 12, “Resolve FX Overview.”