
< Previous | Contents | Next >
The Color section of the Tools consists of only one option: Auto Color. The Auto Color command provides a quick way to automatically balance the blacks and whites of a clip based on the current frame at the position of the playhead. Using advanced algorithms, based on the DaVinci Neural Engine, it provides superior results when automatically adjusting color balance and contrast.
For more details on using Auto Color, see Chapter 127, “Automated Grading Commands and Imported Grades.”
Color controls in the Viewer
![]()
Audio
A slider lets you adjust audio levels of the current clip in the Viewer, making the volume of that audio clips softer or louder. This is identical to each clip’s volume setting in the Edit and Fairlight pages.

Audio controls in the Viewer
Smart Reframe (Studio Version Only)
The Smart Reframe feature in DaVinci Resolve makes it easier to quickly reframe material across extreme aspect ratio changes. It’s useful for situations where you’ve shot a 16:9 horizontal video and find yourself needing to create a vertically-oriented 9:16 version for mobile phones and social media deliverables or using 4:3 archival footage in a 2.39:1 widescreen movie. Smart Reframe can be used manually or automatically executed using the DaVinci Resolve Neural Engine.
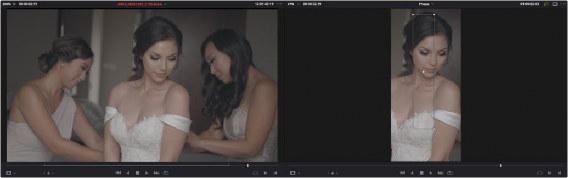
Smart Reframe in action with the Reference Point bounding box active (right)
The Smart Reframe tool is found in the Sizing tab of the Inspector and is available in both the Cut and Edit pages.
1 Duplicate your Timeline, right-click the Timeline and choose Timelines > Timeline Settings, and click Use Custom Settings to change the Timeline Resolution to the aspect ratio needed for delivery. Make sure that “Mismatched resolution files” is set to “Scale full frame with crop,” and click OK.
2 Select one or more clips you want to reframe, and open the Inspector to the Video tab.
3 Open the Smart Reframe controls, leave the Object of Interest drop-down menu set to Auto (if you’ve selected more than one clip, Auto is the only setting available), and click “Reframe.” DaVinci Resolve will analyze your footage and should automatically adjust each individual clip’s position to a more aesthetically pleasing framing.
4 (Optional) If the “Auto” setting does not give you desirable results for a particular clip, you can manually select the main subject using the following steps.
![]()
a) To manually select the subject area, choose “Reference Point” from the Object of Interest drop-down menu, and click the Target icon just to the right of the menu. This automatically sets the Viewer mode to Smart Reframe, exposing the onscreen controls for choosing a reference.
b) Drag the Reference Point bounding box around the main subject of interest in the frame. You may use the Transform controls directly above in the Inspector to move the source clip around if your subject is outside the current framing.
c) Click “Reframe.”
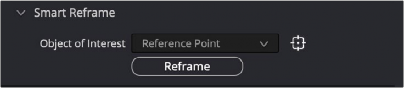
The Inspector’s Smart Reframe controls showing the manual reference point selected
DaVinci Resolve locks onto and, if necessary, tracks your subject using the reference you’ve selected, automatically panning and scanning the original clip as needed to keep the reference within the new aspect ratio. While involving a bit of manual adjustment, this function still dramatically reduces the time involved in pan and scanning footage by manually adjusting and keyframing the sizing controls.