< Previous | Contents | Next >
Keyboard Shortcuts in This Chapter
Here’s a list of of keyboard shortcuts you might find helpful that relate to topics found in this chapter.
Key Shortcut | Function |
Command-N | Create new timeline |
Delete/Backspace | Remove timeline from Media Pool |
Command-Shift-N | Create new bin in Media Pool |
Command-Minus (–) | Zoom out of timeline |
Command-Equals (=) | Zoom into timeline |
Shift-Z | Zoom all clips to available width of screen; toggles back to previous zoom level |
Home | Move playhead to beginning of timeline |
End | Move playhead to end of timeline |
N | Toggle timeline snapping off and on |
Command-Shift-L | Toggle linked selection off and on |
Command-4 | Select the timeline panel |
![]()
Creating and Duplicating Timelines
If you’re not importing a project that’s been edited elsewhere, you can create a new timeline to cut together a new edit from scratch, to use to assemble clips for use in a Fusion composition, to grade a set of dailies, or to put together an audio program within the Fairlight page. When you create a new timeline, you can either create a timeline that contains all clips found in the Media Pool to quickly create a big batch of offline dailies, or an empty timeline that’s ready for you to add specific clips to. Timelines you create are stored in the currently selected Media Pool bin.
If you’d like an easy way to browse all the timelines in your project at once, regardless of their diverse locations, you can enable the “Smart Bin for Timelines” option, which is in the Editing panel of the User Preferences. This creates a Smart Bin in the Bin list of the Media Pool that filters all timelines in your project, making it easy to see all your timelines without altering your original organization.
Individual Timeline Settings for Format, Monitoring, Output, and Color
When you create a new timeline, there are a number of ways you can customize it, but by default it will mirror the current project-wide timeline settings for resolution, frame rate, and other format and monitoring parameters.
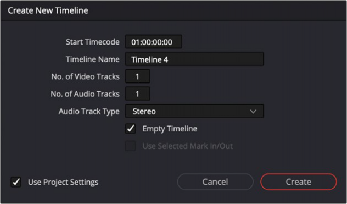
The Create New Timeline dialog with standard customization settings
![]()
However, you have the option of creating separate timelines with individual Format, Monitoring, Output Sizing, and Color Management settings for situations where you need to set up multiple timelines to create multiple deliverables with different resolutions, pixel aspect ratios, frame rates, monitoring, or output scaling options, and color management than the overall project, including “Mismatched Resolution Files” settings. To choose individual settings, uncheck the Use Project Settings box in the New Timeline dialog, and additional controls will appear.
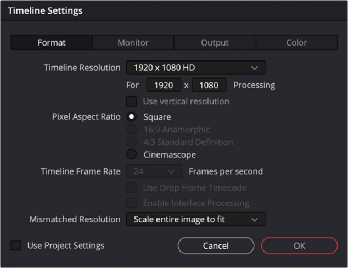
Clicking Use Custom Settings exposes additional panels for individualized timeline settings
Once you’ve created a timeline with individual settings, you can edit its settings by right-clicking that timeline in the Media Pool, and choose Timelines > Timeline Settings from the contextual menu.
An Edit Timeline dialog appears, with separate panels for Format, Monitor, Output, and Color settings that you can choose. You can also click Use Project Settings to have that timeline use the project-wide timeline settings instead.
It is also possible to change the starting timecode for multiple timelines at the same time using the custom timeline settings.
1 Select the Timelines whose timecode you want to modify.
2 Right-click on one of the selected Timelines and choose Timelines > Starting Timecode from the contextual menu.
3 Enter the new timecode in the Time Start field.
4 Click on OK.