< Previous | Contents | Next >
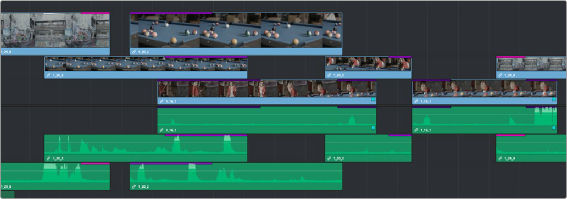
You can turn on Duplicate Frame Detection (often referred to as Dupe Detection) for clips in the Timeline by choosing View > Show Duplicate Frames. Doing so shows colored bars at the top of clips in the Timeline whenever a range of frames has been used more than once.
Duplicate Frame Detection shows colored bars where a range of frames is used more than once in a timeline
![]()
Comparing Timelines
For instances where you’re importing multiple versions of a timeline that’s been edited in another application, or where you’re working with multiple editors on different versions of the same Timeline in either collaborative mode or on multiple separate DaVinci Resolve installations, DaVinci Resolve provides a method of comparing two timelines with one another. Using the Timeline Comparison window, you can both see a visual comparison of which sections of two timelines differ, and you can derive a more traditional change list by opening up the Difference Index.
1 Open the first timeline you want to compare.
2 Right-click a second timeline in the Media Pool, and choose Compare With Current Timeline.
A Timeline Comparison window appears, showing you the currently opened Timeline at the bottom and the Timeline you right-clicked at the top.
The Timeline Comparison Window
When you first open the Timeline Comparison window, the first thing you see is a pair of miniature timelines. The currently open Timeline appears at the bottom and the Timeline you right-clicked appears at the top.
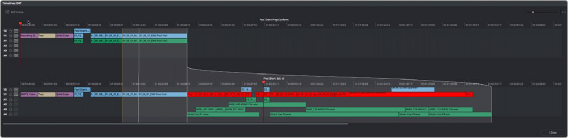
The Timeline Comparison window
Comparison Window Playhead Output
By default, the two playheads are ganged together, with the top playhead being displayed in the Source Viewer, and the bottom playhead being displayed in the Timeline Viewer. These playheads can be unganged if you want to compare different areas of both timelines, simply by turning off Sync Playheads in the option menu.
Highlighting Differences
![]()
Special highlights indicate sections of both timelines that are different. Individual changes are not individually highlighted, although they can be seen, on the premise that you’re more interested in a section by section analysis of what your collaborating editor has been doing, for purposes of deciding whether to incorporate changes or reversions based on this comparison.

Each section of differences between the two timelines are highlighted
When using this tool, you can change the bottom Timeline to match the top Timeline, on a section by section basis, by right-clicking a highlighted section and choosing Accept Change from the contextual menu. When you do this, the currently open Timeline is immediately changed to incorporate the altered section from the Timeline you’re comparing to. If necessary, you can undo this.
Identifying Differences Using Clip Labelling
You can also use the Timeline Comparison window to use clip labeling to indicate all differences between the comparison Timeline and the currently open Timeline. The method for doing this has not yet been defined at the time of this writing.
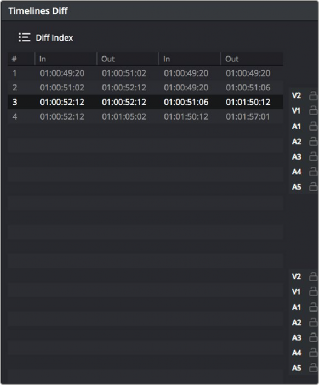
The Change List
Clicking the Diff Index button opens the change list, which shows you a more conventional item by item comparison of the differences between the two timelines.
![]()
The Change List of the Timeline Comparison window
The method of exporting this change list has not yet been defined at the time of this writing.