< Previous | Contents | Next >
Doing a Slip Edit in the Viewer
If you hold the Shift key down while dragging the In or Out point of a timeline clip you’ve opened in the Source Viewer, you’ll move both the In and Out points together, doing a slip edit of that clip’s content in the Timeline. This works using either the Selection or Edit tools.
Shuffle/Swap Insert Edits
A Shuffle Insert edit (sometimes referred to as a Swap Insert edit) lets you quickly rearrange one or more selected clips in the Timeline simply by Command-Shift dragging them to the left or right. When you do so, the surrounding clips automatically move to the right or left to switch places with the clip or clips that you’re dragging. This is a really fast way to reorder clips to try out different arrangements, without needing to drag clips onto multiple tracks to get them out of the way, first.
You have a lot of flexibility in how you shuffle clips around. You can select one clip, or multiple consecutive clips to shuffle. If you select multiple consecutive clips, they’ll move together as a single block. You can even select multiple consecutive clips on multiple tracks to shuffle around the Timeline as a single item.
![]()
Furthermore, you can also select clips that are part of split edits, where the audio and video In and Out points start or end at different frames. In this case, how other clips move in the Timeline to make room for the split edit clip you’re dragging depends on whether you click the video or audio portion of the clip to start dragging:
— If you click-and-drag the video portion of the clip, then all clips will rearrange themselves based on the duration of that video item on that track, so that all video items on that track rearrange themselves without either overwriting one another or leaving gaps. As you drag to shuffle the selection through the Timeline, overlapping linked audio items will either overwrite the audio on neighboring clips, or leave a gap.
— If you click-and-drag the audio portion of the clip, then all clips will rearrange themselves based on the duration of that audio item on that track, so that all audio items on that track rearrange themselves without either overwriting one another or leaving gaps. As you drag to shuffle the selection through the Timeline, overlapping linked video items will either overwrite the video on neighboring clips, or leave a gap.
Given the rules previously described, shuffling clips is really easy, and you can do so in one of two ways.
1 Turn snapping on.
2 Select one or more consecutive clips you want to shuffle.
3 Press and hold the Command and Shift keys down and drag either the video or audio portion of the selected clips to the left or right.
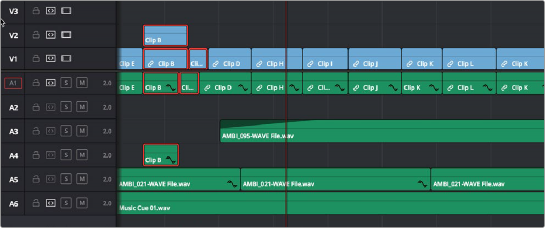
So long as you move clips to the In or Out points of adjacent clips, they’ll automatically switch places with the selection of clips you’re dragging. Snapping will help make sure that you align clip(s) you’re dragging with previously existing edit points until dropped in the desired location.


Before and after clip L being shuffled with clips I, K, and J in a scene to rearrange the sequence
1 Turn snapping off.
2 Select one or more consecutive clips in the Timeline that you want to shuffle.
3 Press and hold the Command and Shift keys down and drag either the video or audio portion of the selected clips to the left or right.
![]()
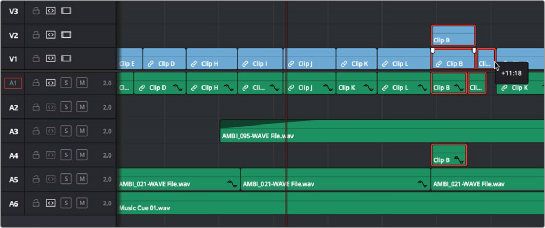
4 The selection of clips you’re dragging will be more easily inserted in the middle of adjacent clips as you drag with snapping turned off, and the cut portion of each clip will be moved into the gap that’s left behind by the clip(s) you’re dragging. Drop the clip into the desired location when you’re finished.


Before and after clip L being inserted into the middle of Clip K, which is split in half to make way for it
1 Select all of the clips you want to move to another position on the Timeline.
2 Press and hold the Command and Shift keys, and drag the clips left or right. Make sure the item you click to drag is on the same track as the majority of clips you’re rearranging; the item you click defines which track is used to guide the rearrangement of clips.
In the following example, the video item of Clip C is selected on track V1, so as it’s dragged to the right, all clips on other tracks are rearranged according to the duration and location of clips B and C on track V1. As a result, clips on tracks other than V1 may be overwritten, or leave gaps, as necessary for the items on track V1 to be rearranged cleanly.
![]()