< Previous | Contents | Next >
Keyboard Shortcuts in This Chapter
![]()
Here’s a list of of keyboard shortcuts you might find helpful that relate to topics found in this chapter.
Key Shortcut | Function |
Command-1 | Choose Media Pool Bin list |
Command-2 | Choose Media Pool browser area |
Arrow Keys | Move selection in the Media Pool Bin list or browser area to choose a bin or clip |
Return or Enter | Open selected clip or timeline into the Source Viewer |
Q | Toggle focus between Source and Timeline Viewers |
I, O | Set In or Out point |
Shift-I, O | Move playhead to In or Out point |
Option-I, O | Delete In or Out point |
Shift-A | Set In and Out points to match the current clip selection in the Timeline |
X | Set In and Out points to fit the current clip at playhead in the Timeline |
Option-X | Delete both In and Out points |
Command-Shift-Up, Down Arrow | Move video destination control up or down to another track |
Command-Option-Up, Down Arrow | Move audio destination control up or down to another track |
Option-1 through 8 | Set video destination control to that track number; press again to enable/disable |
Command-Option-1 t horugh 8 | Set audio destination control to that track number; press again to enable/disable |
Option-F1 through F8 | Toggle video auto-select for that track number |
Option-F9 | Toggle all video auto-select controls off or on |
Option-Command-F1 t hrough F8 | Toggle audio auto-select for that track number |
Option-Command-F9 | Toggle all audio auto-select controls off or on |
Option-Shift-Q | Toggles “Switch to timeline after edit,” to set whether focus stays on the Source Viewer or switches to the Timeline after you make an edit; on by default |
F9 | Insert Edit selected clip(s) from Media Pool or Source Viewer to the Timeline |
Function | |
F10 | Overwrite Edit selected clip(s) from Media Pool or Source Viewer to the Timeline |
F11 | Replace Edit the first of selected clip(s) from Media Pool or Source Viewer to the Timeline |
F12 | Place On Top Edit from Media Pool or Source Viewer to the Timeline |
Shift-F10 | Ripple Overwrite from Media Pool or Source Viewer to the Timeline |
Shift-F11 | Fit to Fill from Media Pool or Source Viewer to the Timeline |
Shift-F12 | Append To End Edit from Media Pool or Source Viewer to the Timeline |
Undo | Command-Z |
Redo | Command-Shift-Z |
![]()
Introduction to Three-Point Editing
Three-point editing is a standard editorial method that’s shared with many other post-production applications, so this procedure should feel familiar. The idea is that you need only set any combination of three In and Out points in the source clip and Timeline to edit a clip into your program at a specific time, and DaVinci Resolve automatically figures out the fourth edit point that’s necessary to execute the edit. Three-point editing is most commonly accomplished using overwrite and insert edits.
Choosing a Track to Edit and Using Destination Controls
The orange destination controls, found in the Timeline header area, let you specify which video and audio tracks you want incoming source clips to be edited to when you use editing methods other than drag and drop. No matter how many video or audio channels may be embedded within a single clip of media, only one video and one audio destination control is available. In the case of video, you can only expose one video channel of a clip at a time. In the case of audio, all audio channels for a given clip are embedded within a single Timeline track, making it a snap to edit stereo or other multi-channel audio sources together. For more information about working with audio, see Chapter 44, “Working with Audio in the Edit Page.”
Setting the destination control of a track is a vital step in the process of creating an edit and is easy to do. You can set the video and audio destination controls to be separate tracks.
— Click the destination control of any unassigned track to enable that track as the destination.
— Drag the destination control to any unassigned track in the Timeline.
— Press Command-Shift Up Arrow and Down Arrow to move the Video destination control up and down among different video tracks, or press Command-Option Up Arrow and Down Arrow to move the Audio destination control up and down among different audio tracks.
— Press Option-1 through 8 to set a video destination, or press Option-Command-1 through 8 to set an audio destination on tracks 1 through 8.
— Press Option-Command-9 to set the audio destinations to all tracks.
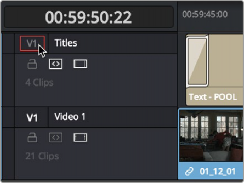
Moving the destination control to track V2, labeled “Titles”
![]()
You can also disable the Video or Audio destination controls in situations where you want to edit a source video clip into the Timeline without its audio, or vice versa.
— Click an already assigned destination control to toggle it off and then on again.
— Pressing the “assign destination control” repeatedly for a given track (Option 1-8 for video, Option-Command-1-8 for audio) toggles the destination track on and off.
Disabled destination controls are highlighted gray.
A disabled destination control