< Previous | Contents | Next >
Height allows independent control of the ellipse mask’s height. In addition to the slider in the mask’s controls, interactively drag the height (top or bottom edge) of the mask on the view using the pointer. Any changes will be reflected in this control.
To change the mask’s size without affecting the aspect ratio, drag the onscreen control between the edges (diagonal). This will modify both the width and height proportionately.
Change the rotational angle of the mask by moving the Angle control left or right. Values can be entered into the number fields provided. Alternately, use the onscreen controls by dragging the little circle at the end of the dashed angle line to interactively adjust the rotation of the ellipse.
Common Controls
The Image and Settings tabs in the Inspector are also duplicated in other mask nodes. These common controls are described in detail at the end of this chapter in “The Common Controls” section.
Mask Paint [PnM]

![]()
The Mask Paint node
Mask Paint Node Introduction
The Mask Paint node allows direct painting of mask images, using the pointer as if it was a paintbrush.
In addition to regular paint strokes, it is possible to apply basic primitive shapes and polyline style strokes.
Each stroke can have a duration that lasts for the entire project, a single frame. or an arbitrary number of fields. The strokes can have independent durations in the Keyframes Editor for easy manipulation
of time. Alternatively, Multistrokes is a faster but non-editable way for doing many mask clean up paint tasks.
Inputs
The Paint mask node includes a single effect mask input.
— Effect Mask: The optional blue input expects a mask shape created by polylines, basic primitive shapes, paint strokes, or bitmaps masks. Connecting a mask to this input combines the masks. How masks are combined is handled in the Paint mode menu in the Inspector.
Basic Node Setup
The Mask Paint node is useful for painting masks using a more free hand, pressure sensitive style. In the node tree below, the Mask Paint node is used to patch up holes in a Bitmap mask.

A Mask Paint node can be used to repair problematic areas of a matte.
Inspector

![]()
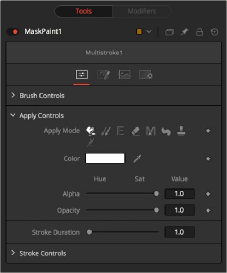
Mask Paint controls
As the Controls tab in the Mask Paint node is fundamentally identical to the Paint node, for more detail, see Chapter 51, “Paint Node,” in the Fusion Reference Manual. The only difference between the two nodes is that, as Mask Paint operates on single-channel mask images, there is no Channel
Selector control, and all color controls have only a single Alpha value. The Mask tab, however, includes several parameters that are different from the Paint tool, so they are covered below.

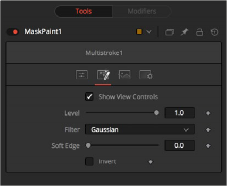
The Mask Paint tab
Mask Tab
The Mask tab is used to refine the basic mask parameters that do not fall into the category of “panting.” These include how multiple masks are combined, overall softness control, and level control.
The Show View Controls checkbox is used to enable/disable the display of the masks onscreen controls in the viewer. Onscreen controls including, center position, polylines, angles, and others, do not appear when this checkbox is disabled, even when the node is selected.

NOTE: Lowering the level of a mask lowers the values of all pixels covered by the mask in the mask channel. For example, if a Circle mask is placed over a Rectangle mask, lowering the level of the Circle mask lowers the values of all of the pixels in the mask channel, even though the Rectangle mask beneath it is still opaque.
NOTE: Lowering the level of a mask lowers the values of all pixels covered by the mask in the mask channel. For example, if a Circle mask is placed over a Rectangle mask, lowering the level of the Circle mask lowers the values of all of the pixels in the mask channel, even though the Rectangle mask beneath it is still opaque.
NOTE: Lowering the level of a mask lowers the values of all pixels covered by the mask in the mask channel. For example, if a Circle mask is placed over a Rectangle mask, lowering the level of the Circle mask lowers the values of all of the pixels in the mask channel, even though the Rectangle mask beneath it is still opaque.
The Level control sets the transparency level of the pixels in the mask channel. When the value is 1.0, the mask is completely opaque (unless it has a soft edge). Lower values cause the mask to be partially transparent. The result is identical to lowering the blend control of an effect.
![]()
This control selects the filtering algorithm used when applying Soft Edge to the mask.
— Box: This is the fastest method but at reduced quality. Box is best suited for minimal amounts of blur.
— Bartlett: Otherwise known as a Pyramid filter, Bartlett makes a good compromise between speed and quality.
— Multi-box: When selecting this filter, the Num Passes slider appears and lets you control the quality. At 1 and 2 passes, results are identical to Box and Bartlett, respectively. At 4 passes and above, results are usually as good as Gaussian, in less time and with no edge “ringing.”
— Gaussian: The Gaussian filter uses a true Gaussian approximation and gives excellent results, but it is a little slower than the other filters. In some cases, it can produce an extremely slight edge “ringing” on floating-point pixels.
Use the Soft Edge slider to blur (feather) the mask, using the selected filter. Higher values cause the edge to fade off well beyond the boundaries of the mask. A value of 0.0 creates a crisp, well- defined edge.
Connecting a mask to the effect mask input displays the Paint mode menu. The Paint mode is used to determine how the incoming mask for the effect mask input and the mask created in the node are combined.
— Merge: Merge is the default for all masks. The new mask is merged with the input mask.
— Add: The mask’s values add to the input mask’s values.
— Subtract: In the intersecting areas, the new mask values subtract from the input mask’s values.
— Minimum: Comparing the input mask’s values and the new mask, this displays the lowest (minimum) value.
— Maximum: Comparing the input mask’s values and the new mask, this displays the highest (maximum) value.
— Average: This calculates the average (half the sum) of the new mask and the input mask.
— Multiply: This multiplies the values of the input mask by the new mask’s values.
— Replace: The new mask completely replaces the input mask wherever they intersect. Areas that are zero (completely black) in the new mask do not affect the input mask.
— Invert: Areas of the input mask that are covered by the new mask are inverted; white becomes black and vice versa. Gray areas in the new mask are partially inverted.
— Copy: This mode completely discards the input mask and uses the new mask for all values.
— Ignore: This mode completely discards the new mask and uses the input mask for all values.
![]()
Selecting this checkbox inverts the entire mask. Unlike the Invert Paint mode, the checkbox affects all pixels, regardless of whether the new mask covers them or not.
Common Controls
The Image and Settings tabs in the Inspector are also duplicated in other mask nodes. These common controls are described in detail at the end of this chapter in “The Common Controls” section.