
< Previous | Contents | Next >
The Grow Edges slider expands the color of the edges to fill in holes until fully green or blue screen is created.
The Fill checkbox fills in remaining holes with color from the surrounding screen color.
— Sequence: Generates a new clean plate every frame.
— Hold Frame: Holds the clean plate at a single frame.
The Clean Plate Mask tab
Mask Tab
The Mask tab is used to invert the mask connected to the garbage mask input on the node.
The garbage mask can be applied to clear areas before growing edges or filling remaining holes.
Invert uses the transparent parts of the mask to clear the image.
![]()
Common Controls Settings Tab
The Settings tab in the Inspector is also duplicated in other matte nodes. These common controls are described in detail at the end of this chapter in “The Common Controls” section.
Delta Keyer
The Delta Keyer node
Delta Keyer Node Introduction
The Delta Keyer is an advanced color difference keyer, with many features and controls for tuning the matte and separating the subject from a blue or green screen.
It contains several keying systems: the Key tab is the master difference keyer and Pre-Matte is a built- in clean plate to smooth out screen color. Tuning, Fringe, and Matte finish the keying process. The tabs are laid out in the rough order you tend to use them.
Inputs
The Delta Keyer node includes five inputs in the Node Editor.
— Input: The orange input accepts a 2D image that contains the color you want to be keyed for transparency.
— Garbage Matte: The gray garbage matte input accepts a mask shape created by polylines, basic primitive shapes, paint strokes, or bitmaps masks. Connecting a mask to this input causes areas of the image that fall within the matte to be made transparent. The garbage matte is applied directly to the alpha channel of the image.
— Solid Matte: The white solid matte input accepts a mask shape created by polylines, basic primitive shapes, paint strokes, or bitmaps masks. Connecting a mask to this input causes areas of the image that fall within the matte to be fully opaque.
— Clean Plate: Accepts the resulting image from the Clean Plate node.
— Effect Mask: The optional blue input expects a mask shape created by polylines, basic primitive shapes, paint strokes, or bitmaps masks. Connecting a mask to this input limits the pixels where the keying occurs. An effects mask is applied to the tool after the tool is processed.
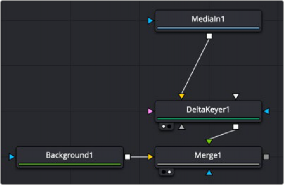
Basic Node Setup
![]()
The first operation needed to use the Delta Keyer is to open the Delta Keyer in the Inspector, then click and drag the background color eyedropper tool into the Viewer to select the color you want to key out. This color will then turn gray in the Viewer. A single Delta Keyer rarely gets perfect results because most green- or blue-screen shots have problems that the keyer is not made to handle. Keyers often need the help of garbage mattes or solid mattes created with a Polygon or B-Spline node. Shots can also require more than just one keyer to achieve perfect results. That is shown in one of the examples below, where one Delta Keyer is used to create a hard inner white matte, while a second Delta Keyer
is used to capture the soft edges. The core matte below is then connected into the solid matte input on the second Delta Keyer. Color correction, including spill suppression, is best handled as a separate branch in your node tree. Separating your matte from your color correction using underlays makes it clear what branch of nodes is performing what operation.
Starting point for a Delta Keyer setup
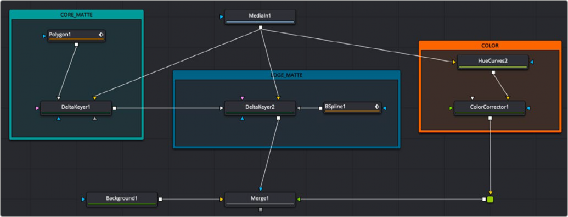
An expanded key setup with two Delta Keyers, a Polygon and B-Spline nodes for mattes, and a branch for color correction
Inspector
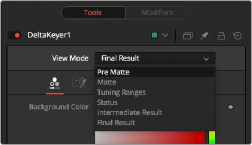
The Delta Keyer View Mode menu
![]()
Key Tab View Mode
At the top of the Inspector is the View Mode menu. The default selection shows the final result. You can change the view to see various intermediate stages of the keying process.
— Pre Matte: Displays the output of the Pre Matte key.
— Matte: Displays the alpha of the key before being combined with solid and garbage masks. When displaying the matte, set the viewer to show the alpha channel.
— Tuning Ranges: Displays a false color for Shadow, Midtone, and Highlight ranges of the image.
Shadows are in the red channel, Midtones are in the green channel, and Highlights are in the blue channel.
— Status: Displays information to indicate areas that are solid, transparent, or in between. It also displays areas that have been affected by matte adjustments, such as thresholding or erode/dilate and areas affected by the solid mask.
— Intermediate Result: The untouched source image color channels combined with the final matte. Optionally, combine this output with additional Delta Keyer nodes.
— Final Result: The final keyed image with spill suppression, ready to merge onto a scene.
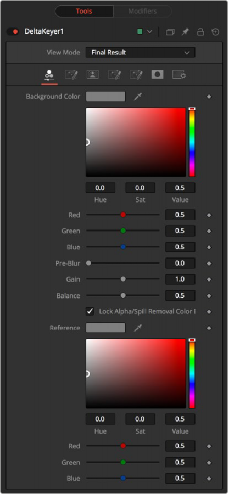
The Delta Keyer Key tab
![]()
Key Tab
The Key tab is where most keying begins. It is used to select the screen color.
This is the color of the blue or green screen, sometimes called the screen color. To create the key with the Delta Keyer, use the background color Eyedropper to select the screen color from the image.
Applies a blur before generating the alpha. This can help with certain types of noise, edge enhancements, and artifacts in the source image.
Gain increases the influence of the screen color, causing those areas to become more transparent.
A color difference keyer, like the Delta Keyer, compares the differences between the dominant channel determined by the selected background color and the other two channels. Adjusting balance determines the proportions of the other two channels. A value of 0 uses the minimum of the other two channels, where a value of 1 uses the maximum. A value of 0.5 uses half of each.
Unlocking this allows you to use different color references when generating the alpha and when determining how much of the background color to subtract from the image. When enabled, spill and color are combined.
The Color balance reference controls adjust for lighting or white balance that might be reducing background color purity and saturation. A correction is applied based on the reference of a neutral-colored object when generating the key and determining the amount of background color subtraction, without altering the background color that is subtracted.
![]()
The Delta Keyer Pre Matte tab
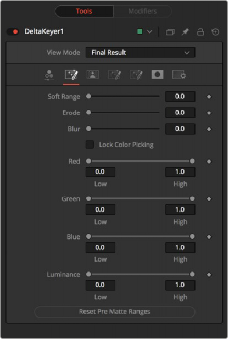
Pre Matte Tab
The Pre Matte tab is in some ways a garbage matte keyer that occurs before the delta keyer process. It is used to even out the screen color before a more delicate key is done. After selecting the initial screen color, you can switch to the Pre Matte tab and view the PreMatte Out from view mode menu at the top of the Inspector. The Pre Matte works on ranges of color, so you start by dragging a bounding box around areas where lighting is different from the initial screen color pick. Use the Soft range to expand, and Erode to cut away the edges.
Once you have a more even screen selection, you can move to the Matte tab.
The Soft Range extends the range of selected color and rolloff of the screen color.
Erode contracts the edge of the pre matte, so the edge detail does not clip.
This softens the edges of the pre matte.
These controls update automatically to represent the current color selection. The controls tweak the selection slightly, although selecting colors in the viewer is all that is required.
When this checkbox is activated, it prevents the accidental growth of the selected range by selecting more colors from the view. It is a good idea to activate this checkbox after selecting the color for the matte. All other controls in the node remain editable.
This button discards all color selection by resetting the ranges but maintains all other slider and control values.
![]()
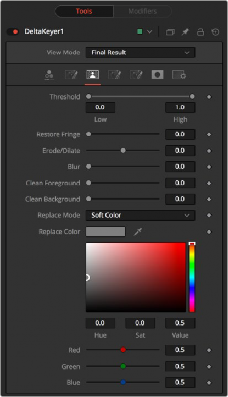
The Delta Keyer Matte tab
Matte Tab
The Matte tab refines the alpha of the key, combined with any solid and garbage masks connected to the node. When using the matte tab, set the viewer to display the alpha channel of the Delta Keyer’s final output.
This range slider sets the lower threshold using the handle on the left and sets the upper threshold using the handle on the right.
Any value below the lower threshold setting becomes black or transparent in the matte.
Any value above the upper threshold setting becomes white or opaque in the matte. All values within the range maintain their relative transparency values.
This restores the edge of the matte around the keyed subject. Often when keying, clipping occurs around the edge of the subject where there is hair. Restore Fringe brings back that edge while keeping the matte solid.
Expands or contracts the matte.
Softens the matte.
Fills slightly transparent (light gray) areas of the matte.
Clips the bottom dark range of the matte.
Determines how matte adjustments restore color to the image.
— None: No color replacement. Matte processing does not affect the color.
— Source: The color from the original image.
— Hard Color: A solid color.
— Soft Color: A solid color weighted by how much background color was originally removed.
![]()
The color used with the Hard Color and Soft Color replace modes.
The Delta Keyer Fringe tab
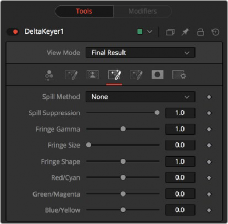
Fringe Tab
The Fringe tab handles the majority of spill suppression in the Delta Keyer. Spill suppression is a form of color correction that attempts to remove the screen color from the fringe of the matte.
Spill is the transmission of the screen color through the semitransparent areas of the alpha channel. In the case of blue- or green-screen keying, this usually causes the color of the background to become apparent in the edges of the foreground subject.
This selects the strength of the algorithm used to apply spill suppression to the image.
— None: None is selected when no spill suppression is required.
— Rare: This removes very little of the spill color and is the lightest of all methods.
— Medium: This works best for green screens.
— Well Done: This works best for blue screens.
— Burnt: This works best for blue screens. Use this mode only for very troublesome shots.
When this slider is set to 0, no spill suppression is applied to the image. Increasing the slider increases the strength of the spill method.
This control can be used to adjust the brightness of the fringe or halo that surrounds the keyed image.
This expands and contracts the size of the fringe or halo surrounding the keyed image.
Fringe Shape presses the fringe toward the external edge of the image or pulls it toward the inner edge of the fringe. Its effect is most noticeable while the Fringe Size value is large.
Use these three controls to color correct the fringe of the image.
![]()
This is useful for correcting semitransparent pixels that still contain color from the original background to match the new background.
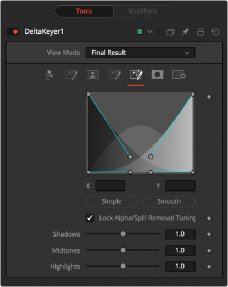
The Delta Keyer Tuning tab
Tuning Tab
The Tuning tab is an advanced tab that allows you to determine the size of the shadow, midtone, and highlight ranges. By modifying the ranges, you can select the strength of the matte and spill suppression based on tonal values.
The range controls define how much color is considered to fall into the shadows, midtones, and highlights areas of the image. The spline controls allow for easy adjusting of the tonal ranges of each Shadow and Highlight tonal map.
The Simple button sets the range to be linear. The Smooth button sets a smooth tonal gradient for the ranges.
When this checkbox is disabled, separate tuning controls are used when generating the alpha and when determining how much of the background color to subtract from the image.
— Shadows: Adjusts the strength of the key in darker areas of the background.
— Midtones: Adjusts the strength of the key in midtone areas of the background.
— Highlights: Adjusts the strength of the key in brighter areas of the background.
![]()
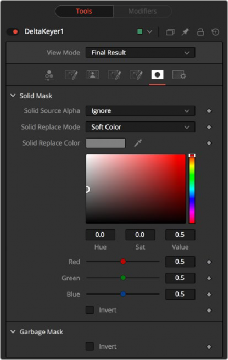
The Delta Keyer Mask tab
Mask Tab
The Mask tab determines how the solid and garbage mattes are applied to the key.
Used to combine the existing alpha from the source image with the solid mask.
— Ignore: Does not combine the alpha from the source image.
— Add: Solid areas of the source image alpha are made solid in the solid mask.
— Subtract: Transparent areas of the source image alpha are made transparent in the solid mask.