< Previous | Contents | Next >
![]()
Creating visual effects is almost always an iterative process. You’ll often need to create revisions after your first pass at the effect. Built into Fusion Connect is a versioning feature that lets you create multiple revisions of an effect and switch between them from within Media Composer.
Create New Version
This checkbox creates a copy of the current comp without affecting the original.
Any changes that are rendered in the copy will be written to a new folder and become another version of the rendered result played on the Avid Timeline. Previous versions of the comp and their rendered results are accessible using the Version slider.
Version
This slider selects which version of the comp is used in the Media Composer Timeline. It can be used to interactively switch from one version to the other in order to compare the results.
About RAW Images
Fusion Connect creates a Fusion RAW file image sequence for intermediate folders between Avid Media Composer and Fusion Studio, in order to preserve all the image information. This allows the images to reside on disk and not take up space in RAM. The benefits of using Fusion RAW include:
— The ability to continue the editing process while an effect is rendering
— The ability to take advantage of network rendering
— The ability to retime footage
— The ability to run Fusion Studio remotely
About Color Depth
Fusion Connect derives its images directly from the RGB data within Avid Media files. This allows the images to be codec agnostic. All RAW files from Avid that begin as 8- or 10-bit images are remapped to 16-bit float in Fusion. Rendered results from Fusion are processed in 16-bit float to maintain the full color fidelity supported by Media Composer.
Manual vs. Auto-Render
While Auto-Render is the easier workflow, the manual approach offers faster renderings in Fusion and more control over the performance and memory usage on your system.
— In the manual workflow, Fusion Studio is not required to be installed on the Avid system itself but can reside on any other computer.
— For Auto-Render, Fusion Studio must be installed on the local computer.
The following diagram shows typical workflows for manual and automatic renders.
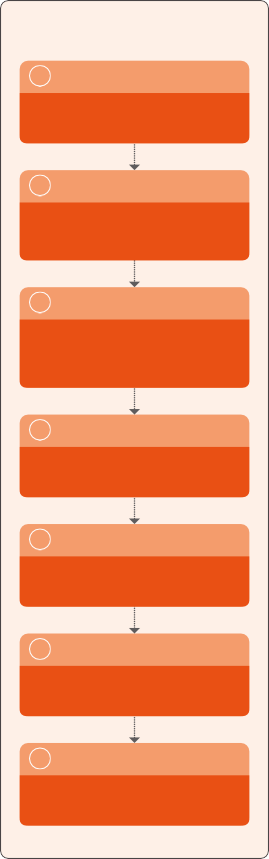
Manual Workflow
Manual Workflow
Manual Workflow
1
1
1
Add Connection effect
Add Connection effect
Add Connection effect
2 Click Export Clip
Creates Fusion RAW files at the given location on the media drive. These files are not deleted automatically, and manual cleanup of old files will be rquired to avoid running out of disk space.
2 Click Export Clip
Creates Fusion RAW files at the given location on the media drive. These files are not deleted automatically, and manual cleanup of old files will be rquired to avoid running out of disk space.
2 Click Export Clip
Creates Fusion RAW files at the given location on the media drive. These files are not deleted automatically, and manual cleanup of old files will be rquired to avoid running out of disk space.
3 Click Edit Effect
Create a comp file when first clicked, but will not overwrite this file when clicked again. Attempts to launch Fusion and load the comp. If Fusion is not installed locally, the comp can be accessed manually from a different machine via the network.
3 Click Edit Effect
Create a comp file when first clicked, but will not overwrite this file when clicked again. Attempts to launch Fusion and load the comp. If Fusion is not installed locally, the comp can be accessed manually from a different machine via the network.
3 Click Edit Effect
Create a comp file when first clicked, but will not overwrite this file when clicked again. Attempts to launch Fusion and load the comp. If Fusion is not installed locally, the comp can be accessed manually from a different machine via the network.
4
4
4
Edit comp in Fusion
Edit comp in Fusion
Edit comp in Fusion
Work your magic here.
Work your magic here.
Work your magic here.
5 Save comp in Fusion
This step is important!
Do not forget to save the comp.
5 Save comp in Fusion
This step is important!
Do not forget to save the comp.
5 Save comp in Fusion
This step is important!
Do not forget to save the comp.
6
6
6
Render comp in Fusion
Render comp in Fusion
Render comp in Fusion
You can continue working in Avid while Fusion renders. Your Timeline will update automatically with any frame that is succesfully rendered.
You can continue working in Avid while Fusion renders. Your Timeline will update automatically with any frame that is succesfully rendered.
You can continue working in Avid while Fusion renders. Your Timeline will update automatically with any frame that is succesfully rendered.
7
7
7
Render clip in Avid
Render clip in Avid
Render clip in Avid
Optional step, but recommended.
Optional step, but recommended.
Optional step, but recommended.

Auto-Render Workflow
Auto-Render Workflow
Auto-Render Workflow
1
1
1
Add Connection effect
Add Connection effect
Add Connection effect
Ensure thatAuto-Render is ticked.
Ensure thatAuto-Render is ticked.
Ensure thatAuto-Render is ticked.
2
2
2
Click Edit Effect
Click Edit Effect
Click Edit Effect
Creates Fusion RAW files as Export Clip would do. Also creates a comp file when first clicked, but will not overwrite this file when clicked again. Launches Fusion and loads the comp.
Creates Fusion RAW files as Export Clip would do. Also creates a comp file when first clicked, but will not overwrite this file when clicked again. Launches Fusion and loads the comp.
Creates Fusion RAW files as Export Clip would do. Also creates a comp file when first clicked, but will not overwrite this file when clicked again. Launches Fusion and loads the comp.
3
3
3
Edit comp in Fusion
Edit comp in Fusion
Edit comp in Fusion
Work your magic here.
Work your magic here.
Work your magic here.
4
4
4
Save comp in Fusion
Save comp in Fusion
Save comp in Fusion
This step is important!
Do not forget to save the comp.
This step is important!
Do not forget to save the comp.
This step is important!
Do not forget to save the comp.
5
5
5
Render clip in Avid
Render clip in Avid
Render clip in Avid
In this case, both the Fusion comp and the Avid clip will be rendered simultaneously. If a full-size rendered frame is not found, the full size/depth source frames are exported automatically for that time. Fusion is then instructed to start rendering from that point.
The resulting frame is loaded and returned to MC, and process is repeated for each frame thereafter.
![]()
Avid/Fusion layer to comp relationship for auto and manual renders