< Previous | Contents | Next >
The Film Grain node
Film Grain Node Introduction
The Film Grain node adds generated film grain to an image. Typically, when compositing with different elements shot on film and in digital, the grain is removed for compositing operations and then reapplied to the final composite. This helps create the appearance that all elements were shot as a single scene with the same film stock.

NOTE: Although more accurate, the Film Grain node does not replace the older Grain node, which is still provided to allow older compositions to load and render, but in almost every case, it is better to use the Film Grain node.
NOTE: Although more accurate, the Film Grain node does not replace the older Grain node, which is still provided to allow older compositions to load and render, but in almost every case, it is better to use the Film Grain node.
NOTE: Although more accurate, the Film Grain node does not replace the older Grain node, which is still provided to allow older compositions to load and render, but in almost every case, it is better to use the Film Grain node.
Input
There are two inputs on the Film Grain node: one for the image and one for the effects mask.
— Input: The orange input is used for the primary 2D image that gets the grain applied.
— Effect Mask: The blue input is for a mask shape created by polylines, basic primitive shapes, paint strokes, or bitmaps from other tools. Connecting a mask to this input limits the grain to be within the pixels of the mask. An effects mask is applied to the tool after the tool is processed.
Basic Node Setup
The Film Grain node is commonly used before a MediaOut node in DaVinci Resolve or before a Saver node in Fusion Studio. Since grain is often removed from source material to achieve cleaner keys and composite, film grain is added back before the output to create a more realistic composite.
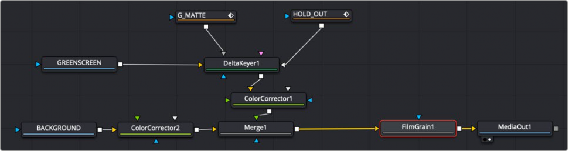
![]()
Film Grain node adding grain back before output
Inspector
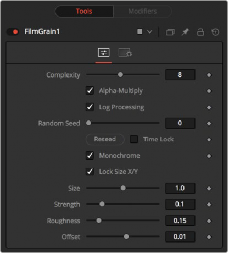
Film Grain controls
Controls Tab
The Controls tab includes all the parameters for modifying the appearance of the film grain.
The Complexity setting indicates the number of “layers” of grain applied to the image. With a complexity of 1, only one grain layer is calculated and applied to the image. When complexity is set to 4, the node calculates four separate grain layers and applies the mean combined result of each pass to the final image. Higher complexities produce visually more sophisticated results, without the apparent regularity often perceivable in digitally-produced grain.

NOTE: Since it is impossible to say what the final value of semitransparent pixels in the image are until after they are composited with their background, you should avoid applying log-processed grain to the elements until after they have been composited. This ensures that the strength of the grain is accurate.
NOTE: Since it is impossible to say what the final value of semitransparent pixels in the image are until after they are composited with their background, you should avoid applying log-processed grain to the elements until after they have been composited. This ensures that the strength of the grain is accurate.
NOTE: Since it is impossible to say what the final value of semitransparent pixels in the image are until after they are composited with their background, you should avoid applying log-processed grain to the elements until after they have been composited. This ensures that the strength of the grain is accurate.
When the Alpha Multiply checkbox is enabled, the Film Grain node multiplies its results by the source image’s Alpha channel. This is necessary when working with post-multiplied images to ensure that the grain does not affect areas of the image where the Alpha is 0.0 (transparent).
When this checkbox is enabled (default), the grain applied to the image has its intensity applied nonlinearly to match the grain profile of most film. Roughly speaking, the intensity of the grain increases exponentially from black to white. When this checkbox is disabled, the grain is applied uniformly, regardless of the brightness of the affected pixel.
![]()
One of the primary features of grain in film is that the appearance of the grain varies radically with the exposure so that there appears to be minimal grain present in the blacks, with the amount and deviation of the grain increasing as the pixels exposure increases. In a film negative, the darkest portions of the developed image appear entirely opaque, and this obscures the grain. As the negative becomes progressively clearer, more of the grain becomes evident in the result. Chemical differences in the R, G, B, layer’s response to light also cause each color component of the film to present a
different grain profile, typically with the blue channel presenting the most significant amount of grain.
As a result, an essential control in the Film Grain node is the Log Processing checkbox, which should be enabled when matching film, and disabled when working with images that require a more linear grain response. Having this checkbox enabled closely mimics the results of preceding the old Grain node with a Linear to Log conversion and following with a Log to Linear conversion immediately after.
The Seed slider and Reseed button are presented whenever a Fusion node relies on a random result. Two nodes with the same seed values produce the same random results. Click on the Reseed button to randomly select a new seed value, or adjust the slider to select a new seed value manually.
Enabling Time Lock stops the random seed from generating new grain on every frame.
When the Monochrome checkbox is enabled (default), the grain is applied to the red, green, and blue color channels of the image equally. When deselected, individual control over the Size, Strength, and Roughness of the grain in each channel becomes possible.
Deselect the Lock Size X/Y checkbox to control the size of the grain along the X- and Y-axis individually.
The grain size is calculated relative to the size of a pixel. Consequently, changing the resolution of the image does not impact the relative appearance of the grain. The default grain size of 1.0 produces grain kernels that cover roughly 2 pixels.
Grain is expressed as a variation from the original color of a pixel. The stronger the grain’s strength, the wider the possible variation from the original pixel value. For example, given a pixel with an original value of p, and a Grain node with complexity = 1 size = 1; roughness = 0; log processing = off; the grain produces an output value of p +/- strength. In other words, a pixel with a value of 0.5 with a grain strength of 0.02 could end up with a final value between 0.48 and 0.52.

NOTE: When visualizing the effect of the grain on the image, the more mathematically inclined may find it helps to picture a sine wave, where each lobe of the sine wave covers 1 pixel when the Grain Size is 1.0. The Grain Size controls the frequency of the sine
wave, while the Grain Strength controls its amplitude. Again, this is something of an oversimplification.
Once again, that’s a slight oversimplification, especially when the complexity exceeds 1. Enabling the Log Processing checkbox also causes that variation to be affected such that there is less variation in the blacks and more variation in the whites of the image.
![]()
The Roughness slider applies low frequency variation to give the impression of clumping in the grain. Try setting the roughness to 0, and observe that the grain produced has a very even luminance variation across the whole image. Increase the roughness to 1.0 and observe the presence of “cellular” differences in the luminance variation.
The Offset control helps to match the intensity of the grain in the deep blacks by offsetting the values before the intensity (strength) of the grain is calculated. So an offset of 0.1 would cause a pixel with a value of 0.1 to receive grain as if its value was 0.2.
Common Controls
The Settings tab controls are common to all Film nodes, so their descriptions can be found in “The Common Controls” section at the end of this chapter.
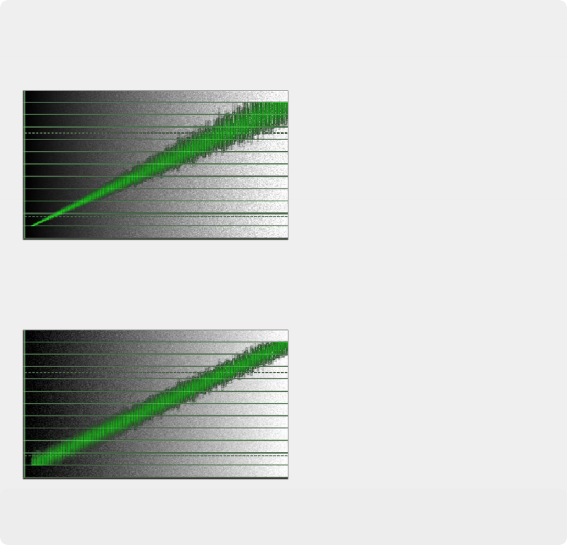
Processing Examples
Processing Examples
Processing Examples
In the default setting, the different amounts of Grain are applied to the blacks and the whites of the image
In the default setting, the different amounts of Grain are applied to the blacks and the whites of the image
In the default setting, the different amounts of Grain are applied to the blacks and the whites of the image
When Log processing is off, the Grain is applied evenly to the entire image, as shown here
When Log processing is off, the Grain is applied evenly to the entire image, as shown here
When Log processing is off, the Grain is applied evenly to the entire image, as shown here
![]()