
< Previous | Contents | Next >
Multicam clips appear like any other clip in the Color page. However, each angle within a multicam clip has its own grade (unlike the Take Selector described later, in which all takes share the same grade).
If you grade a multicam clip, you’re actually editing the grade of the specific angle that’s currently exposed in that clip.
If you want access all of the angles within a multicam clip for grading, right-click it and choose “Open in Timeline” to expose each angle within a superimposed stack. Then you can open the Color page and grade whatever angles you want, whether they’re visible back in the Edit page or not. You might do this to make the different angles match one another better, or to pre-grade all of the angles to give them the look you want prior to multicam editing. You also need to use “Open in Timeline” in order to access and manipulate the camera RAW settings if your footage was shot in a RAW format.
An open multicam clip in the Color page exposes all of its angles for individual grading
![]()
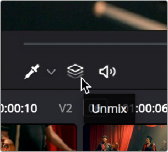
Because opening multicam clips in the Timeline results in a vertical stack of superimposed clips, you’ll want to turn on Unmix in the Color page viewer so that you can actually see the currently selected angle in the Thumbnail Timeline while you work.
The Unmix control lets you see only one of a
superimposed stack of clips
When flattening a multicam clip, you can choose to grade individual angles or the multicam clip as a whole. In the Edit page, select Flatten Multicam Clip and either Copying Multicam Grades to apply the existing color grade to the flattened multicam angles, or Retaining Grades from Angles to keep any color grades done on individual angles.
When you’re done grading, go back to the Edit page, and use the path control at the bottom left-hand corner of the Timeline to return to your edited Multicam timeline.