< Previous | Contents | Next >
You can slip the contents of the clip by holding the Shift key down and dragging either the In or Out point.
![]()
![]()

NOTE: To open a match frame of a clip that’s part of an edited sequence into the
Source Viewer using the mouse, hold the Option key down while double-clicking a clip in the Timeline.
NOTE: To open a match frame of a clip that’s part of an edited sequence into the
Source Viewer using the mouse, hold the Option key down while double-clicking a clip in the Timeline.
NOTE: To open a match frame of a clip that’s part of an edited sequence into the
Source Viewer using the mouse, hold the Option key down while double-clicking a clip in the Timeline.
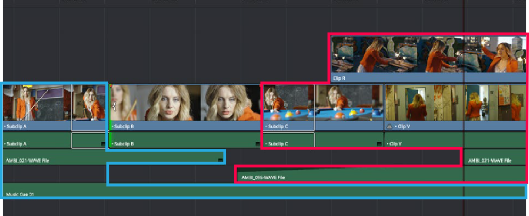
A Timeline clip being slipped by opening it into the Source Viewer and Shift-dragging its In point using the Trim tool
Ripple Editing Rules
![]()
Ripple operations are the only trim functions that change the duration of the overall Timeline, and that can potentially alter the sync relationship between multiple clips on different tracks. This makes them incredibly useful, but it’s important to understand which parts of the Timeline will move as part of a ripple operation, and which parts won’t.
The following operations ripple the Timeline:
— Ripple deleting a clip or gap (Forward-Delete)
— Ripple cutting a clip (Shift-Command-X)
— Rippling one or more edits or gaps using the Trim tool (press T to choose the Trim tool)
— Using the Extend Edit (E), Trim Start (Shift-[), or Trim End (Shift-]) commands in Trim mode
— Using the Ripple Start (Command-Shift-[) or Ripple End (Command-Shift-]) commands in any mode
— Performing an insert edit (F9) or ripple overwrite edit (Shift-F10)
— Using the Retime controls to speed up or slow down a clip in Trim mode
— Using the Change Speed dialog with the Ripple Sequence checkbox turned on
— Changing clips in a Take Selector with the Ripple control enabled
During a ripple edit, superimposed clips with an In point that’s to the left of the edit point or clip being rippled are not moved. This can be seen in the previous example via the audio clip at the bottom
of the Timeline, which stays in place even as the clips on track V1 and A1 are rippled. All clips with In points to the right of the edit point or clip being rippled move left to follow the trim operation you’re making.
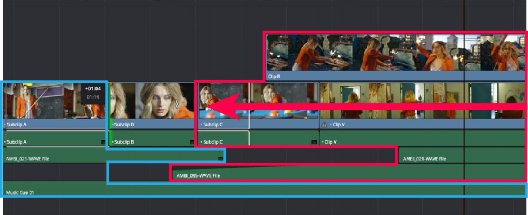
Before Ripple
![]()
After Ripple

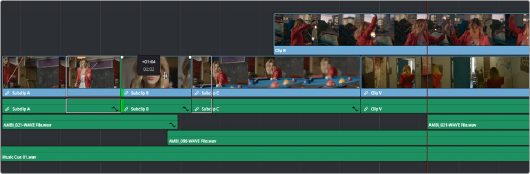
The rules of timeline rippling illustrated. All clips with In points to the left of Subclip B (the clip being rippled) are left in place (area in blue), while all clips to the right of the edit being rippled are moved by the duration of the ripple operation (in red)