< Previous | Contents | Next >
This simple rule means that, if you’re in the habit of building sequences of clips from left to right, long overlapping superimpositions such as titles, graphics, and music clips will stay in place while you’re rippling various clips within a montage that you’re editing in relation to these longer clips.
However, there’s one exception to this rule. It is often the case that split edits, where linked audio and video are cut at different places, create a situation where the audio In point of a pair of linked audio and video items precedes a video In point that you want to ripple. In other words, the audio In point extends to the left of the video In point, which ordinarily would trigger the rule that clips with edit points to the left of a rippled edit point won’t be moved, which would throw the audio and video of this item out of sync. In this case, you probably want to maintain sync, so all items that are linked to a clip being rippled always ripple along with it, even if they do have In points that extend to the left of the edit point being rippled.
Using Auto Select Controls to Control Trimming
The Auto Select buttons on each track in the Timeline control a host of different operations, but while they’re deceptively powerful, they’re also among the most misunderstood controls of the Timeline.
![]()
When a track’s Auto Select control is on, clips on that track are automatically included in three different types of operations:
— Operations that affect clips intersecting the position of the playhead
— Operations that affect clips intersecting a region defined by timeline In and Out points
— Operations that ripple clips to the right of an affected clip on the Timeline
When a track’s Auto Select control is off, clips on that track are ignored by those same categories of operations, unless you manually select one or more clips or edit points.
The next three sections go into detail on how the Auto Select buttons help you control the trimming operations described in this chapter, particularly when it comes to operations that ripple the Timeline, and the kinds of “playhead-targeted” trim operations described later in this chapter. For more information on using the Auto Select controls to define selections and control other editing operations, see Chapter 36, “Editing Basics.”
Using Auto Select to Control Which Clips Are Trimmed
One of the principal uses of the Auto Select controls is to let keyboard shortcut-driven editors choose which specific clips on which tracks will be affected by an operation that would otherwise affect every superimposed clip at the position of the playhead or encompassed by In and Out points set in the timeline.
For example, if multiple clips are superimposed in V1, V2, and V3, and A1, A2, and A3, all six tracks have their Auto Select controls turned on, and you park the playhead over one of them and use the Trim End command in Selection mode, then all six superimposed clips will be trimmed.
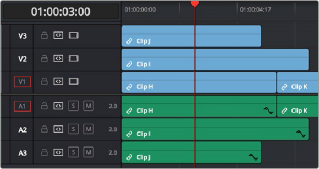
![]()
Trimming all clips at the position of the playhead
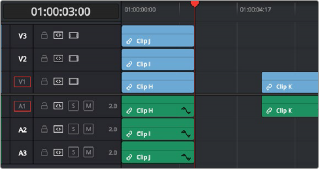
However, if you only want to trim the clip in track V3, then you can solo the Auto Select control of V3 by Option-clicking it, and then when you use the Trim End command, the clip on V3 is the only one that’s trimmed, the other clips are ignored.
Trimming only the clip in V3 by soloing the V3 Auto Select controls