< Previous | Contents | Next >
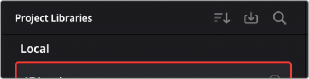
1 Click the button at the upper-left hand corner of the Projects window to open the Project Libraries sidebar.
2 Click to select a project library in the sidebar, and an orange highlight will appear
If you had a project already open, you’ll be asked if you want to save it before closing, because all open projects must be closed prior to viewing the contents of another project library. Then, the projects corresponding to that user within the selected project library appear in the Project Manager window.
![]()
1 Click the button at the upper-left hand corner of the Projects window to open the Project Libraries sidebar.
2 Click to select a project library in the sidebar, and if necessary use the drop-down menu at the right of the project library listing to choose a specific user. The projects corresponding to that user within the selected project library appear in the Project Manager window.
3 Select a project you want to import, and press Command-C to copy it.
4 Click to select the current project library again (the project library you want to work within).

NOTE: For more details on shared project library setup and operation, see Chapter 194, “Managing Project Libraries and Project Servers.”
NOTE: For more details on shared project library setup and operation, see Chapter 194, “Managing Project Libraries and Project Servers.”
NOTE: For more details on shared project library setup and operation, see Chapter 194, “Managing Project Libraries and Project Servers.”
5 Press Command-V to paste the project you copied. A copy appears in the current project library.
1 Click the button at the upper-left hand corner of the Projects window to open the Project Libraries sidebar.
2 Select a project you want to import Project Settings to so that it’s highlighted.
3 Right-click any project and choose “Load Project Settings to Current Project.” That project’s settings will be copied to the project you selected in step 2.
Managing Project Libraries
in the Project Libraries Sidebar
Controls within the Project Libraries sidebar make it easy to create new project libraries (via the button at the bottom), upgrade project libraries that have been flagged (via circular badges), import and export project libraries (via buttons at the top), and reveal additional information about each project library (via buttons at the top of this sidebar).
Project Libraries sidebar controls
— Sort Order drop-down menu: This menu lets you choose how to sort the various local and network project libraries displayed in the sidebar. You can sort by Project Library Name, Schema (by date), Status, or Location in Ascending or Descending order.
— Restore: Imports .resolve.backup files to restore a backed up project library.
— Show Search Field: Displays a search field and search criteria drop-down that lets you search for project libraries in the sidebar by Name, Schema, Status, or Location.
![]()
Clicking on the Display Project Library Details icon (the circled letter “i” to the right of the project library), shows additional information underneath each project library in the sidebar. What information depends on the type of project library. Local project libraries display their status (compatible/incompatible) and location (directory path). Network and cloud project libraries display their schema (created and modified dates), their status (compatible/incompatible), their IP location, and below any members that have access to the project library.
Creating and Connecting to Project Libraries
You can use local, network, and cloud libraries side by side for switching to the use of one or the other, depending on your needs. These instructions will show you how to set up local project libraries. Network and cloud libraries require additional configuration and setup first. For more details on network and cloud project libraries setup and operation, see Chapter 194, “Managing Project Libraries and Project Servers.”
1 Click the button at the upper-left hand corner of the Projects window to open the Project Libraries sidebar.
2 Click the Add Project Library button at the bottom of the sidebar.
3 Click on the Create tab. The Add Project Library window should look like the following screenshot:
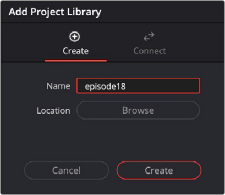
Creating a local project library
4 In the remaining fields, do the following:
a) Type a name for the new project library into the Name field
b) Click within the Location field and use the Filesystem navigation dialog to choose where to put the directory that will contain all of the DaVinci Resolve project directories
5 Click Create, and the new local project library will appear in the local project library section of the Project Libraries sidebar.
1 Click the button at the upper-left hand corner of the Projects window to open the Project Libraries sidebar.
2 Click the Add Project Library button at the bottom of the sidebar.
![]()
3 Click on the Connect tab. The Add Project Library window should look like the following screenshot:

Connecting to an existing local project library
4 In the remaining fields, do the following:
a) Type a name for the new project library into the Name field.
b) Click within the Location field and use the Filesystem navigation dialog to choose the location of the existing project library you wish to connect to.
5 Click Connect, and the new local project library will appear in the local project library section of the Project Libraries sidebar.
Backing Up and Restoring Project Libraries
You can also back up project libraries by exporting them, and then reimport them later.
1 Click the button at the upper-left hand corner of the Projects window to open the Project Libraries sidebar.
2 Select the project library you want to back up.
3 Click the Display Project Library Details icon (the circled letter “i” to the right of the project library).

The Display Project Library Details icon
4 Select the Back Up button.
5 Choose a location to which to save the backup in the Backup Project Libraries dialog, and click Save.
1 Click the button at the upper-left hand corner of the Projects window to open the Project Libraries sidebar.
2 Click the Restore button at the top of the Project Libraries sidebar.
![]()
![]()
The Restore button
3 Find the project library you need to import using the file import dialog, and click Open.
4 In the Add Project Library dialog, do the following:
a) Type a name for the new project library into the Name field. This will rename the imported project library but will not alter its contents. You can also name it the same as the original project library.
b) Click within the Location field and use the Filesystem navigation dialog to choose the directory that contains the existing DaVinci Resolve project libraries.
5 Click Create, and the imported local project library will appear in the Local section of the Project Libraries sidebar.
Upgrading Project Libraries
Selected libraries display an upgrade warning in the Project Manager only when you’ve installed a new version of DaVinci Resolve and you have project libraries that were created in older versions of DaVinci Resolve that need upgrading.

The upgrade warning in the Project Manager indicates that the project library needs to be upgraded
It’s generally a good idea to back up a project library prior to upgrading it, in case something goes wrong. In general, upgrading from a whole version release to the next whole version release of DaVinci Resolve usually requires an upgrade, while upgrading to a dot release of the same version may or may not. If the currently used project library requires an update, you’ll be told on application startup.