< Previous | Contents | Next >
Changing Audio Clip Attributes After Editing
It’s best to make decisions about which audio tracks and channels are assigned prior to beginning editing. This is because once you’ve edited a clip into a timeline, you can’t use the Clip Attributes window to edit how many audio tracks and audio channels are exposed in the Timeline.
However, you can use Clip Attributes to change which channels are assigned and/or muted within the available tracks and channels you’ve edited into the Timeline. For example, if you’re editing clips that have five channels of source audio (channels 1 and 2 are a stereo mix and channels 3 through 5 are three different microphones), you may have set your synced source clips to have one audio track and five audio channels, with channels 3–5 muted. Later you have a few clips that would sound much better if you only used channel 4, which is the isolated lavaliere microphone for that actor, so you can select those clips and use the Audio panel of Clip Attributes to mute all channels but channel 4.
If, for whatever reason, you need to expose more audio tracks in the Timeline than you originally set an audio clip to use, you can do the following.
1 Right-click the clip you want to change the audio track mapping of in the Timeline, and choose Find in Media Pool from the contextual menu.
2 Right-click that clip in the Media Pool and choose Clip Attributes from the contextual menu.
![]()
3 Open the Audio panel of the Clip Attributes dialog, and choose how many audio tracks and audio channels you want to set that clip up with. Click OK.
4 Once that’s done, edit the changed audio clip from the Media Pool to the Timeline to replace the original clip using whichever method makes sense.
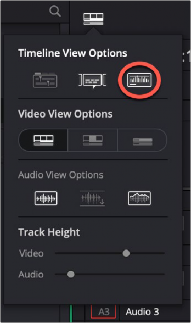
Displaying Waveforms in the Timeline
The Timeline View options palette lets you turn Audio Waveform display on and off via a button at the top. The Audio View options let you define how you wish your waveforms to be presented on the Timeline.
— Audio View Options: Three buttons govern the look of audio waveforms in the Timeline, when visible.
— Non-Rectified Waveform: Lets you toggle between the waveform being drawn from the bottom of the audio track up, or centered and mirrored about itself.
— Full Waveform: Hides the divider bar that keeps the waveform separate from the file name area of each audio clip, so the waveform occupies the full space of each audio bar in the Timeline.
— Waveform Border: Draws a dark border around the edges of each waveform to make them easier to see.
— Video track height slider: Lets you resize the size of all video tracks at once, independently of the audio tracks.
— Audio track height slider: Lets you resize the size of all audio tracks at once, independently of the video tracks.