< Previous | Contents | Next >
When you position the pointer directly over an audio clip, a pair of Audio Fade handles appear at the In and Out points. Dragging each of these handles towards the center of the clip lets you fade in the clip volume at the beginning of the clip, and fade out the clip volume at the end of the clip.
Audio Fade handles at either end of an audio clip

NOTE: When you import a Final Cut Pro X project, the fade handles for each clip automatically import as well.
NOTE: When you import a Final Cut Pro X project, the fade handles for each clip automatically import as well.
NOTE: When you import a Final Cut Pro X project, the fade handles for each clip automatically import as well.
![]()
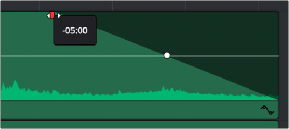
Audio Fade Handles can also be adjusted in subframe increments, if necessary, to create a precise transition.

Adjusting an Audio Fade handle in subframe increments, seen within a one-frame playhead shadow
Once you’ve created a fade effect, you can adjust the curve of the fade by dragging the handle that appears right on top of the fader curve. Dragging the handle up and down affects the angle of the curve, and dragging the handle left and right affects the shape of the curve. In this way, you can create all manner of fade effects.
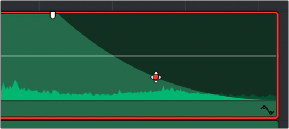
Adjusting the curve of the fade Fade effects can be created and edited on both the Edit and Fairlight pages.