< Previous | Contents | Next >
Intelligent Keyboard Edit Modes
The DaVinci Resolve Speed Editor has dedicated keys to perform common editing functions.
DAVINCI RESOLVE SPEED EDITOR
DAVINCI RESOLVE SPEED EDITOR
DAVINCI RESOLVE SPEED EDITOR
The Cut page Editing tool
![]()
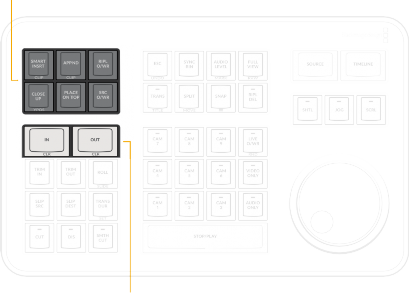
In and Out point
IN / CLR
This key selects the In Point of a clip or timeline. Double press this key (CLR) to clear the In point.
OUT / CLR
This key selects the Out point of a clip or timeline. Double press this key (CLR) to clear the Out point.
If you are viewing a bin in the Source tape, you can use the In and Out keys to limit the Source tape between the two points. This allows you to quickly reduce the Source tape to a specific section, regardless of how many clips are in your bin.
1 In the Source tape, set the newly desired duration using the In and Out keys on the Speed Editor.
2 Press the “Source” key.
3 The Source tape is now limited to the duration between the two points.
4 If you wish top return to the original full Source tape, press the “Esc” key.
SMART INSRT (Smart Insert) / CLIP
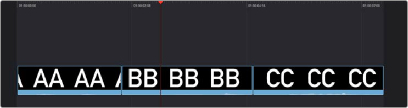
Automatically inserts an incoming clip at the closest edit point to the playhead (as shown by the Smart Indicator) on the selected track, pushing all clips to the right of the edit point forward to make room for the incoming clip you’ve inserted to Track 1. Because this is a smart operation, you are prevented from inserting a clip at any arbitrary frame; incoming clips are only inserted at the closest previously existing edit point.
Double Press this key (CLIP) to Smart Insert the entire source clip, ignoring any In and Out points previously set on the clip.
In the Edit page, it automatically inserts an incoming clip at the playhead or selected In point on the selected track, pushing all clips to the right of the edit point forward to make room for the incoming clip.

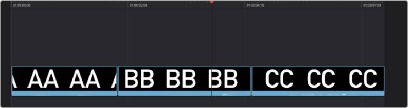
APPND (Append) / CLIP
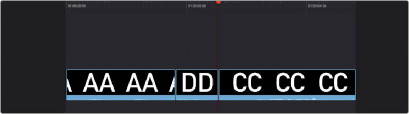
(Top) Before doing a Smart Insert, (Bottom) After inserting clip DD between clips AA and BB
The position of the playhead is ignored; incoming clips are always placed after the last clip in the Timeline.
![]()
Double Press this key (CLIP) to append the entire source clip, ignoring any In and Out points previously set on the clip.
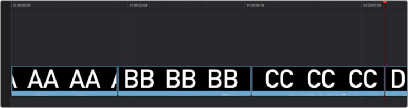
RIPL O/WR (Ripple Overwrite)
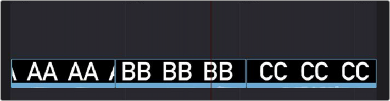
Performing an Append edit of clip DD to the Timeline
At its simplest, Ripple Overwrite substitutes a clip in the Timeline with an incoming clip. If you use Ripple Overwrite on a clip on Track 1, this will automatically move all clips that are to the right of the affected clip in the Timeline either forward to make room, if the incoming clip is longer, or back to eliminate gaps, if the incoming clip is shorter.


TIP: Using Ripple Overwrite is an efficient way to audition different takes of the same shot without disrupting the narrative flow of the entire scene.
TIP: Using Ripple Overwrite is an efficient way to audition different takes of the same shot without disrupting the narrative flow of the entire scene.
TIP: Using Ripple Overwrite is an efficient way to audition different takes of the same shot without disrupting the narrative flow of the entire scene.
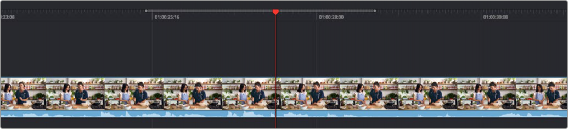
Performing a Ripple Overwrite to substitute an entire clip at the playhead (BB) with the incoming clip (DD)
CLOSE UP / YPOS
![]()
Pressing this key reframes a clip as a zoomed-in close up to make up for a lack of actual close ups that would have been shot with either longer lenses, or by moving the camera closer to the subject. This function is particularly useful when you’re working with 4K media in a 1080 timeline, or 8K media in
a 4K timeline, which enables you zoom into existing wide shots to create medium shots, or medium shots to create close up shots, with no loss of quality.
Performing this edit adds the incoming clip as an approximate 20% to 40% zoomed close up and also performs a face detection. If a face or faces are found, it automatically re-positions the face top center in the frame. You can always reposition the close up manually using the Sizing controls in the Inspector.
Press and Hold this key (YPOS) to adjust the Y position of the Clip using the search dial. How this key works depends on the mode that is active in the Cut page.
— The selected clip in the Source Tape view is edited into the Timeline as a close up, duration based on the In and Out points set in the clip, and the Smart Indicator on the Timeline.
— The clip under the playhead has a Close Up applied to it, and is copied to the track above it, with a 5 second duration starting from the playhead position.
— This will perform a Close Up on the selected camera as it’s overwritten into the Timeline.
— The LED on this key will then illuminate, to show you that this mode is armed.
In the Edit page, how this key works depends on if you are in the Source or Timeline Viewers.
— The selected clip in the Source Viewer is edited into the Timeline as a close up, on the next highest track. The duration is based on the In and Out points set in the clip and inserted at the playhead position on the Timeline.
— The clip under the playhead has a Close Up applied to it and is copied to the track above it, with a five second duration starting from the playhead position.
PLACE ON TOP
This key lets you edit the incoming clip as a superimposition above whatever other clips are in the Timeline; the incoming clip is always placed on top, so if there are clips in Tracks 1, 2, and 3, the incoming clip is automatically placed on Track 4, regardless of which track is selected. The frame the incoming clip aligns with depends on the following:
— When the playhead is near an edit point (within five frames), the incoming clip aligns with the closest timeline edit point in proximity to the playhead (as shown by the Smart Indicator) if no timeline In or Out points have been defined.
— When the playhead is not near an edit point, the incoming clip aligns with the playhead if no timeline In or Out points have been defined.
— The incoming clip aligns with a Timeline In point if one has been set.
![]()
— The incoming clip’s Out point will align with a timeline Out point if one has been set without an In point. This “backtimes” the clip.

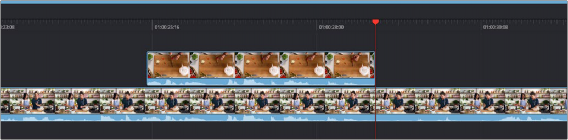
(Top) Before placing a clip on top, (Bottom) After editing clip DD into the Timeline with a Place on Top edit
SRC O/WR (Source Overwrite)
This edit requires overlapping timecode in multiple clips and Track 1 of the Timeline to work properly, such as when recording synced timecode to multiple cameras during a multi-cam shoot. If there is no overlapping timecode, this edit does nothing.
If you are working with footage from multiple cameras that have synced timecode, then the easiest way to use this edit type is to set In and Out points over a clip in the Timeline where you want to cut away to another angle. In the following example, a wide shot of a cooking show covers the moment when the chef starts slicing a chili.
Setting timeline In and Out points to identify a cutaway
You can then select a clip in the Media Pool that corresponds to the desired angle you want to add as a cutaway, which has synced timecode that overlaps with the clip on Track 1 in the Timeline. Don’t set In and Out points; if necessary, you can clear previously set In and Out points by pressing Option-X.

![]()
Choosing a Media Pool clip from another camera that has overlapping timecode
When you click the Source Overwrite key, a synced section of the selected Media Pool clip will be edited into the Timeline between the In and Out points you placed, superimposed on top. The result is a perfectly timed cutaway.
Using Source Overwrite to edit a superimposed and synced section of the source clip into the Timeline between the In/Out points
Alternatively, you can also use Source Overwrite to automatically place a source clip with a marked In/Out region on top of a clip in the Timeline so that its timecode syncs with the timecode of the Timeline clip, when you don’t know exactly how much of the incoming source clip you want to edit into the Timeline, and you just want it synced appropriately.