< Previous | Contents | Next >
The Live Overwrite mode in the Speed Editor can be thought of as switching a live Multicam shoot without all the annoying constraints of linear time. With all the camera angles locked together in the Sync Bin, you can perform and trim all the edits, transitions, and camera switches, you want and never go out of sync. Every edit you make will be perfectly synchronized to the Timeline automatically.
DAVINCI RESOLVE SPEED EDITOR
DAVINCI RESOLVE SPEED EDITOR
DAVINCI RESOLVE SPEED EDITOR
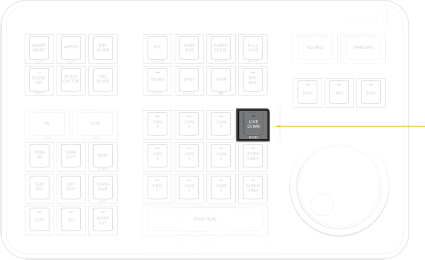
Live Overwrite key
![]()
LIVE O/WR (Live Overwrite Mode) / RND (Random)
Press this key to enter Live Overwrite mode. An LED will illuminate to tell you this mode is active. It immediately activates the Sync Bin and the Multicam Viewer, and switches the Speed Editor into a different mode, slightly changing the functionality of several keys to accommodate the Live Overwrite workflow. A key that is in Live Overwrite mode has an LED light illuminate to let you know that the key’s function is currently active.
Double Press this key (RND) to edit a Random camera angle with a random duration into the Timeline from the Sync Bin.
This key is inactive in the Edit Page.
Using Live Overwrite Mode

NOTE: Live Overwrite Mode only works with clips in the Sync Bin. If there are no clips set in the Sync Bin, this mode will not function. For more information on setting up the Sync Bin, see Chapter 28, “Fast Editing in the Cut Page.”
NOTE: Live Overwrite Mode only works with clips in the Sync Bin. If there are no clips set in the Sync Bin, this mode will not function. For more information on setting up the Sync Bin, see Chapter 28, “Fast Editing in the Cut Page.”
NOTE: Live Overwrite Mode only works with clips in the Sync Bin. If there are no clips set in the Sync Bin, this mode will not function. For more information on setting up the Sync Bin, see Chapter 28, “Fast Editing in the Cut Page.”
Editing Multicamera shoots in Live Overwrite mode starts with the base layer on track V1. The clip you put here has two additional functions other than its video content. First, it provides a continuous timecode track that is the foundation of all the Sync Bin functionality. Second, it provides content to measure all of the ripple functions against.
A good starting point is to place your master camera angle, uninterrupted from beginning to end on track V1. You will be able to edit this track, remove whole sections, and re-arrange it as necessary later in the process, but for now, this master clip on V1 will serve as the backbone of the edit.
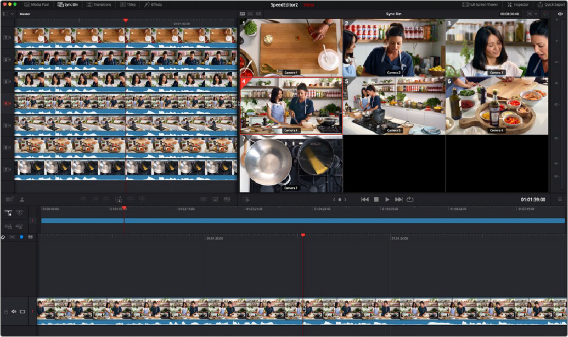
Live Overwrite mode, with the master camera angle (Cam 4) edited in on track V1
![]()
Once the master clip of the Sync Bin is on V1, you can start using the Live Overwrite mode in earnest. The concept to understand about Live Overwrite is that this method of editing bypasses traditional In and Out points all together, and edits are performed with the Camera keys working in conjunction with the Search Dial.
1 Press the Live O/WR key to activate the mode. The LED on the key will illuminate.
2 Use the search dial to navigate the Sync Bin to where you want to make an edit (switch camera angles). You will notice all cameras and the Timeline will move together in sync.
3 Select a camera angle in the Multicam Viewer you wish to edit in, and press and hold the corresponding Camera key on the Speed Editor, while rotating the search dial forward. This will edit in a new clip on top of the V1 track, and you can use the search dial to immediately set its duration.
4 Release the Camera key to set the edit.
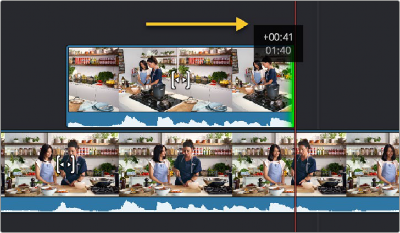
Performing a Live Overwrite by holding down the Camera 5 key and rotating the search dial to the right
From here you can immediately press and hold another Camera key and rotate the search dial to continue the Multicam edit. You can think of this method as “painting-on” clips to the Timeline, rather than inserting them. Clips edited in this fashion will never overwrite other clips on the same track. Live Overwrite will always add the clip to the next highest track, and create a new track automatically if necessary.
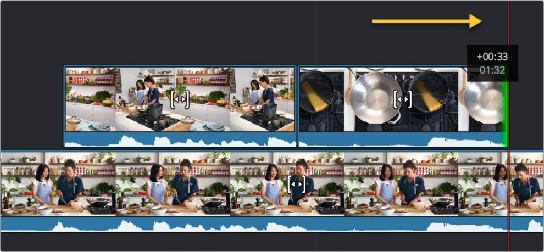
”Painting-on” the next edit by holding down the Camera 7 key and rotating the search dial to the right
![]()
Continuing the edit from here does not require working in a linear fashion. Because the master track is on V1, you can skip ahead anywhere on the Timeline and start “painting-in” camera angles wherever you wish, and because the Timeline and Source clips are locked together in the Sync Bin, whatever edit you add will always be in perfect sync.
Live Overwrite Mode Key Modifiers:
Selecting Live Overwrite mode subtly changes the functions of many keys on the Speed Editor, so they work in conjunction with this mode. Each of these keys has an LED that illuminates to tell you the function is active before you perform a Live Overwrite edit.
— CUT: Automatically adds a simple cut to the beginning of each clip edited to the Timeline. This option is also effectively no transition added.
— DIS: Automatically adds a Cross Dissolve transition to the beginning of each clip edited to the Timeline. If the edited clip is immediately adjacent to another clip on the same track, the dissolve will be centered on the cut. If there is no clip immediately adjacent, the dissolve will start on the edit instead, and dissolve from the video on the track underneath the clip.
— SMTH CUT: Automatically adds a Smooth Cut transition to the beginning of each clip edited to the Timeline. If the edited clip is immediately adjacent to another clip on the same track, the Smooth Cut will be centered on the cut. If there is no clip immediately adjacent, the Smooth Cut will start on the edit instead, and Smooth Cut from the video on the track underneath the clip.
— TRANS: Automatically adds whatever transition is set as the “Standard Transition” in the Transitions panel to the beginning of each clip edited to the Timeline. If the edited clip is immediately adjacent to another clip on the same track, the transition will be centered on the cut. If there is no clip immediately adjacent, the transition will start on the edit instead, and transition from the video on the track underneath the clip.
— CLOSE UP: Automatically performs a Close Up action on the camera as its edited into the Timeline.