< Previous | Contents | Next >
Fast Editing in the Cut Page
![]()
The editing methods in the Cut page have been streamlined for fast editing, and the interface of this page and the methods of assembling clips together using different types of edits are designed to be easy to learn and quick to use.
Contents

Creating and Modifying Timelines ������������ 515 Creating New Timelines ����������������������������������� 515 Opening Timelines ��������������������������������������������� 515 About Tracks in the Cut Page Timeline ������� 516 Enlarging Tracks �������������������������������������������������� 516 Adding Tracks ������������������������������������������������������� 516 Deleting Tracks ���������������������������������������������������� 517
Viewer and Timeline����������������������������������������� 517 Viewer Options����������������������������������������������������� 517 Full Screen Viewer����������������������������������������������� 519 Proxy Handling ���������������������������������������������������� 519
the Timeline in the Viewer ������������������������������� 519
Scrolling Through the Timeline ��������������������� 520
Status in the Timeline���������������������������������������� 520
Scene Cut Detection in the Cut Timeline
(Studio Version Only)������������������������������������������� 521 The Boring Detector ������������������������������������������ 521 Setting In and Out Points ������������������������������ 522
Using the Keyboard�������������������������������������������� 522
Using the Pointer ������������������������������������������������ 523
the Cut Page Viewer������������������������������������������� 524 Change Clip Duration Dialog �������������������������� 524 Video Only and Audio Only Edits ���������������� 525 Drag and Drop Editing ������������������������������������� 525 Append�������������������������������������������������������������������� 526 Ripple Overwrite ������������������������������������������������� 526 Overwrite ��������������������������������������������������������������� 526 Using Cut Page Edit Commands ������������������ 527 Smart Indicators�������������������������������������������������� 527 Setting Up and Performing Edits ������������������ 528 Smart Insert ���������������������������������������������������������� 528 Append�������������������������������������������������������������������� 529 Ripple Overwrite ������������������������������������������������� 529 Close Up������������������������������������������������������������������ 530 Place On Top ��������������������������������������������������������� 530 Source Overwrite ������������������������������������������������ 531 Overwrite ��������������������������������������������������������������� 532
![]()
Creating and Modifying Timelines
After you’ve imported and organized the media you need to use in a program, the next thing you must do is create a timeline. Timelines are the organizational entities that contain the edited sequences of clips that make up your program. You can have as many timelines as you like in your project, with each timeline being an independent arrangement of clips. Timelines are stored in the Media Pool and can be organized using bins, just like clips.
Creating New Timelines
A timeline is automatically created when you edit your first clip into the Timeline. You’ll see an icon for the new timeline in the Media Pool, where you can rename it.
You can also create a new timeline by either choosing File > New Timeline (Command-N), or right- clicking in the background of the Media Pool and choosing Create New Timeline. A dialog appears that lets you choose a start timecode (the default is 01:00:00:00), a name, how many video and audio tracks you want it to have, what kind of audio (the default is stereo), and whether or not you want to create
an empty timeline, or a timeline that automatically includes all clips in the Media Pool with or without selected In/Out points (a quick and easy way of creating a stringout of all clips you’ve imported).
By default, all timelines share the same frame rate, resolution, and monitoring settings as the overall project. If you like, you can also click the Use Custom Settings button to choose individual frame rate, resolution, and monitoring settings for that timeline.
Once you’ve created a new timeline, double-clicking it will open it into the Timeline Editor.
Opening Timelines
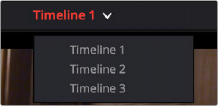
If you only have one timeline in your project, that timeline is always seen in the Timeline Editor.
If you have multiple timelines, you can double-click any timeline in the Media Pool to open it into the Timeline Editor, ready for editing. You can also switch from working on one timeline to another by using the drop-down list at the top of the Cut page Viewer. This unifies Viewer Timeline Selection behavior across the Cut, Edit, Color, and Deliver pages.